Control Flow
We have two major class of control flow. The first is loops and the second is conditional branch statement.
Loops
In Swift, we have 3 types of loops, the for-in loop, while loop and repeat-while loop.
For-In Loops
As we have learned in the previous chapter, for-in loops is used to iterate a collection of data. The general syntax is as follows:
for <index_name> in <collection_of_data> {
<instruction_for_each_iteration_using_index_name>
}
Note: Please note that <index_name> is implicitly declared as a constant. <index_name> can be anything, but preferably the name is associated with the element in the array.
Example:
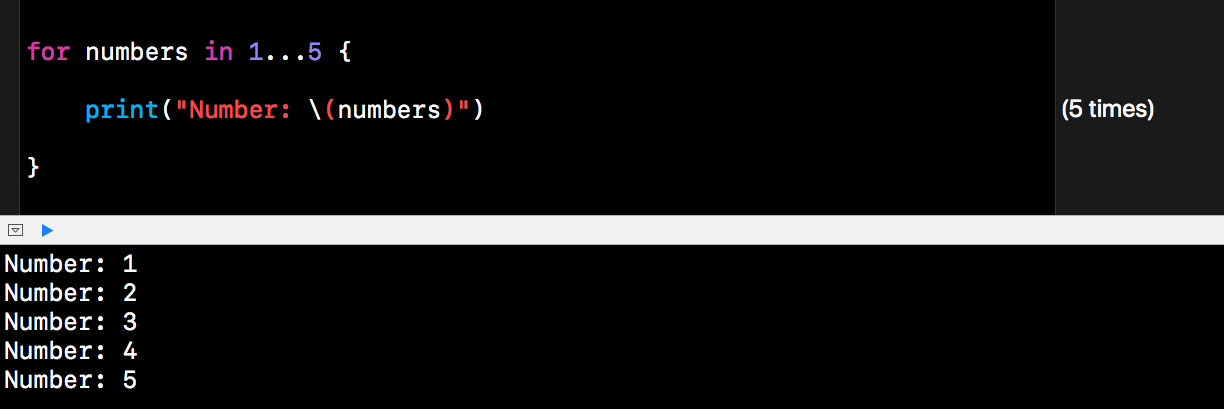
for numbers in 1...5 {
print("Number: \(numbers)") } |
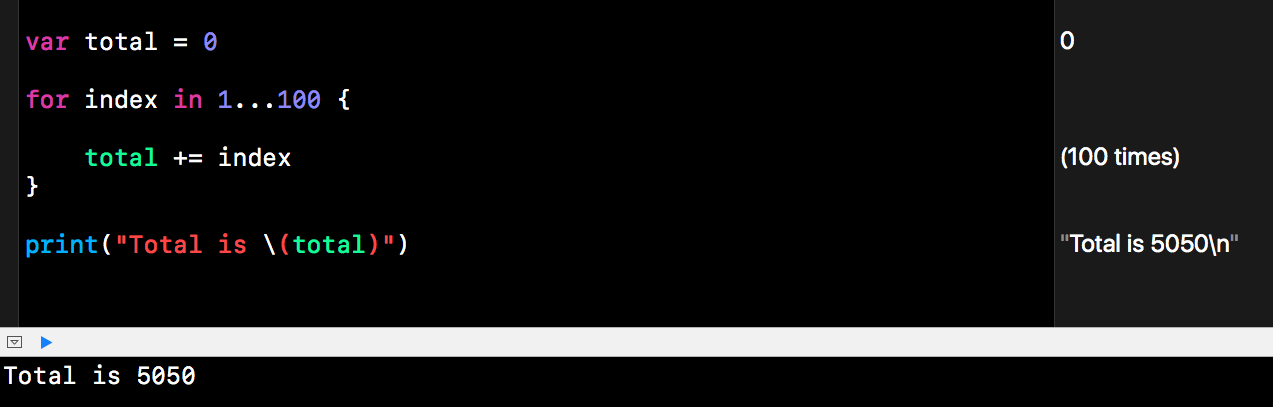
We can also perform computation as follows:
var total = 0
for index in 1...100 { total += index } print("Total is \(total)") |
Another example:
for num in 1...8 {
print("17 times \(num) is \(17 * num)") } |

We can also use for-in loop to perform a task a number of times.
Example:
If we want to calculate 2 to the power of 10. We can use for-in loop.
let xNumber = 2
let yPower = 10 var result = 1 for _ in 1...yPower { result *= xNumber } print("2 to the power of \(yPower) is \(result).") |

In the previous example, we just need the loop to run yPower times. In such cases where index is not required, we can substitute the index name with underscore (_).
For-In Loop with Array
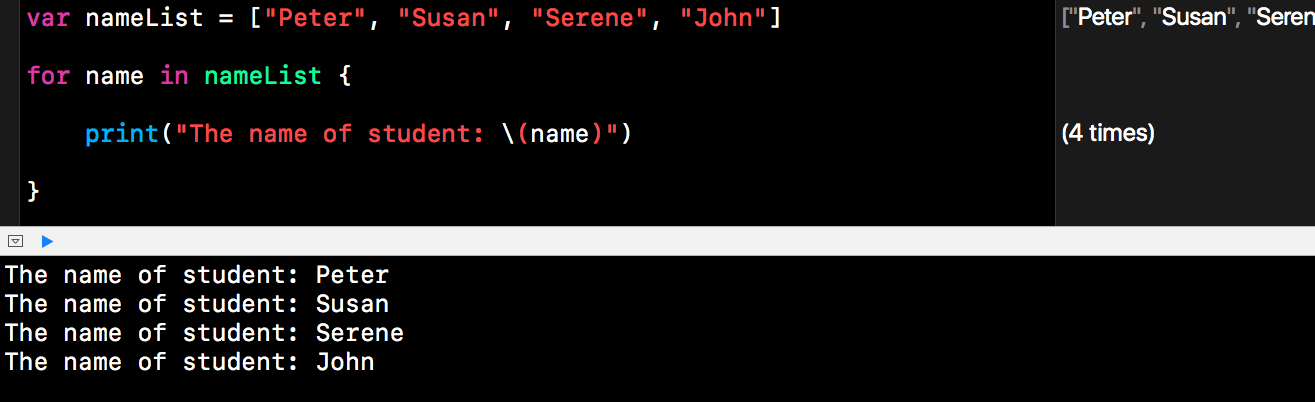
To iterate every item in an array, we use a for-in loop as follows:
var nameList = ["Peter", "Susan", "Serene", "John"]
for name in nameList { print("The name of student: \(name)") } |
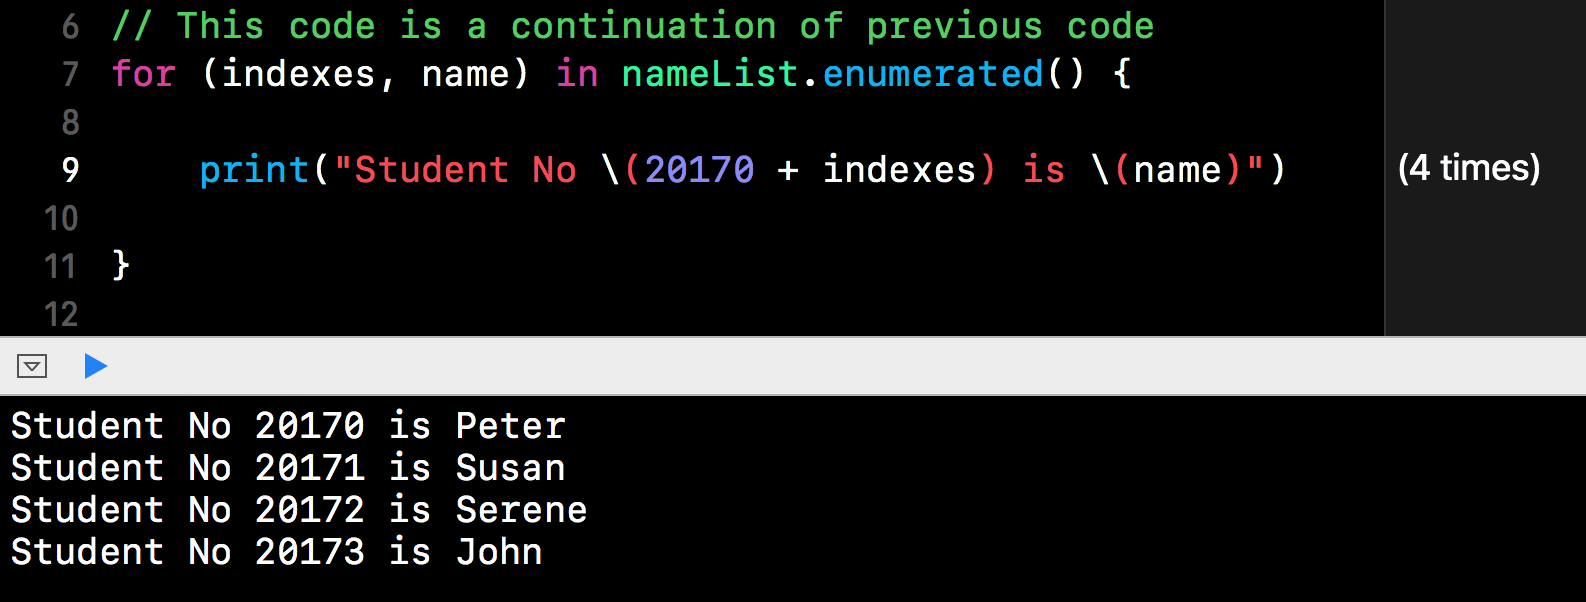
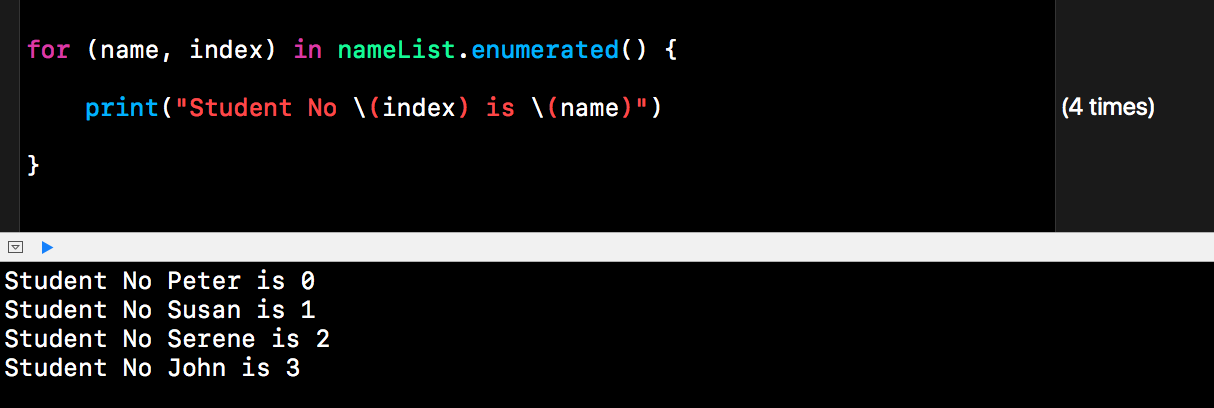
To include an index, we need to use enumerated() method in array. Syntax as shown below:
for <index_name> in <collection_of_data>.enumerated() {
<instruction_for_each_iteration_using_index_name>
}
Example:
// This code is a continuation of previous code
for (indexes, name) in nameList.enumerated() { print("Student No \(20170 + indexes) is \(name)") } |
Additional Note:
- We can name the indexes or name in any name. The first name will be index and the second name will be the array item.
- We need to run the method enumerated() to include the indexes.
Listed below is an example where we flip the name and index, as shown in the result, the first name is always index regardless of what we call them.
For Loops with Stride
If we want to step through a loop with a custom interval, we can use the for-in loop with stride. The syntax is as follows:
for <index_name> in strides(from:<start_count>, to: <end_count>, by: <interval>) {
<instruction_for_each_iteration_using_index_name>
}
Note:
Please note that the system will iterate number indicated in <start_count> to <end_count> but excluding the number <end_count>.
Example:
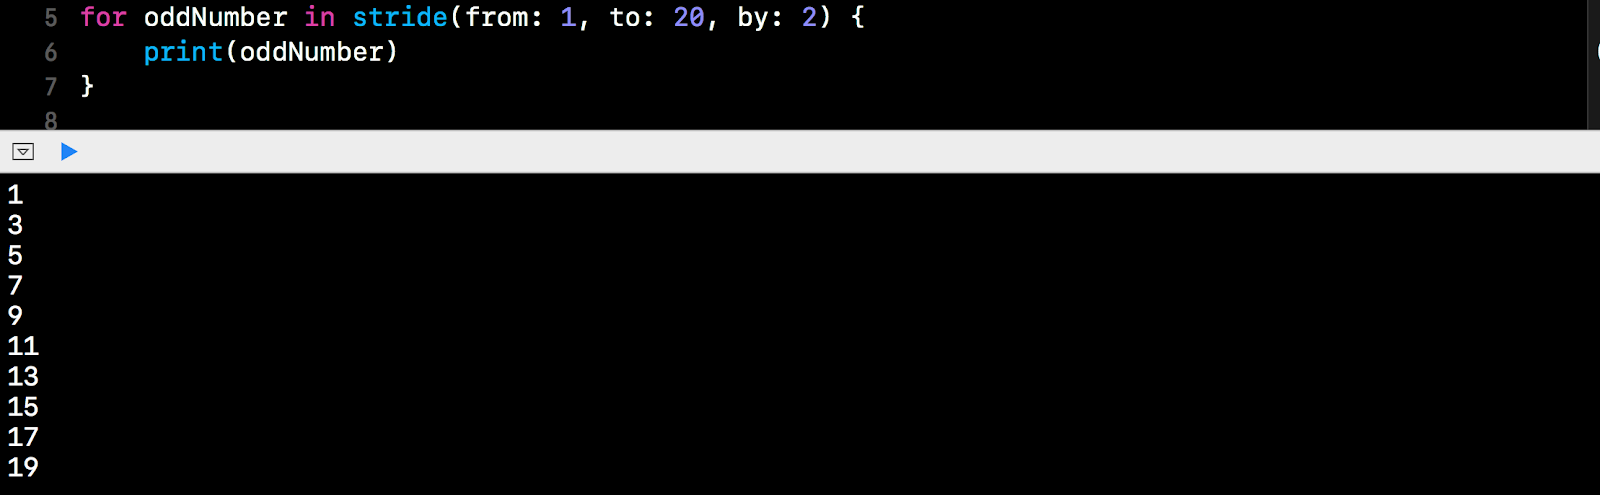
Let's say we want to step through number from 1 to 20, but we will step over every other number. The system will print all the odd number.
for oddNumber in stride(from: 1, to: 20, by: 2) {
print(oddNumber) } |
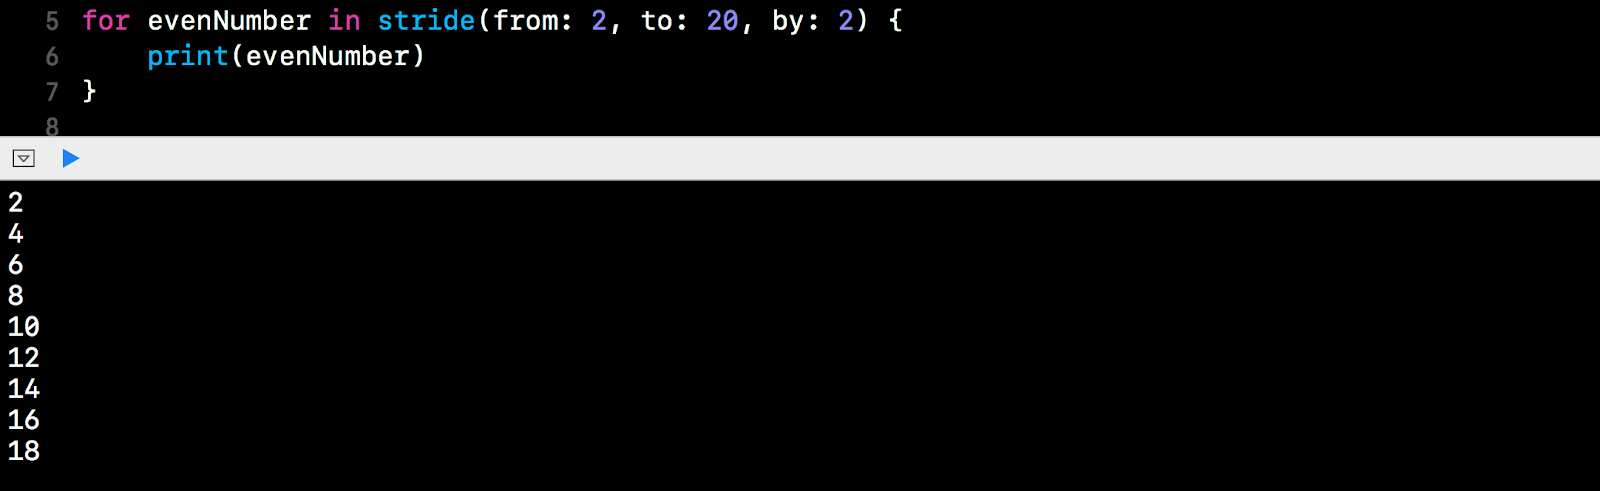
To print only even number, we can start the number from 0 or 2.
for evenNumber in stride(from: 2, to: 20, by: 2) {
print(evenNumber) } |
As mentioned earlier, the system will exclude the number indicated in the (to:) argument. So number 20 will be excluded. If we want to include the last number indicated by us, we can use another stride function. The syntax as follows:
for <index_name> in strides(from:<start_count>, through: <end_count>, by: <interval>) {
<instruction_for_each_iteration_using_index_name>
}
The only changes compare to previous stride function is the argument through instead of to.
Example:
for evenNumber in stride(from: 2, through: 20, by: 2) {
print(evenNumber) } |

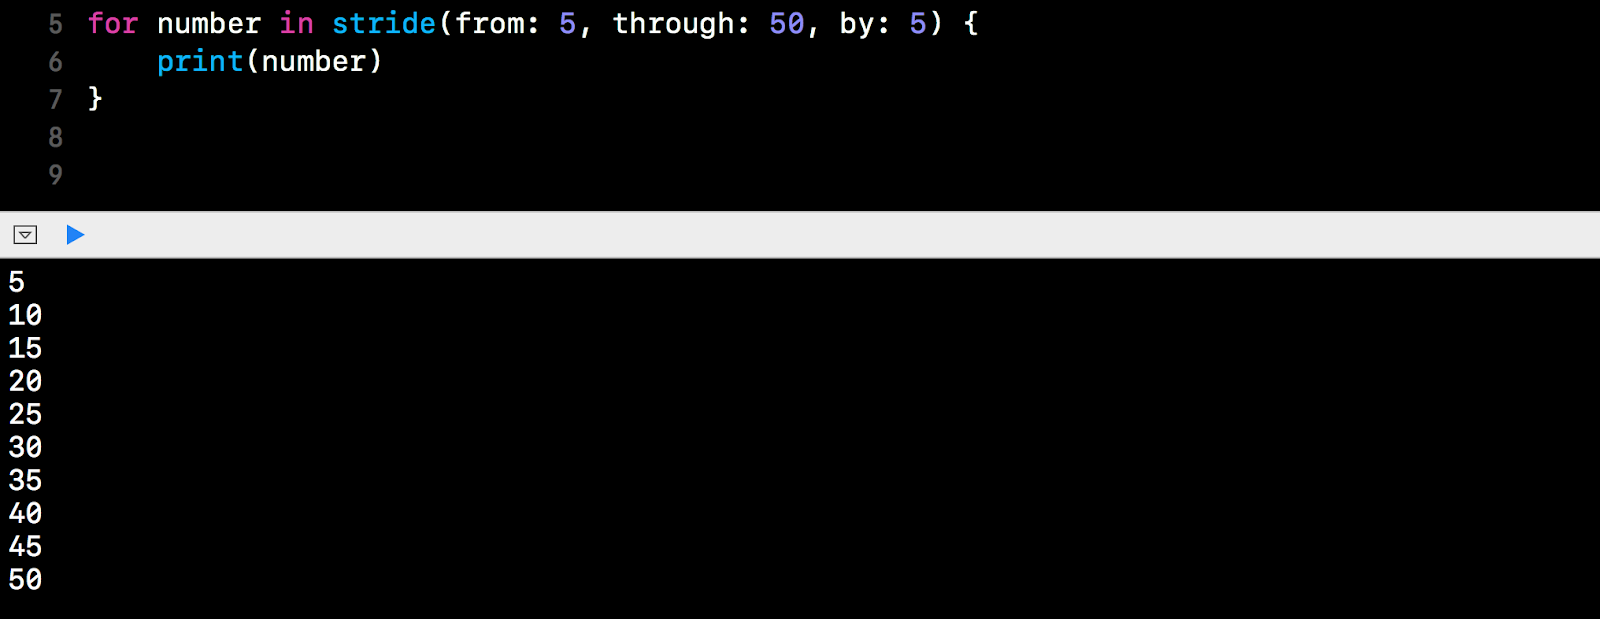
To step over 5 instead of 2. Let's see the example below:
for number in stride(from: 5, through: 50, by: 5) {
print(number) } |
While Loops and Repeat-While Loops
A while loop will perform a set of routine until a condition ask the loop to stop. We can use this type of loop when we do not know the number of iteration. Although we can also use it even when we know the number of iteration. In Swift, we have two type of while loop, they are:
- while loop that examine the condition first before a start of the loop.
- repeat-while (same as do-while in other language) loop that examine the condition after the first routine is done.
While Loops
As mentioned earlier, while loop examine the condition first before running the routine. The syntax is as follows:
while <condition_that_evaluate_to_boolean_value> {
<set_of_routine_instruction>
}
Example:
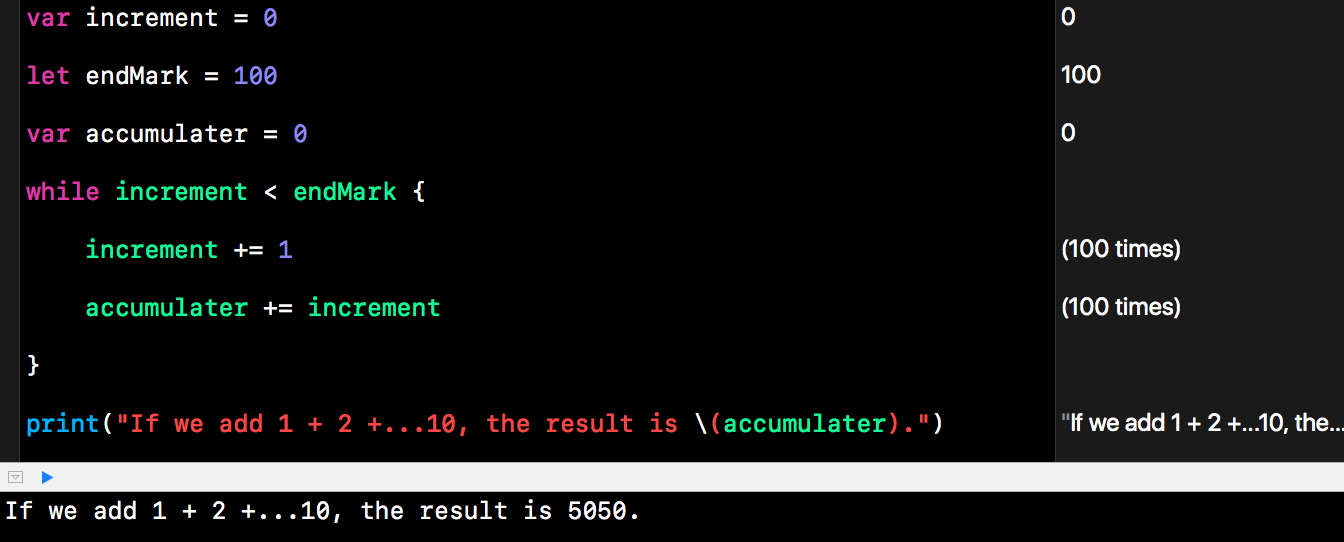
We use the same example of adding 1 + 2 + … + 100. The result should be 5050.
var increment = 0
let endMark = 100 var accumulater = 0 while increment < endMark { increment += 1 accumulater += increment } print("If we add 1 + 2 +...10, the result is \(accumulater).") |
The previous example is not very good. A for-in loop can also do the same job with less variable.
Another example is for the loop to iterate through an array until a outlier or defect is detected. In this case, we stop the routine when we found product is less than 90% accurate:
let products = [98, 97, 99, 100, 96, 12, 98, 97]
var x = 0 while products[x] > 90 { print("This product is \(products[x])% accurate.") x += 1 } print("Defect detected, product inspection stop now.") |
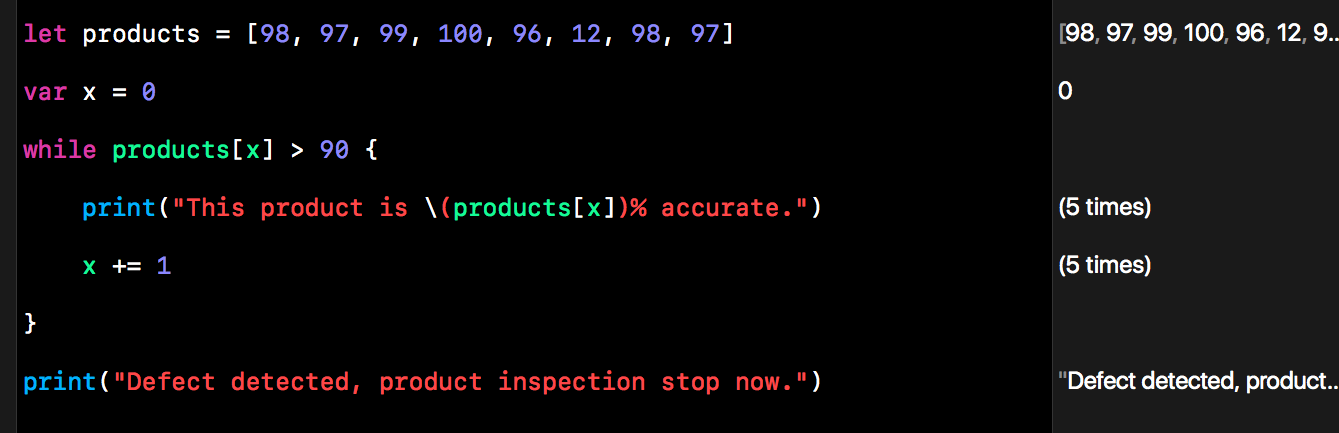
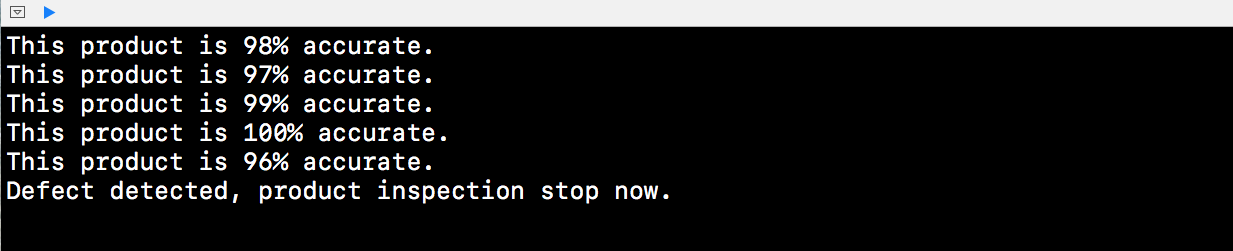
The routine will stop when the accuracy is less than 90%.
The above program seems workable but it is not very robust. What happen if there is no detect? There will be error since we keep increasing x until it is out of range.
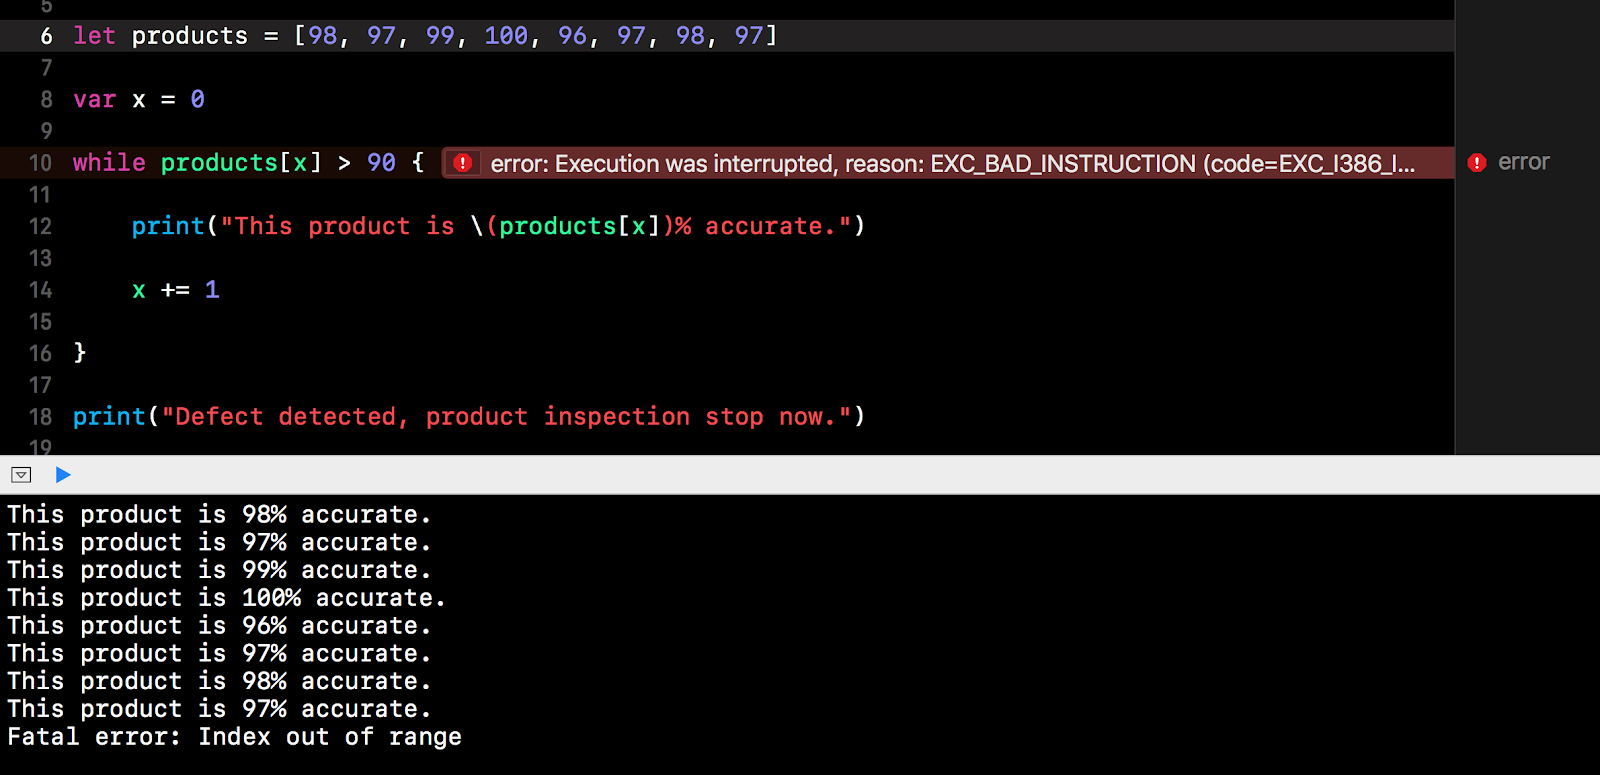
Therefore, we should also include condition where arrays ends. A better method for using while is as follows:
// Setup
let products = [98, 97, 99, 100, 96, 99, 99, 97] var x = 0 // Run Loop - Stop when array is finish or stop when product is less than 90% while x < products.count && products[x] > 90 { print("This product is \(products[x])% accurate.") x += 1 } // Check if defect found or inpection completed if x == products.count { print("Inspection Completed. No defect found") } else { print("Defect detected.") } |
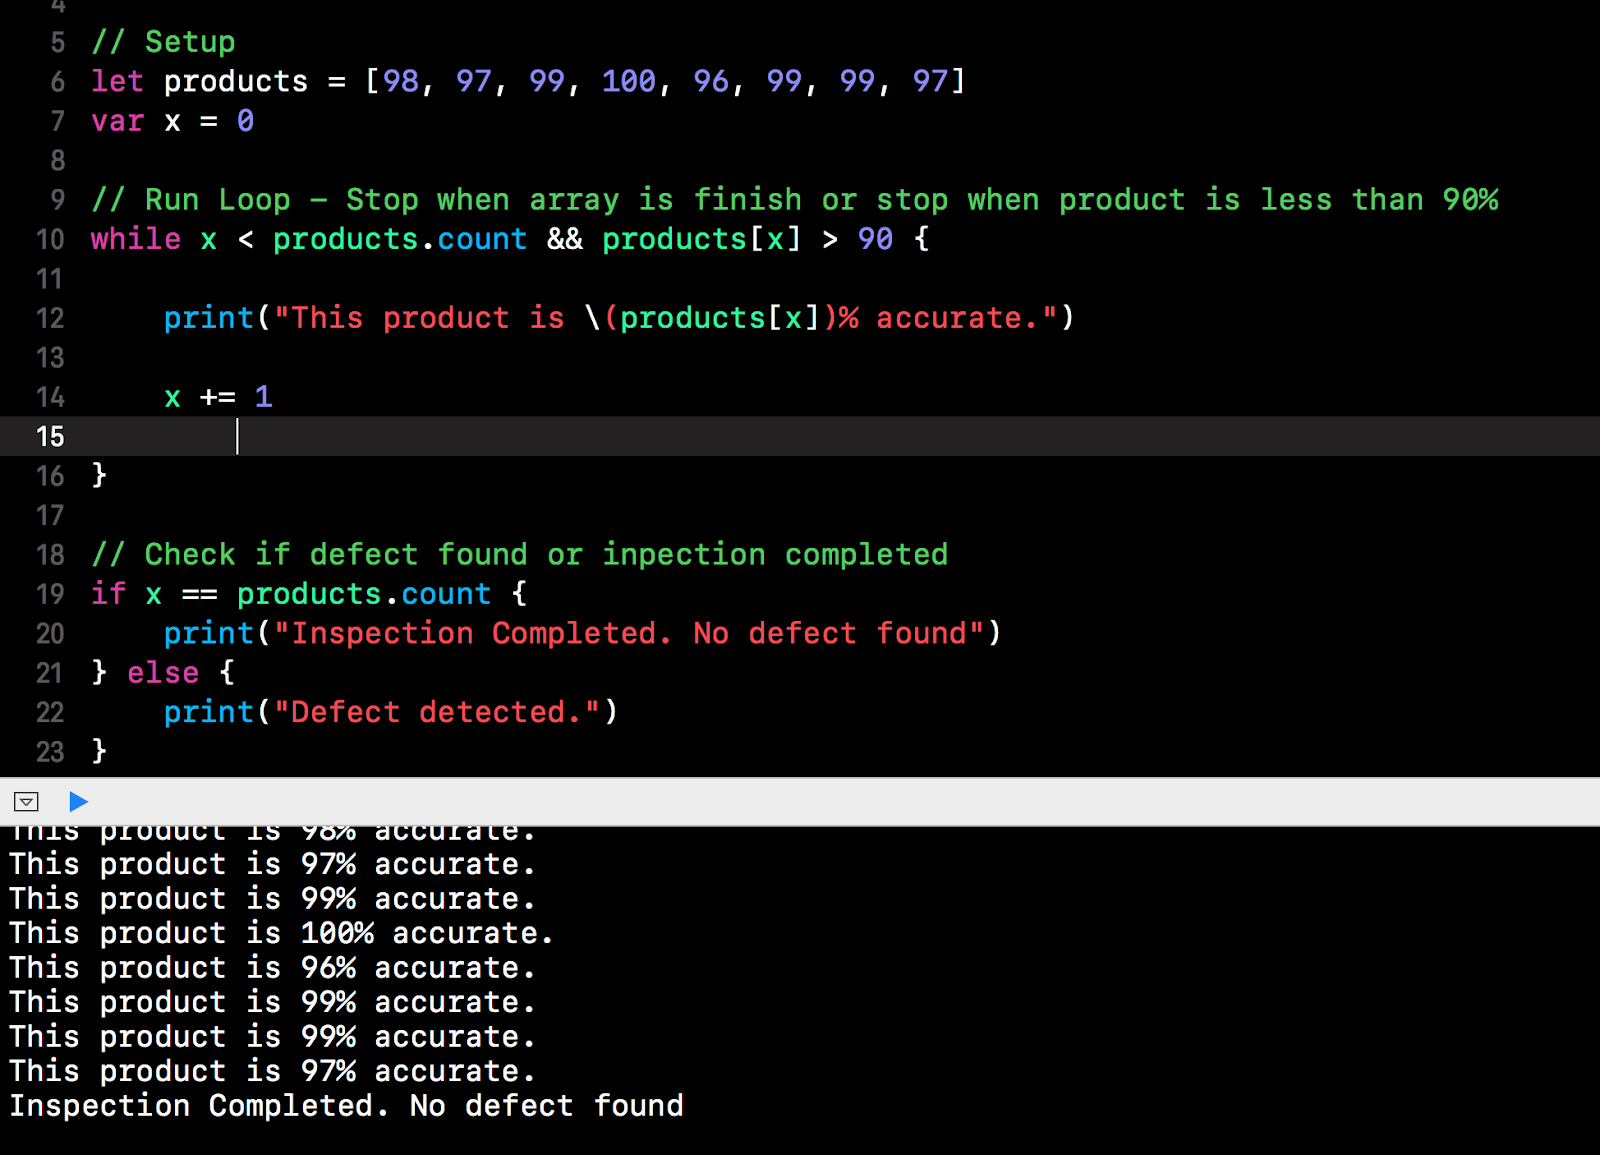
In the previous example, we completed the loop without any defects. Since our condition is when array is completed or when defect is found, we need a condition statement below to check if the loop stop due to defects or array completion.
The following example is the same program with defect in the last item.
// Setup
let products = [98, 97, 99, 100, 96, 99, 99, 54] var x = 0 // Run Loop - Stop when array is finish or stop when product is less than 90% while x < products.count && products[x] > 90 { print("This product is \(products[x])% accurate.") x += 1 } // Check if defect found or inpection completed if x == products.count { print("Inspection Completed. No defect found") } else { print("Defect detected.") } |
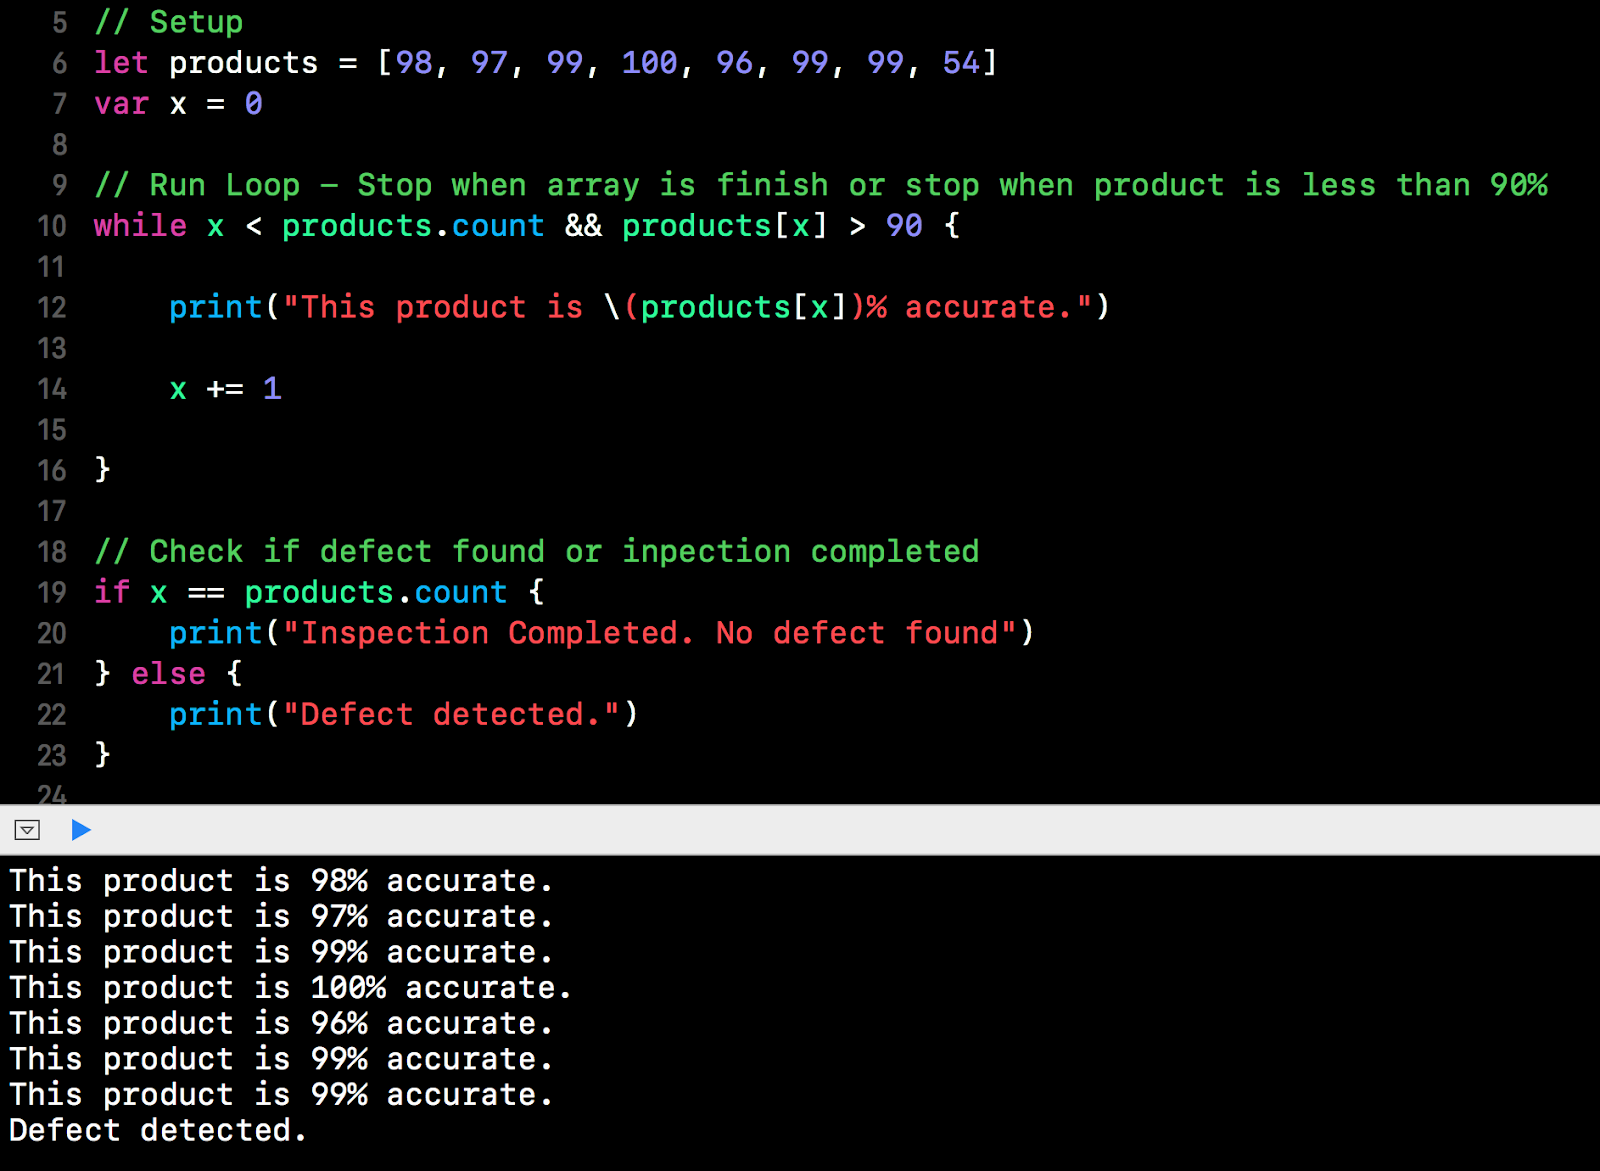
Using the construct above, we can still detect even if the last item is defective.
Repeat-While Loop
Repeat while loop will perform a set of routine instruction first before examine the condition. The syntax is as follows:
repeat {
<set_of_routine_instruction>
} while <condition_that_evaluate_to_boolean_value>
Example:
Using the same example of adding from 1 to 100.
var increment = 0
var sum = 0 let endMark = 100 repeat { sum += increment increment += 1 } while increment <= 100 print("The sum of adding 1 to 100 is \(sum).") |
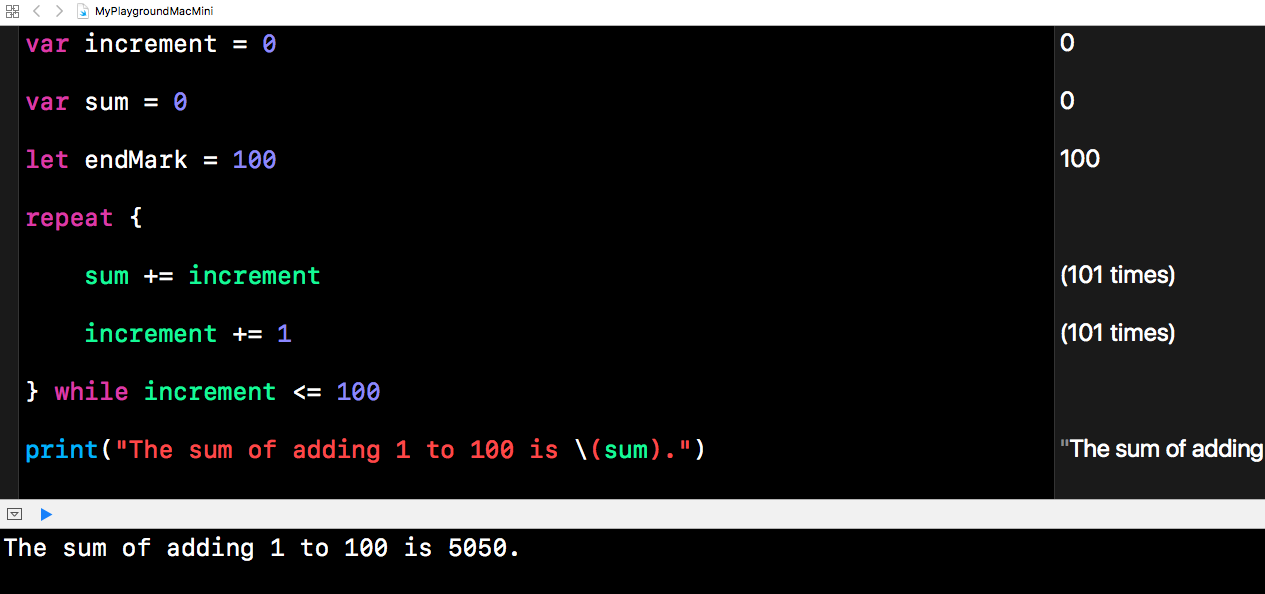
As shown in the example above, we have to run the routine 101 times since the increment and sum are 0 from the start. The first routine is not useful in this case.
A typical example of using while loop is to display a menu and exit the loop when user ask to exit.
While userChoice != "9" {
/*
The program will continue running this routine
By displaying a menu
And accepting users' menu choice until user choose 9 which is meant for exit
*/
*/
}
Example:
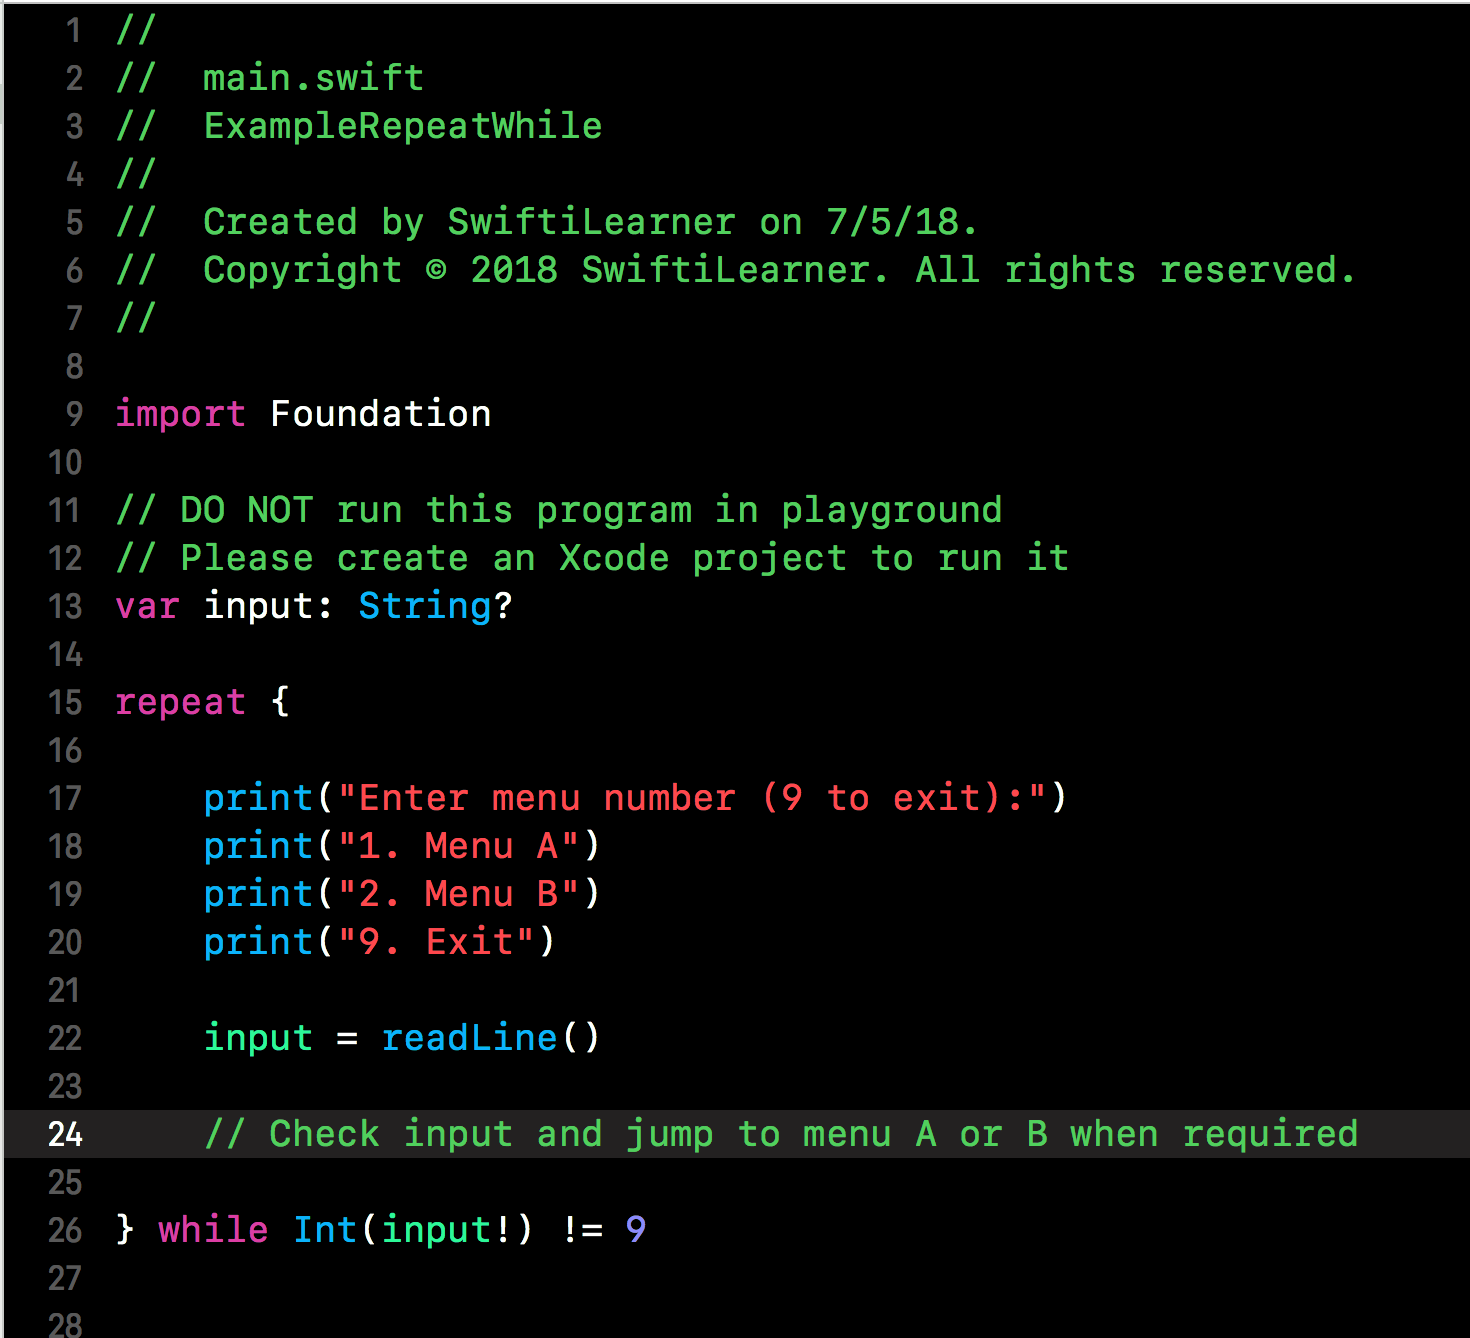
// DO NOT run this program in playground
// Please create an Xcode project to run it var input: String? repeat { print("Enter menu number (9 to exit):") print("1. Menu A") print("2. Menu B") print("9. Exit") input = readLine()
// Check input and jump to menu A or B when required
} while Int(input!) != 9 |
To create a command line project, please use the steps below:
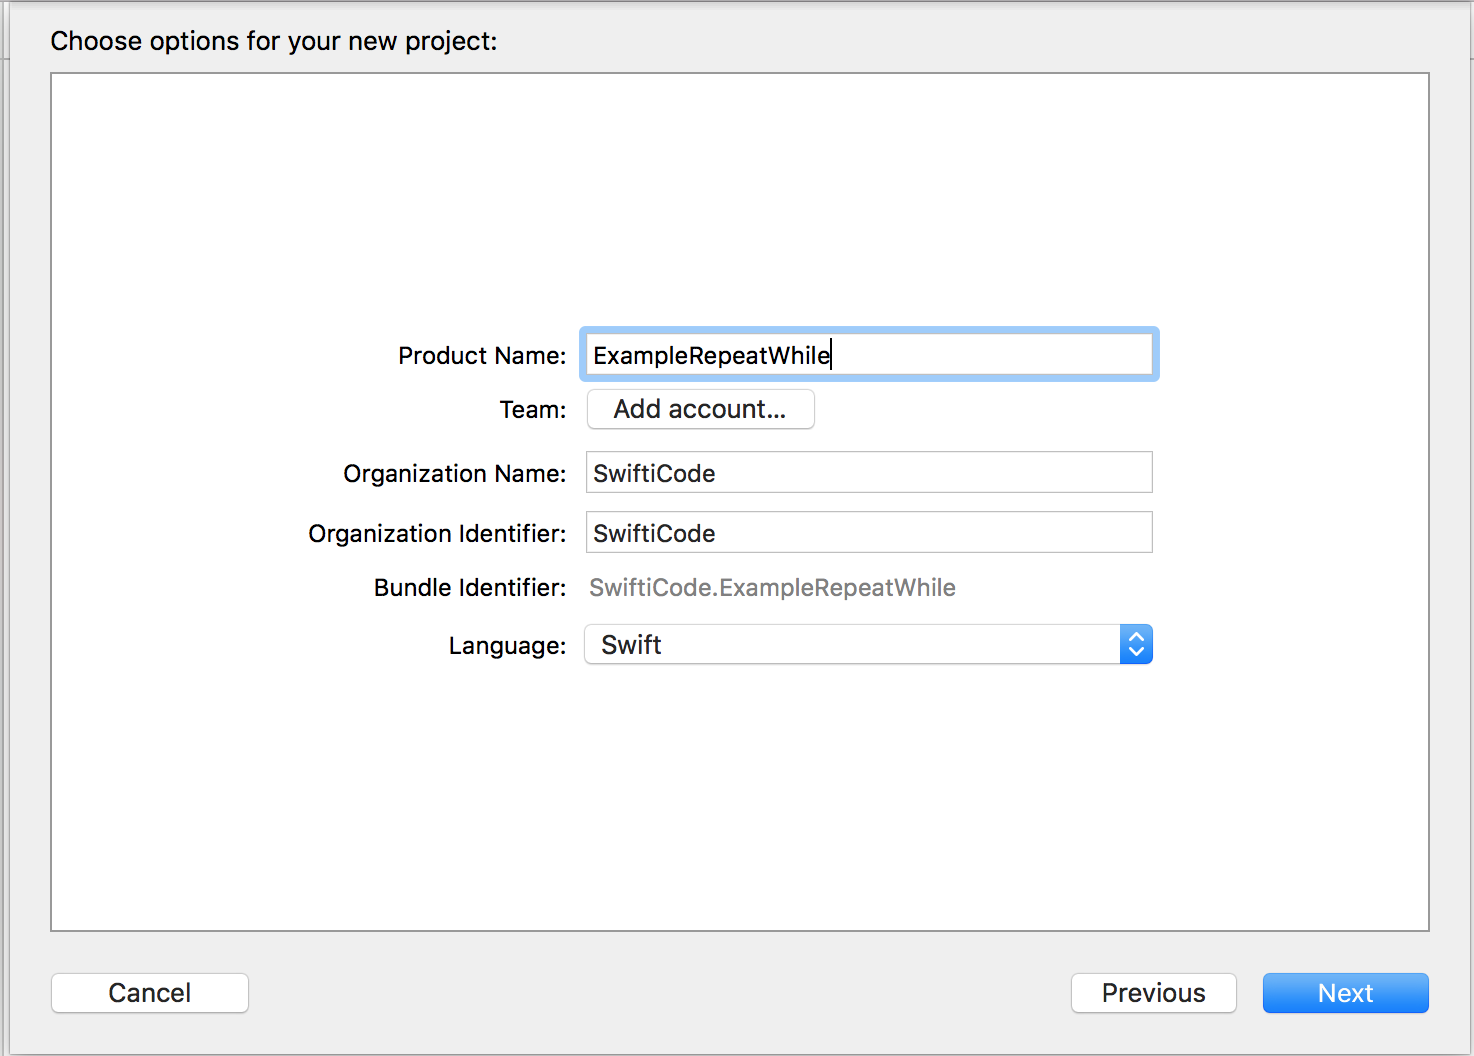
- Click File > New > Project. The following screen appears:
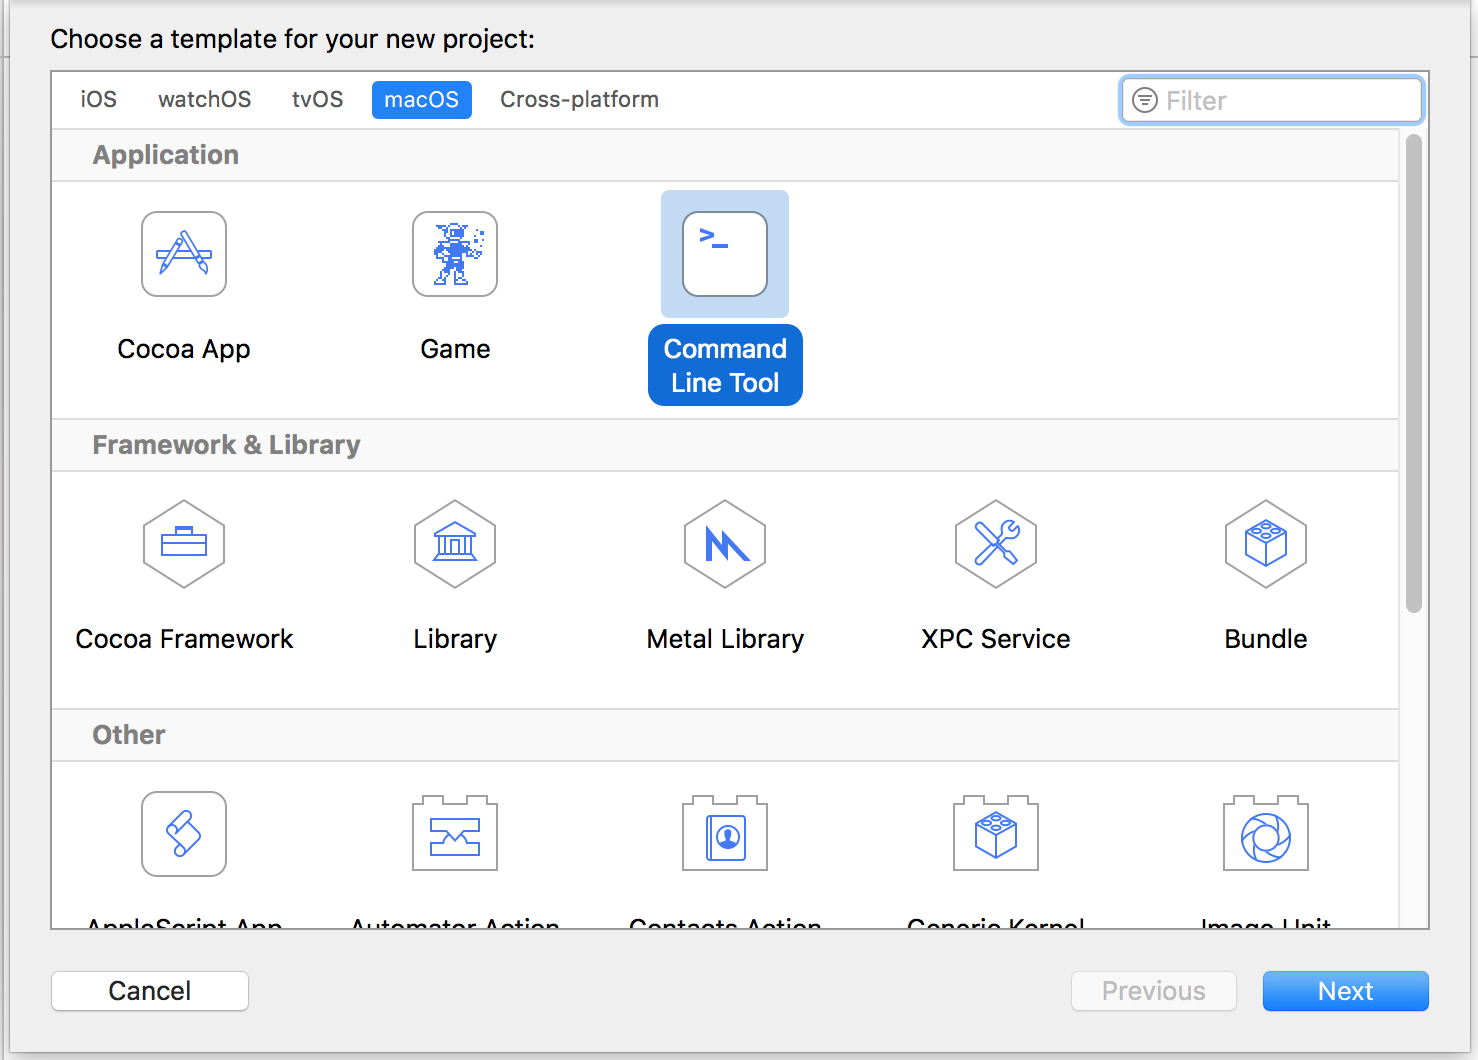
- Select "macOS" and "Command Line Tool" as shown above. Click Next
- Enter project name as shown below.
- Select the folder we want to put the project file
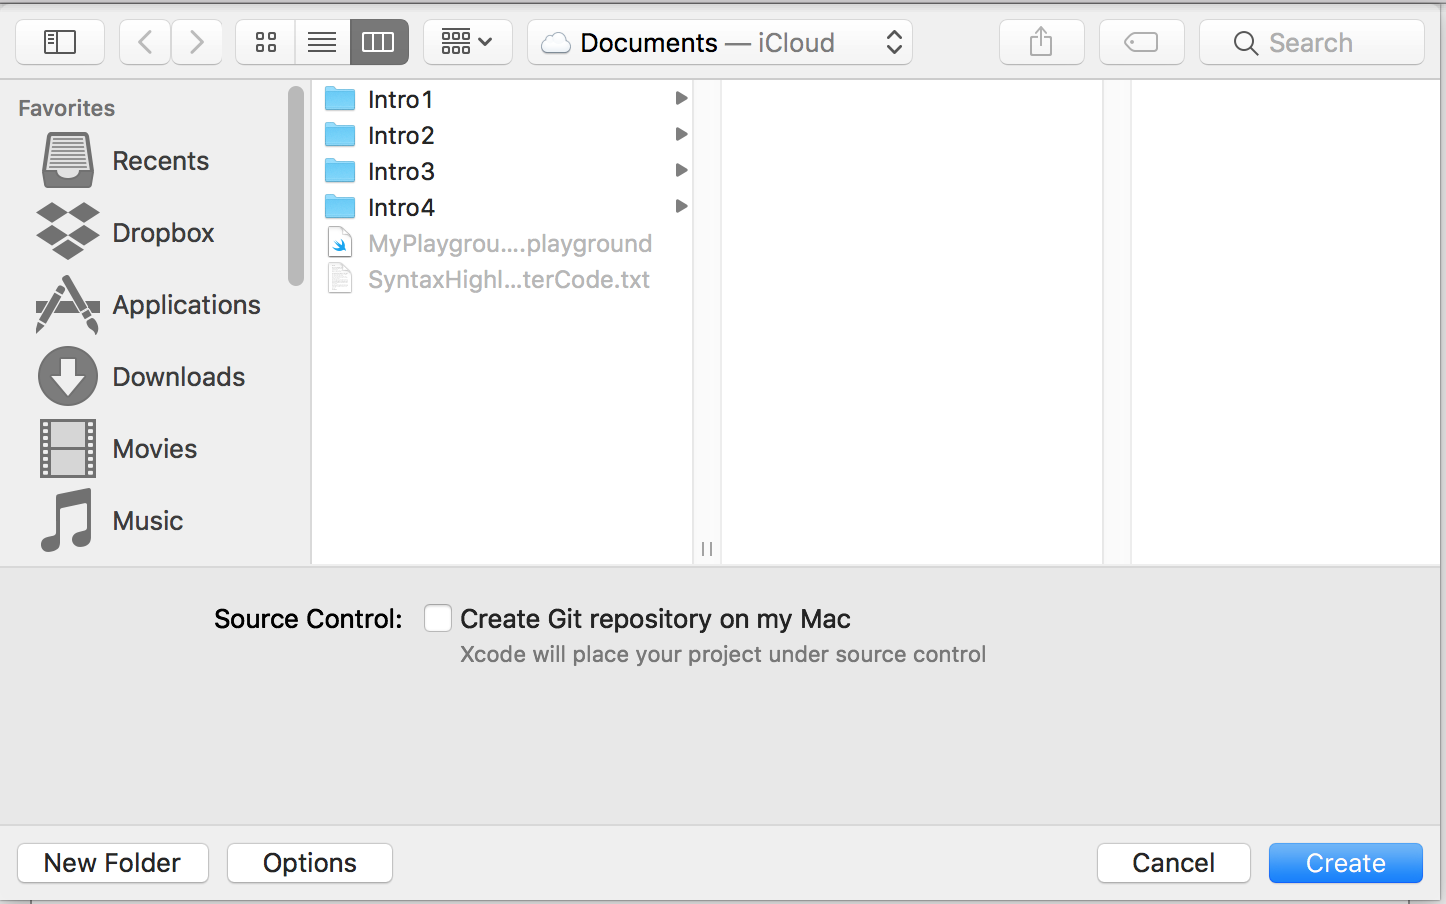
- Click Create
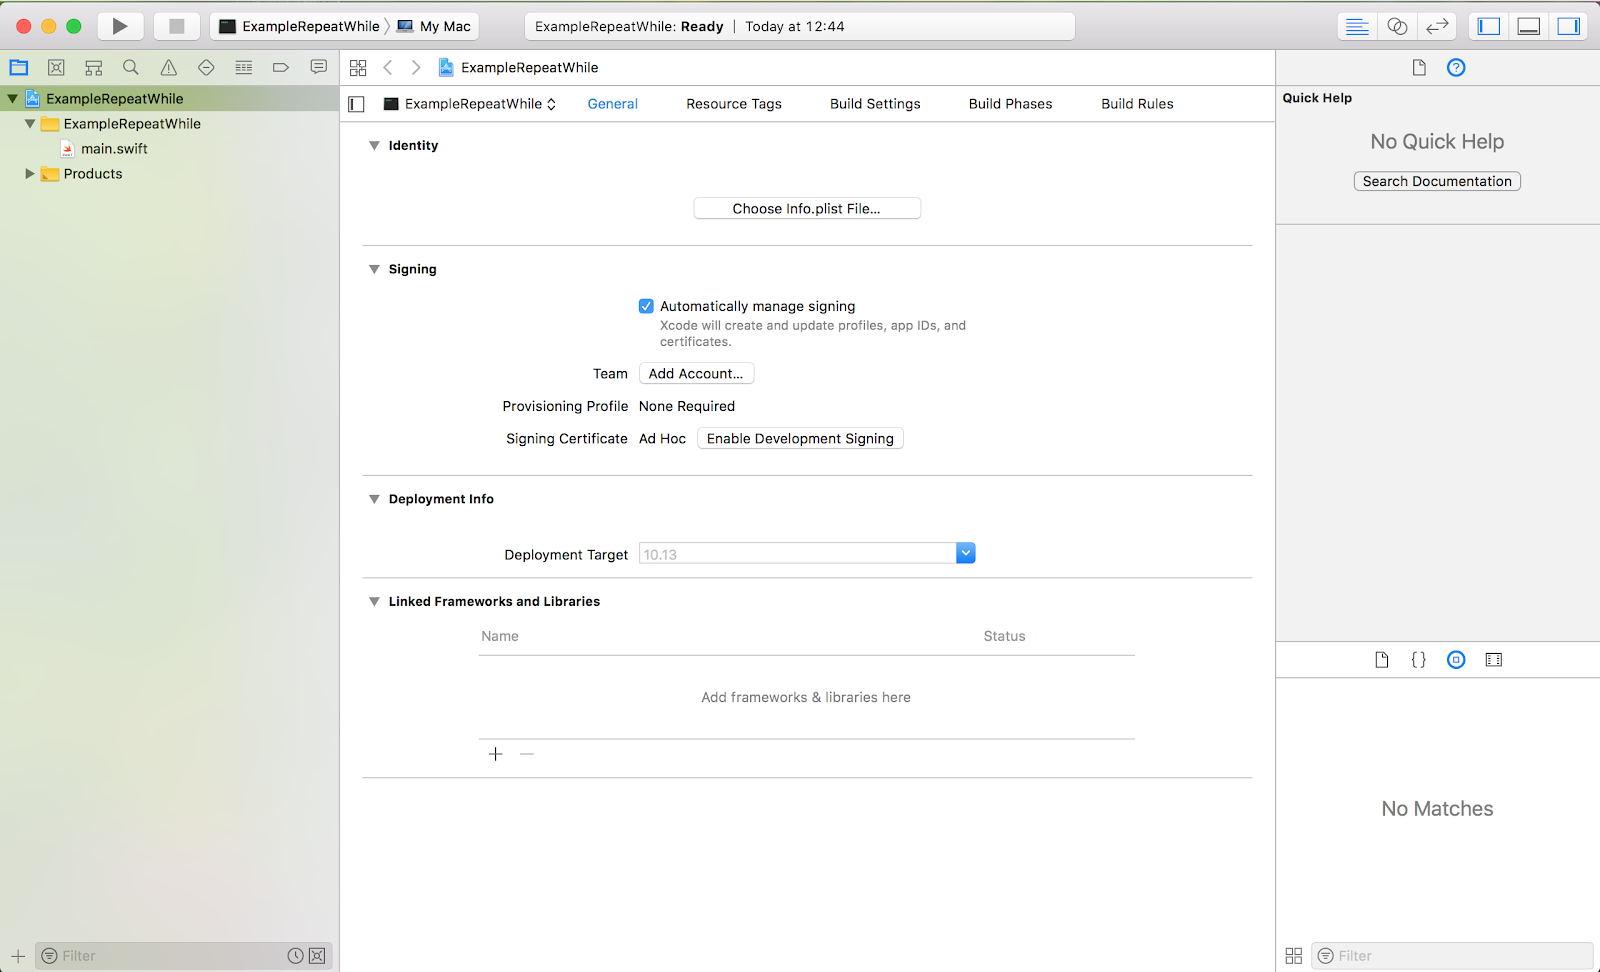
- Once the project is created, we should have screen similar to below
- Select main.swift as shown below.
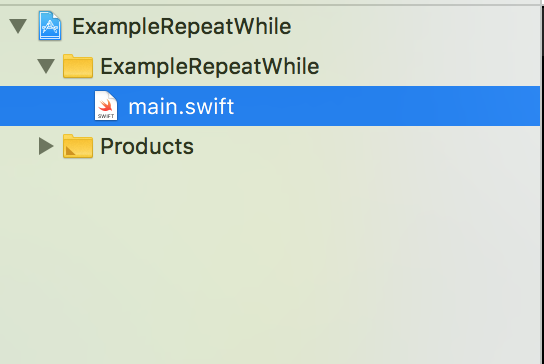
- Now we can copy the program above and replace the print statement.
- We should have program as shown below
- Next we can run the program by clicking on the play button.

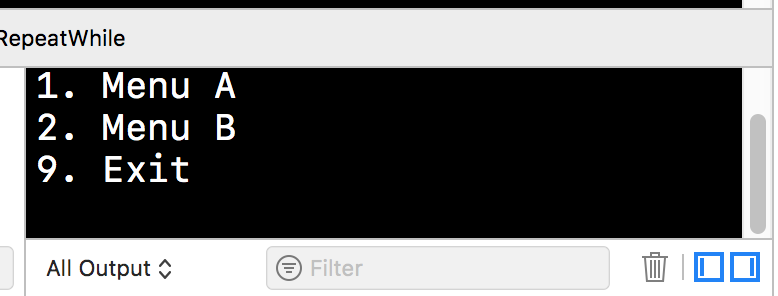
- Once the program runs, it will show the menu. On the screen below
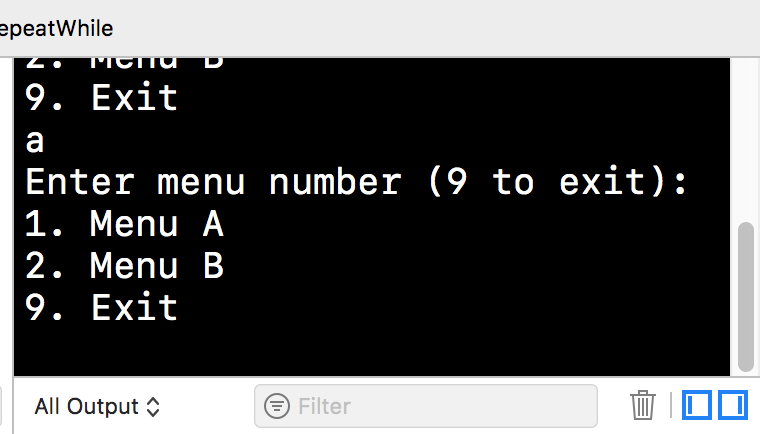
- We can press 1 or any other string. The menu will keep displaying.

- We can also enter other string. It doesn't affect the displaying of menu.
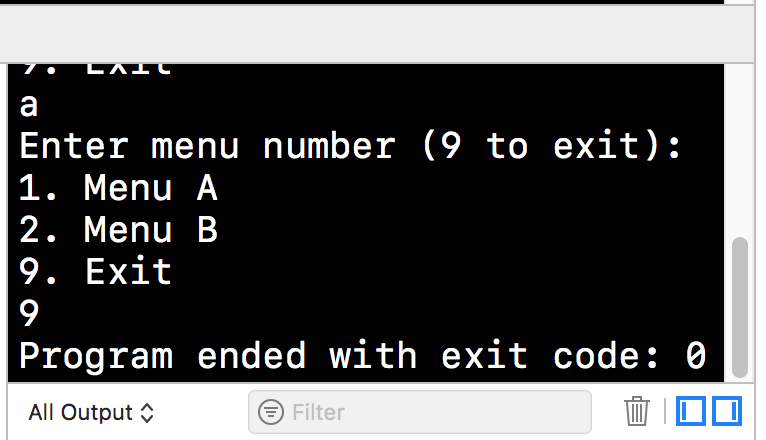
- Once we enter 9, the program stops
Nested Loop
Nested loop are loops within a loop. We can have many nested loop but please refrain from having too many loops that will caused confusion.
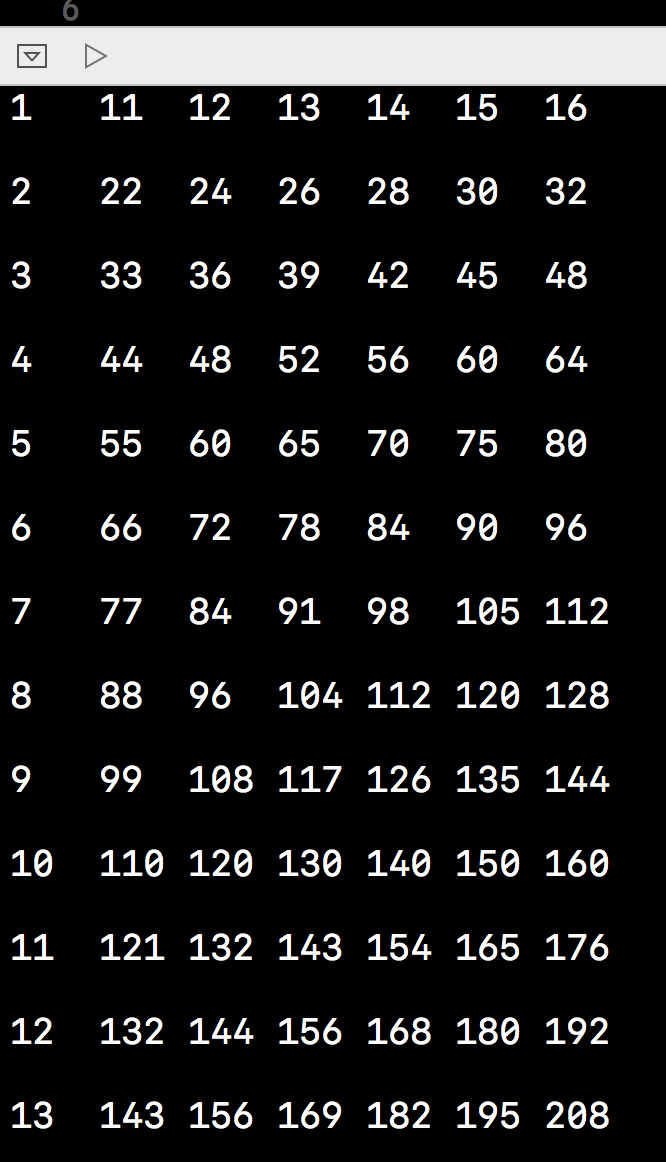
A simple example is to print a user defined multiplication table. User will decide how many column and the multiples. User also define how many row we should have starting from 1.
See example below:
let startTable = 11
let totalColumn = 5 let totalRow = 20 for i in 1...totalRow { print(i, terminator:"\t") for j in startTable...(startTable+totalColumn) { print(i * j, terminator:"\t") } print("\n") } |
We can also form a nested loop with a multiple level menu system.
For this example please use MacOS command line instead of playground. For steps on creating project, please follow the section in repeat-while loop.
The code for this project is as follows:
// DO NOT run this program in playground
// Please create an Xcode project to run it var input: String? repeat { print("Enter menu number (9 to exit):") print("1. Menu - Main Course") print("2. Menu - Dessert") print("9. Exit") input = readLine() switch Int(input!) { case 1: var input1: String? repeat { print("Main Course") print("1. Grilled Chicken") print("2. Grilled Fish") print("99. Exit to previous") input1 = readLine() switch Int(input1!) { case 1: print("You have selected Grilled Chicken") case 2: print("You have selected Grilled Fish") default: break } } while Int(input1!) != 99 case 2: var input2: String? repeat { print("Dessert") print("1. Tiramisu") print("2. Latte") print("99. Exit to previous") input2 = readLine() switch Int(input2!) { case 1: print("You have selected Tiramisu") case 2: print("You have selected Latte") default: break } } while Int(input2!) != 99 default: break } } while Int(input!) != 9 |
This code will run menu for 2 level. It has 2 sub menu with 2 loops nested in a main loop.
The resulting effect is like old ATM selection menu.

Conditional Branch Statement
For most programming language, conditional branch statement consist of If-else-elseif statement and switch statement.
If Statement
We use if statement when there is only a few possible permutation. The basic syntax of if statement is as follows:
if <condition_that_evaluate_to_boolean_value> {
<set_of_routine_instruction>
}
}
For 2 possible permutation, the syntax is as follows:
if <condition_that_evaluate_to_boolean_value> {
<set_of_routine_instruction>
} else {
} else {
<alternative_set_of_routine_instruction>
}
For more than 2 possible permutation, the syntax is as follows:
if <condition_that_evaluate_to_boolean_value> {
<set_of_routine_instruction>
} else if <condition_that_evaluate_to_boolean_value> {
} else if <condition_that_evaluate_to_boolean_value> {
<alternative_set_of_routine_instruction>
} else {
<alternative_set_of_routine_instruction>
}
Using if-else_if-else we can extend the permutation to many possible outcome. However, too many if statement will make the code too confusing. When there are many permutations, it is best to use switch statement.
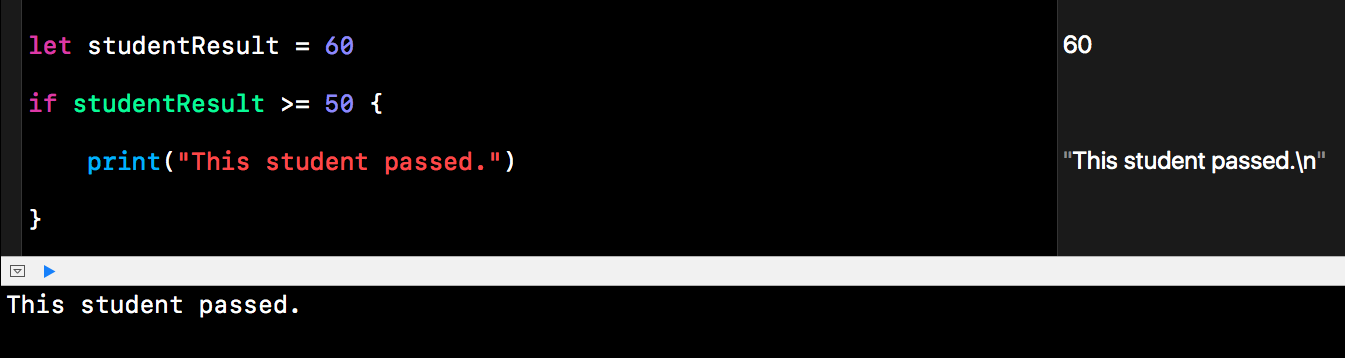
Example:
let studentResult = 60
if studentResult >= 50 { print("This student passed.") } |
Example 2:
let anotherStudentResult = 47
if anotherStudentResult >= 50 { print("This student passed.") } else { print("This student failed.") } |

Example 3:
let yetAnotherStudentResult = 63
if yetAnotherStudentResult >= 90 { print("This student grade : A") } else if (yetAnotherStudentResult < 90) && (yetAnotherStudentResult >= 80) { print("This student grade : B") } else if (yetAnotherStudentResult < 80) && (yetAnotherStudentResult >= 70) { print("This student grade : C") } else if (yetAnotherStudentResult < 70) && (yetAnotherStudentResult >= 60) { print("This student grade : D") } else if (yetAnotherStudentResult < 60) && (yetAnotherStudentResult >= 50) { print("This student grade : E") } else { print("This student grade : F") } |
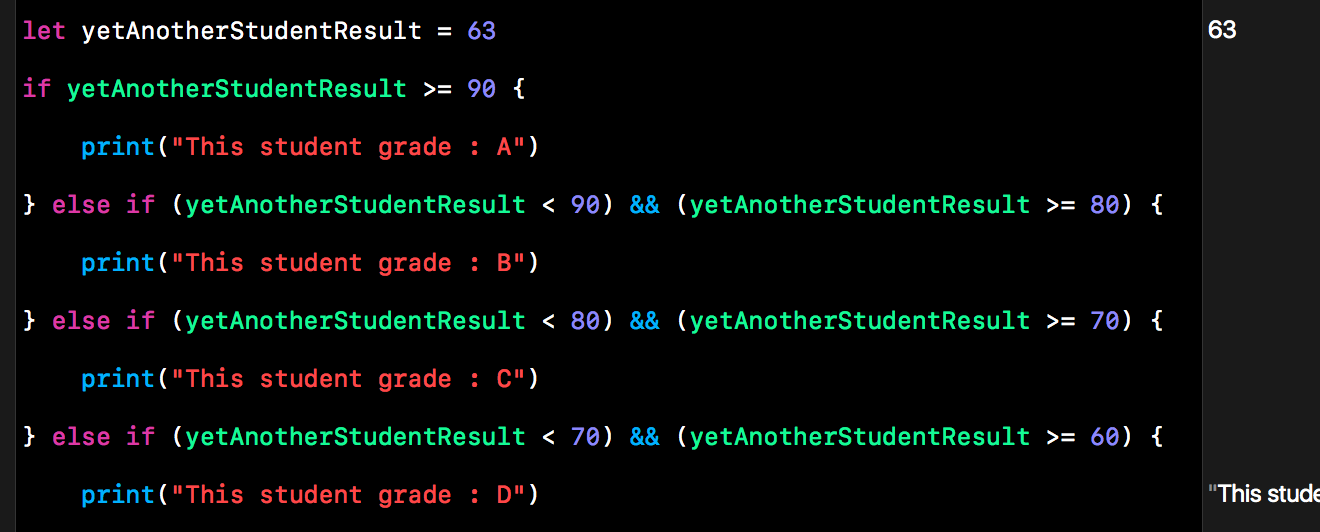

For the previous example, it is best if we use switch statement. This example just demonstrate that you can have many condition or permutation using if-elseif-else statement.
If Statement with Compound Condition
We can also check multiple condition in a if statement. Before we do that, let us consider a normal situation where we need a nested if to verified a set of data. In the following example, we are trying to verified a SIM card number.
Example:
let SimNumber = "89852928387389876362"
let thirdNumber = SimNumber.index(SimNumber.startIndex, offsetBy: 2) let sixthNumber = SimNumber.index(SimNumber.startIndex, offsetBy: 4) // Check of SIM number has 20 digit if SimNumber.count == 20 { // Check if SIM number start with 89 if SimNumber.hasPrefix("89") { // Check if SIM number 3rd to 6th digit contain location code 852 of Hong Kong if SimNumber[thirdNumber...sixthNumber] == "852" { print("Sim number verfied") } else { print("Something wrong with SIM card location code") } } else { print("Something wrong with SIM number prefix") } } else { print("SIM number not correct") } |
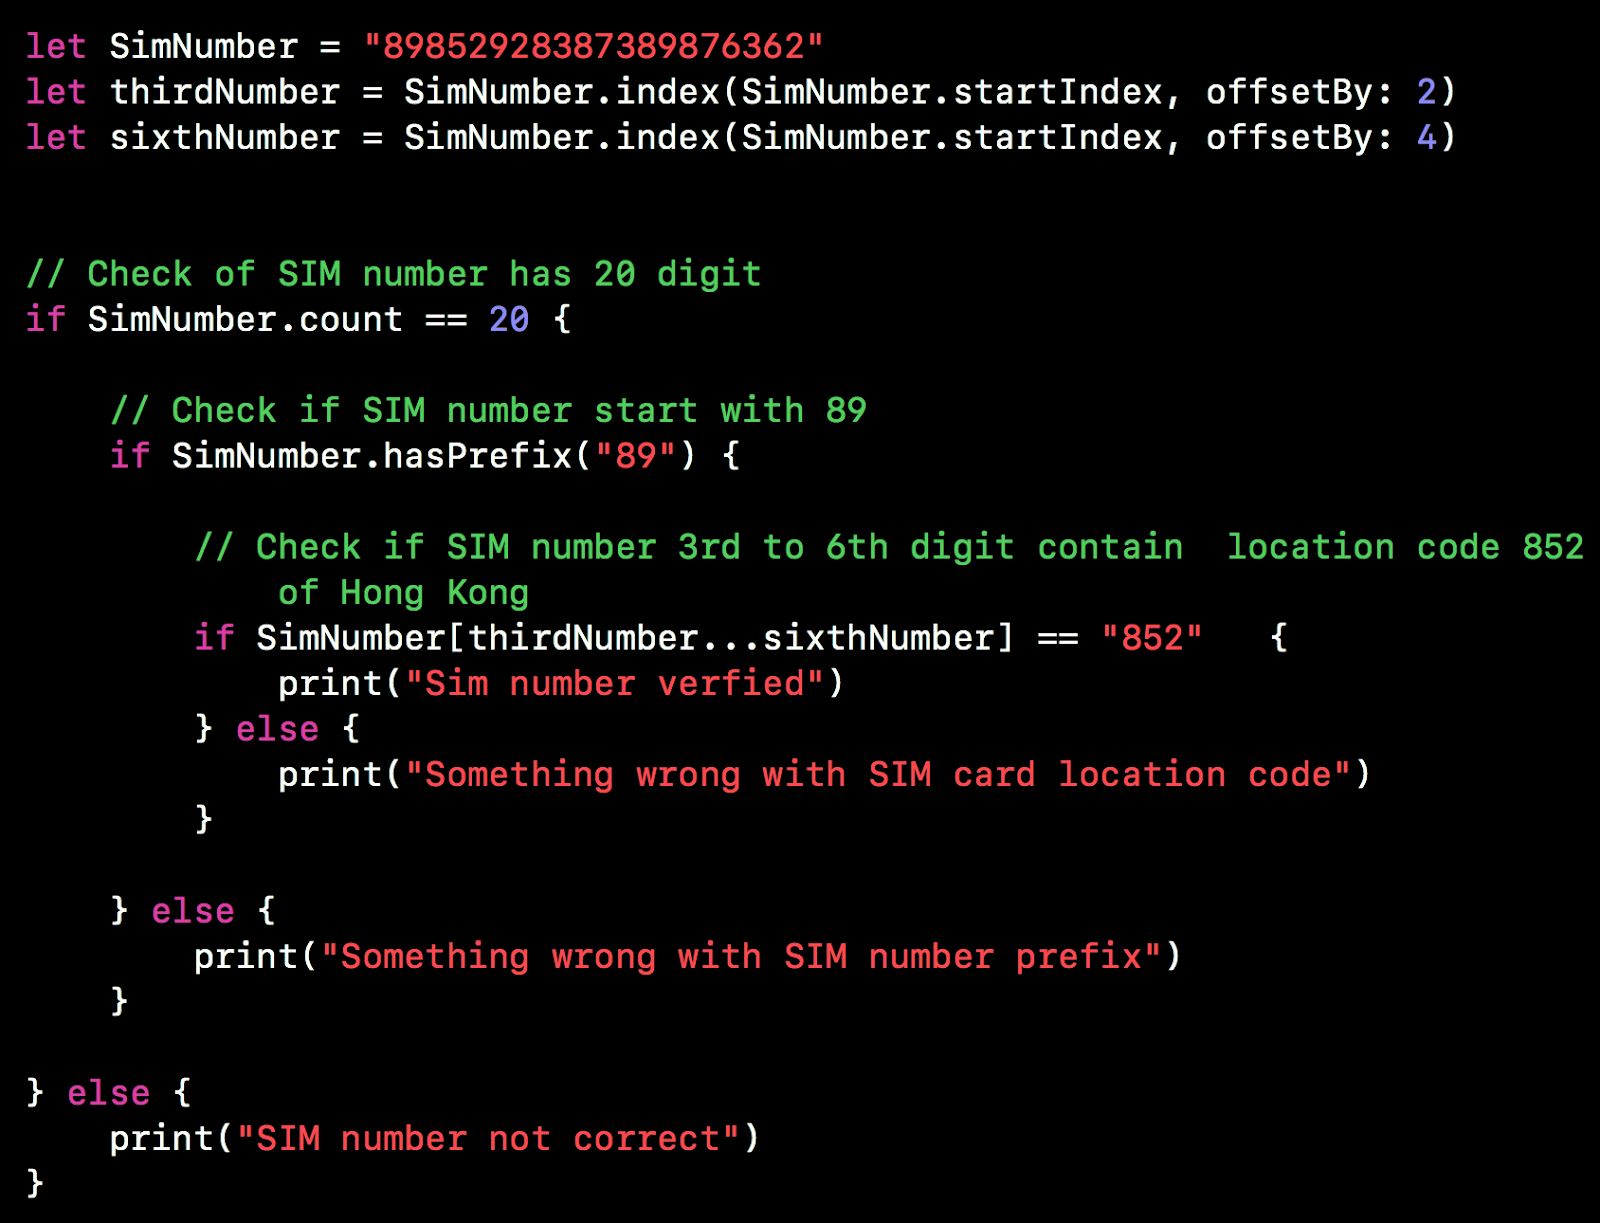
The result should be as follows:

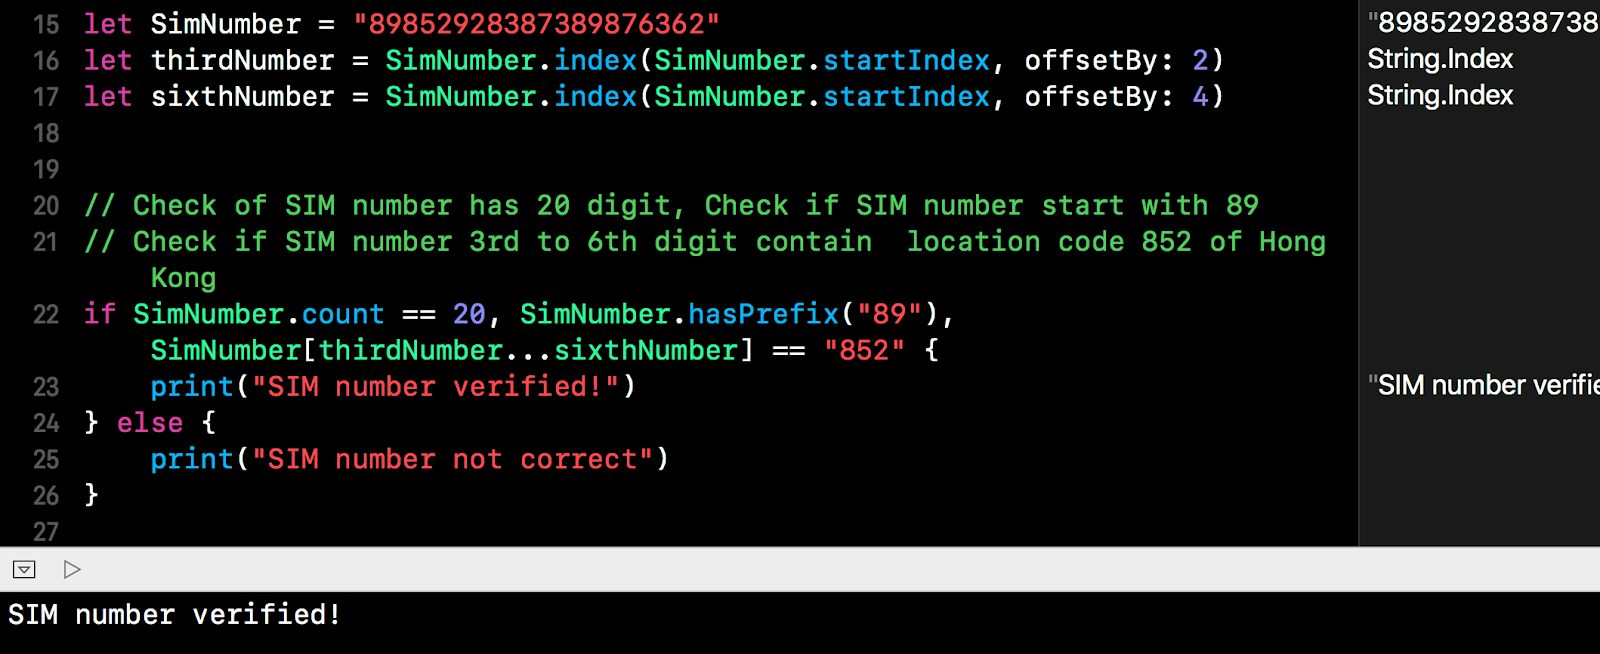
However, we can reconstruct the above if condition using compound if. See below:
let SimNumber = "89852928387389876362"
let thirdNumber = SimNumber.index(SimNumber.startIndex, offsetBy: 2) let sixthNumber = SimNumber.index(SimNumber.startIndex, offsetBy: 4) // Check of SIM number has 20 digit, Check if SIM number start with 89 // Check if SIM number 3rd to 6th digit contain location code 852 of Hong Kong if SimNumber.count == 20, SimNumber.hasPrefix("89"), SimNumber[thirdNumber...sixthNumber] == "852" { print("SIM number verified!") } else { print("SIM number not correct") } |
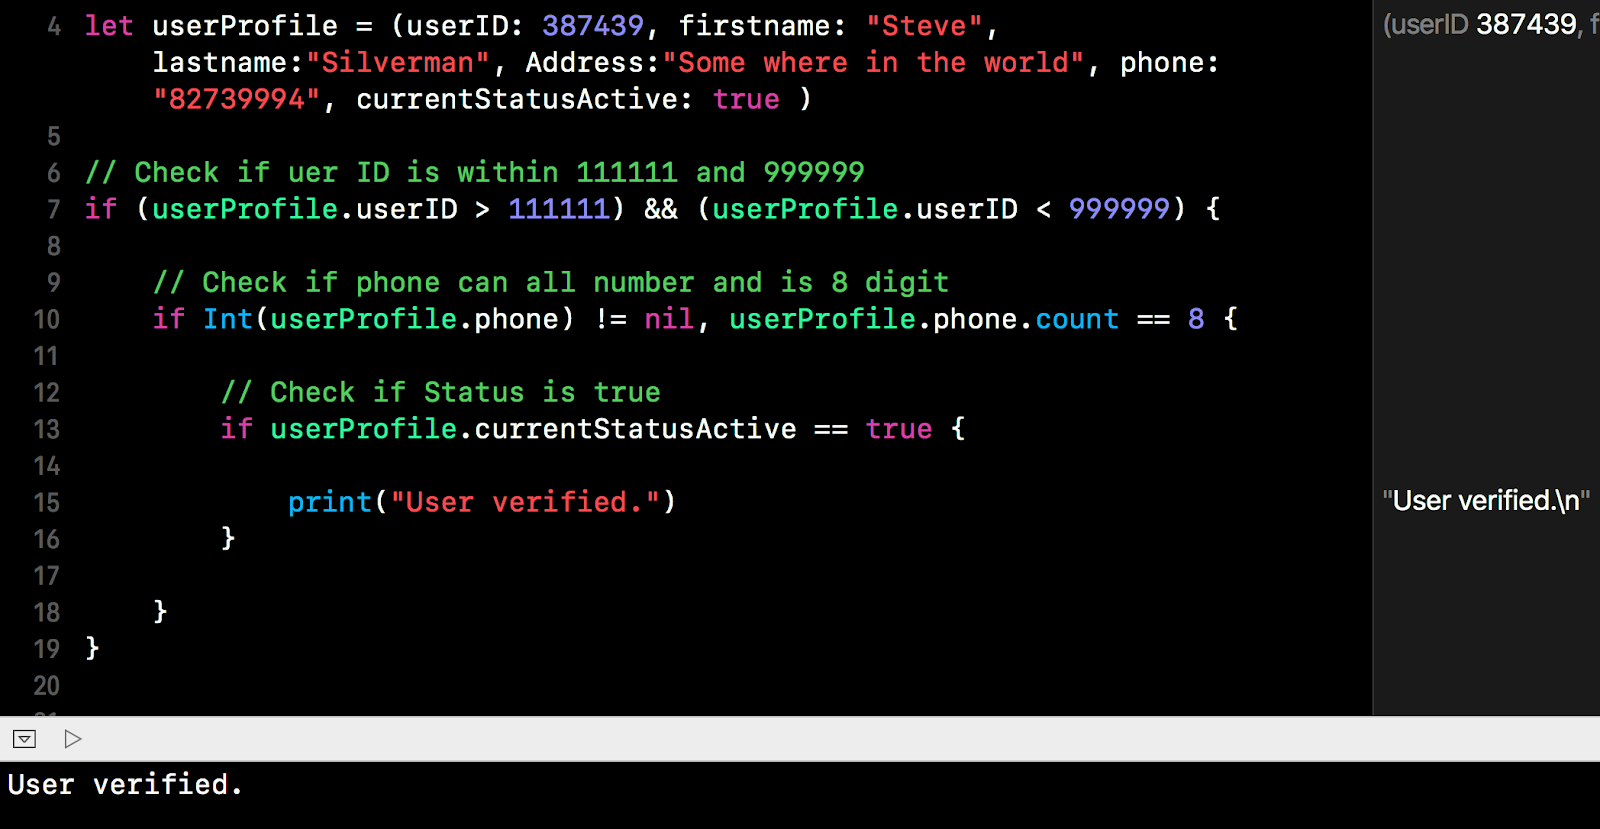
It is much more neater. Another example before compound condition.
let userProfile = (userID: 387439, firstname: "Steve", lastname:"Silverman", Address:"Some where in the world", phone: "82739994", currentStatusActive: true )
// Check if user ID is within 111111 and 999999 if (userProfile.userID > 111111) && (userProfile.userID < 999999) { // Check if phone can all number and is 8 digit if Int(userProfile.phone) != nil, userProfile.phone.count == 8 { // Check if Status is true if userProfile.cuurentStatusActive == true { print("User verified.") } } } |
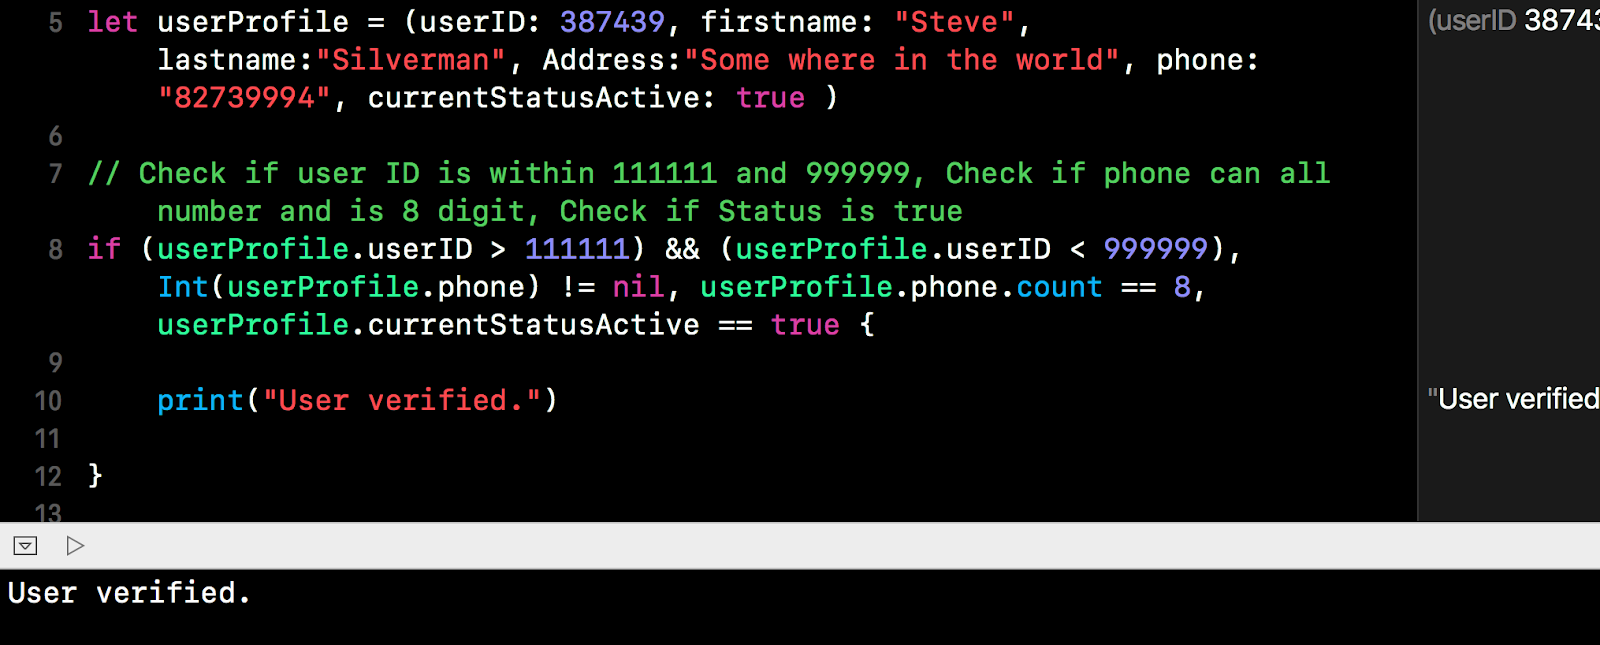
Using compounded if condition, we have
let userProfile = (userID: 387439, firstname: "Steve", lastname:"Silverman", Address:"Some where in the world", phone: "82739994", currentStatusActive: true )
// Check if user ID is within 111111 and 999999, Check if phone can all number and is 8 digit, Check if Status is true if (userProfile.userID > 111111) && (userProfile.userID < 999999), Int(userProfile.phone) != nil, userProfile.phone.count == 8, userProfile.currentStatusActive == true { print("User verified.") } |
Switch Statement
Switch statement is used when we have more possible permutation in a condition evaluation. The syntax is as follows:
switch <variables> {
case <value1> :
<statement_to_execute_if_value_is_value1>
case <value2>, <value3> :
{
<group_of_statement_to_execute_if_value_is_value2_or_value3>
}
default:
<execute_the_statement_if_value_fall_outside_previous_case>
}
Additional Note:
- In a switch statement, every possible condition must be met.
- The case statement must be exhaustive.
- Each case statement must have an execution statement, otherwise error will be generated.
- If it is not possible to list down every condition, use default as the catch all phrase.
Example:
We convert the previous example to switch statement.
let yetAnotherStudentResult = 63
switch yetAnotherStudentResult { case 90...100 : print("This student grade : A") case 80...89 : print("This student grade : B") case 70...79 : print("This student grade : C") case 60...69 : print("This student grade : D") case 50...59 : print("This student grade : E") default: print("This student grade : F") } |

For multiple condition, switch is much more neater.
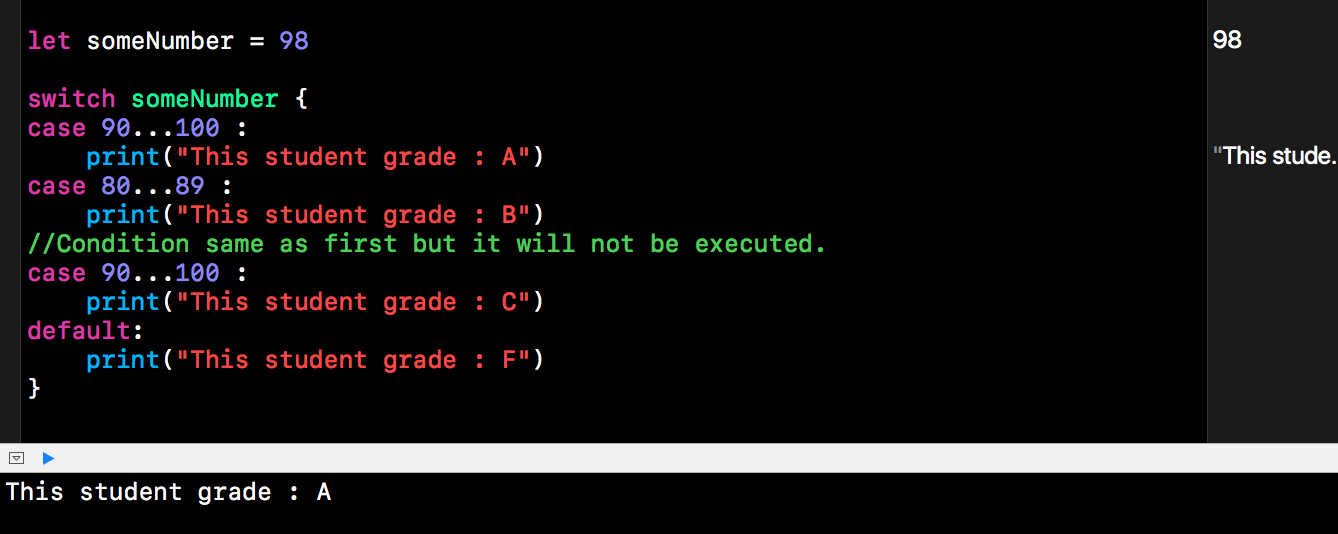
Compare to C and Objective-C, switch statement in Swift doesn't fall through, therefore break statement is not necessary. Switch statement in Swift will stop comparing values once the first condition is met. Switch statement in C will continue running through each condition if there is no break. Take the example below, the switch statement will act on the first case statement and stop even there is another similar condition below.
Example:
let someNumber = 98
switch someNumber { case 90...100 : print("This student grade : A") case 80...89 : print("This student grade : B") //Condition same as first but it will not be executed. case 90...100 : print("This student grade : C") default: print("This student grade : F") } |
Each case statement must have an execution code, otherwise it will generate error.

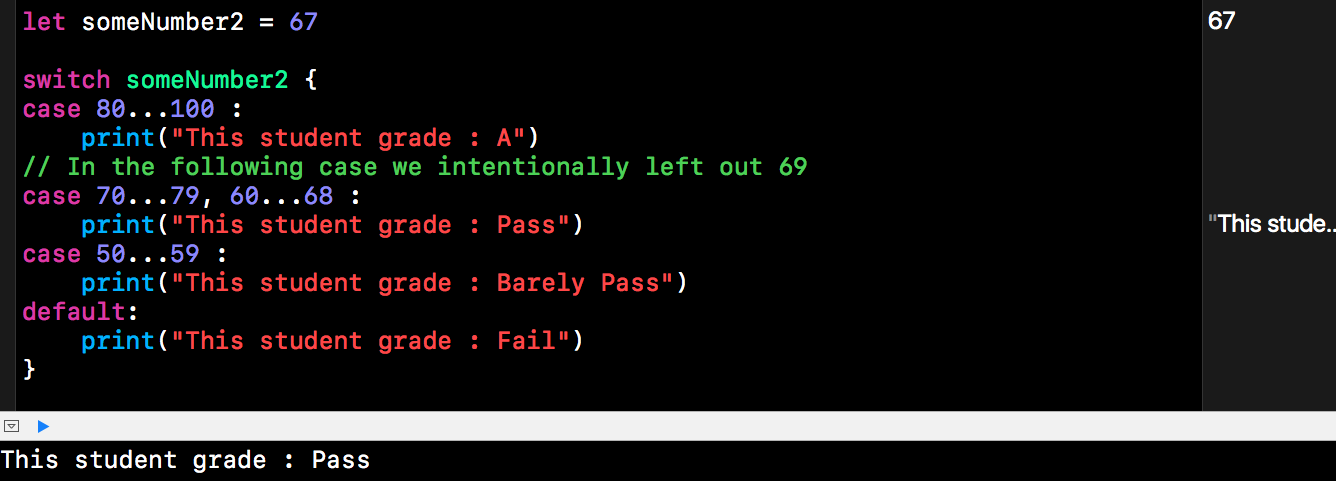
To compare more than a value in switch, we use comma.
Example:
let someNumber2 = 67
switch someNumber2 { case 80...100 : print("This student grade : A") // In the following case we intentionally left out 69 case 70...79, 60...68 : print("This student grade : Pass") case 50...59 : print("This student grade : Barely Pass") default: print("This student grade : Fail") } |
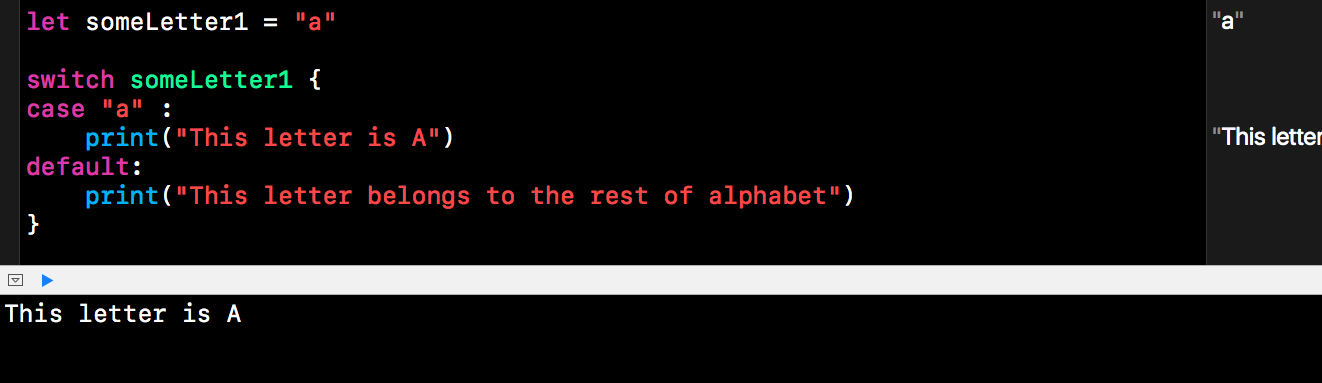
Let's try switch statement for string.
Example:
let someLetter1 = "a"
switch someLetter1 { case "a" : print("This letter is A") default: print("This letter belongs to the rest of alphabet") } |
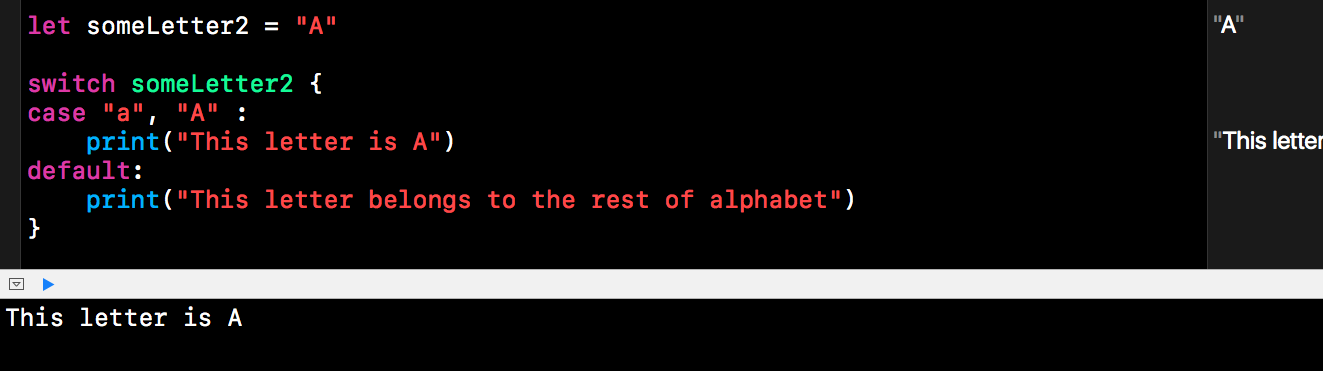
What happen if our value is A instead of a

To consider both A and a, we use comma as shown below
let someLetter2 = "A"
switch someLetter2 { case "a", "A" : print("This letter is A") default: print("This letter belongs to the rest of alphabet") } |
Using Switch with Tuples
We can use switch with tuples, the best example we have is the coordinated system.
Example:
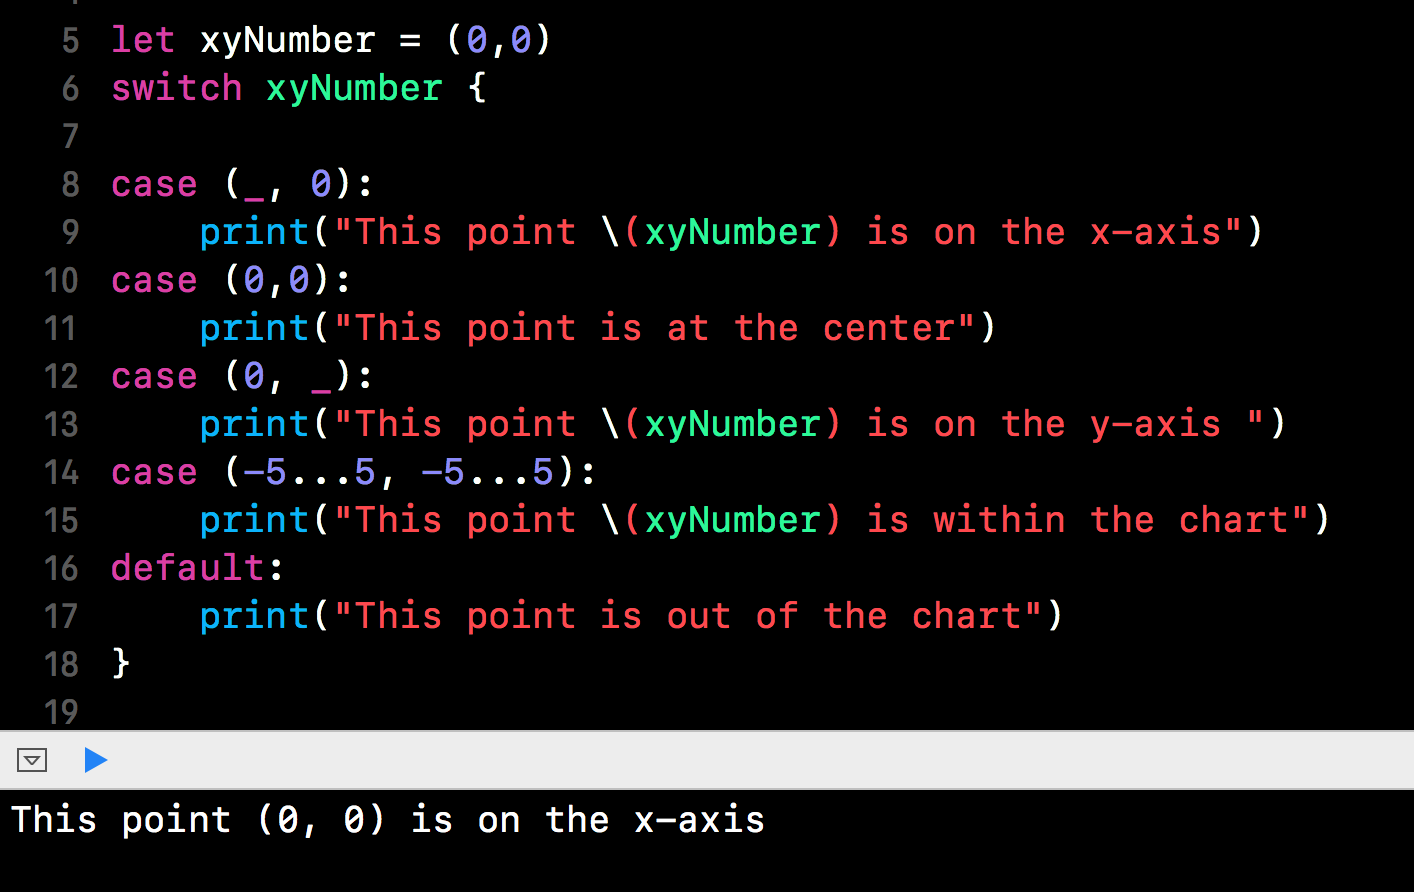
let xyNumber = (3,4)
switch xyNumber { case (0,0): print("This point is at the center") case (_, 0): print("This point \(xyNumber) is on the x-axis") case (0, _): print("This point \(xyNumber) is on the y-axis ") case (-5...5, -5...5): print("This point \(xyNumber) is within the chart") default: print("This point is out of the chart") } |
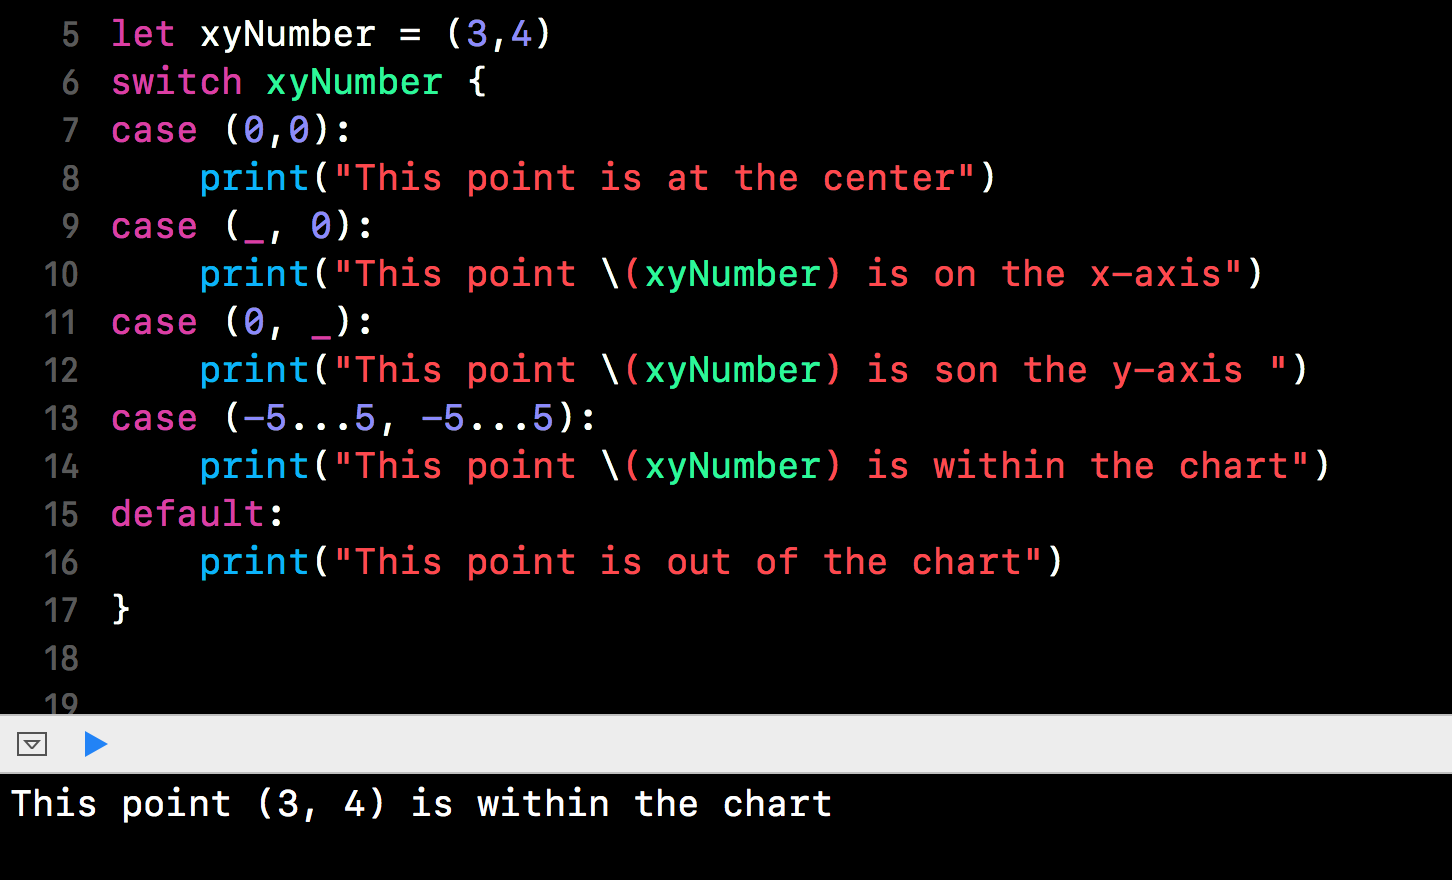
Please note that we can use underscore (_) to include any values.
Other permutation is as follows:


Note:
Please note that for the example above, the point (0,0) satisfy all the condition. However, since the first condition is for (0,0), the switch statement will not execute subsequent sentences when it satisfy the first condition.
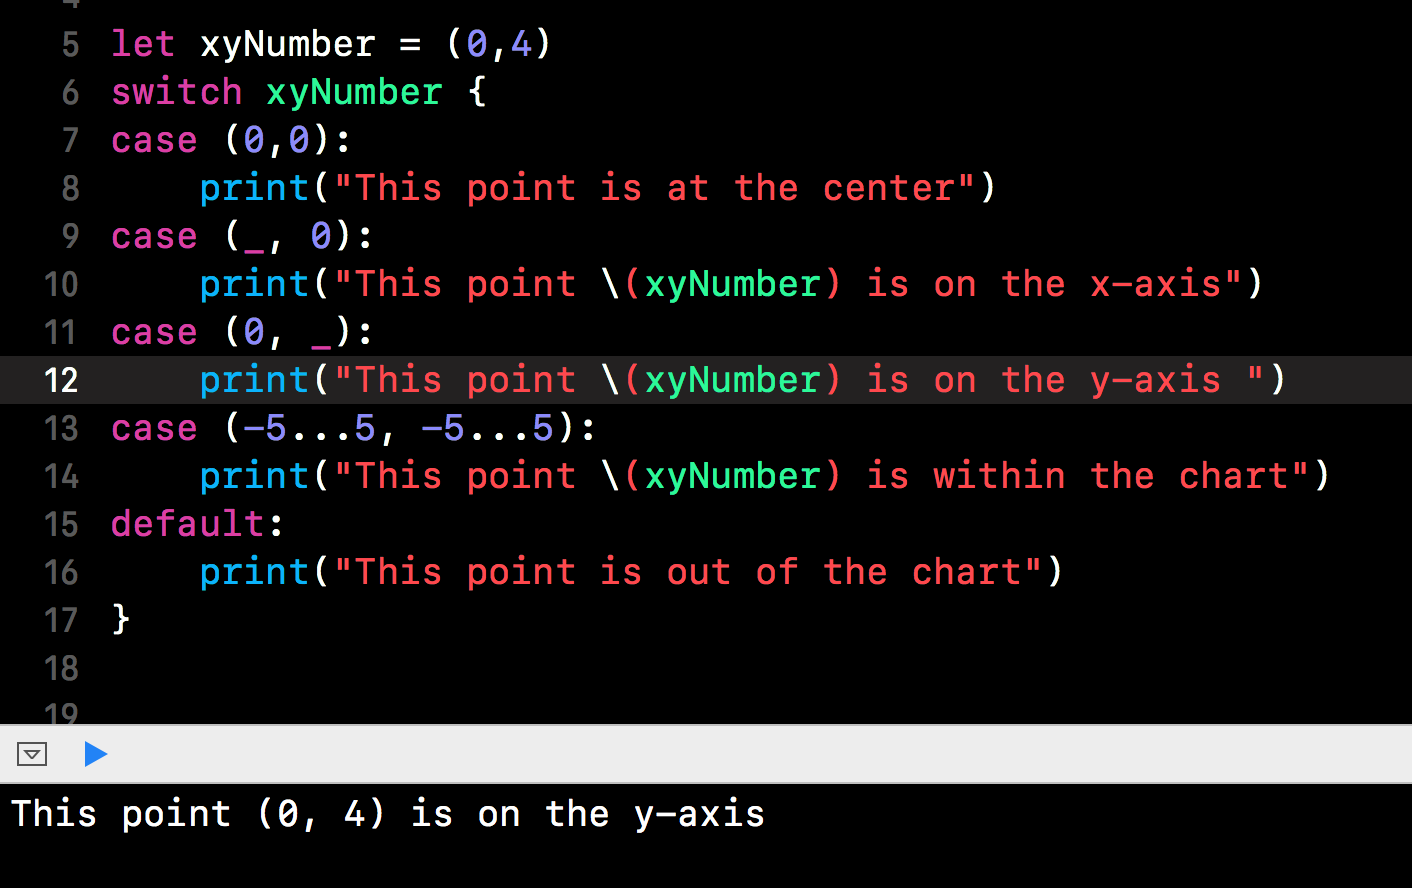
Let change the order to illustrate our point.
let xyNumber = (0,0)
switch xyNumber { case (_, 0): print("This point \(xyNumber) is on the x-axis") case (0,0): print("This point is at the center") case (0, _): print("This point \(xyNumber) is on the y-axis ") case (-5...5, -5...5): print("This point \(xyNumber) is within the chart") default: print("This point is out of the chart") } |
As shown in the example above, if we shift the first condition to the second, it will never be executed since the point (0,0) will always satisfy the first condition which is the x-axis condition.
Another example on using switch with tuple:
let studentScore:(id: Int, score: Double) = (78001,2.0)
switch studentScore { case (1001..<5000, 5): print("Student \(studentScore.id) with GPA 5.") case (1001..<5000, 0..<3): print("This student \(studentScore.id) has below average score.") case (_, _): print("Invalid student or score number") } |
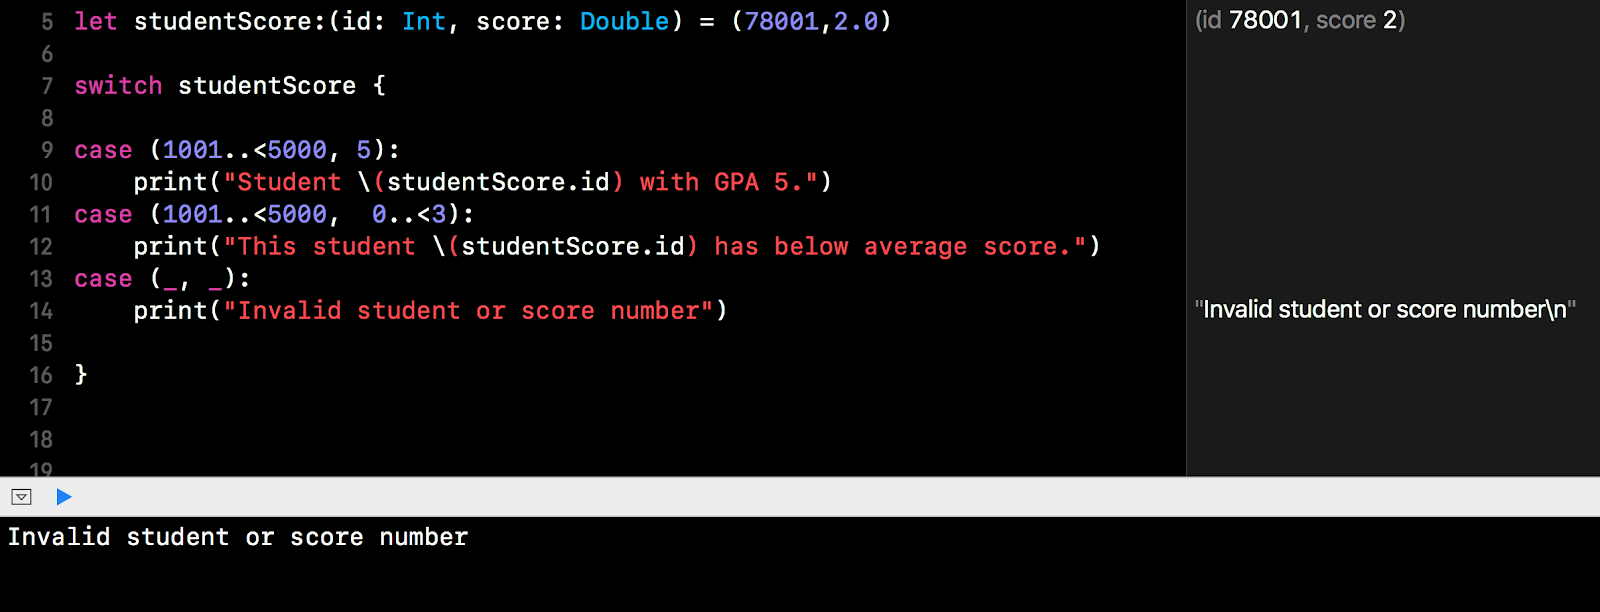
In the previous example, we use 2 underscore for the third condition. We mentioned earlier, underscore is a catch all symbol. So using 2 catch all symbol will catches all data. In such case, no default is required since it includes all possible condition.
Using Value Binding with Tuple
Let's refer to the previous example of x and y coordinate. We can use the keyword "let" as value binding. Value binding accepts any condition similar to underscore (_). The differences is that we need to make use of the binded value. Let's see with an example
Example:
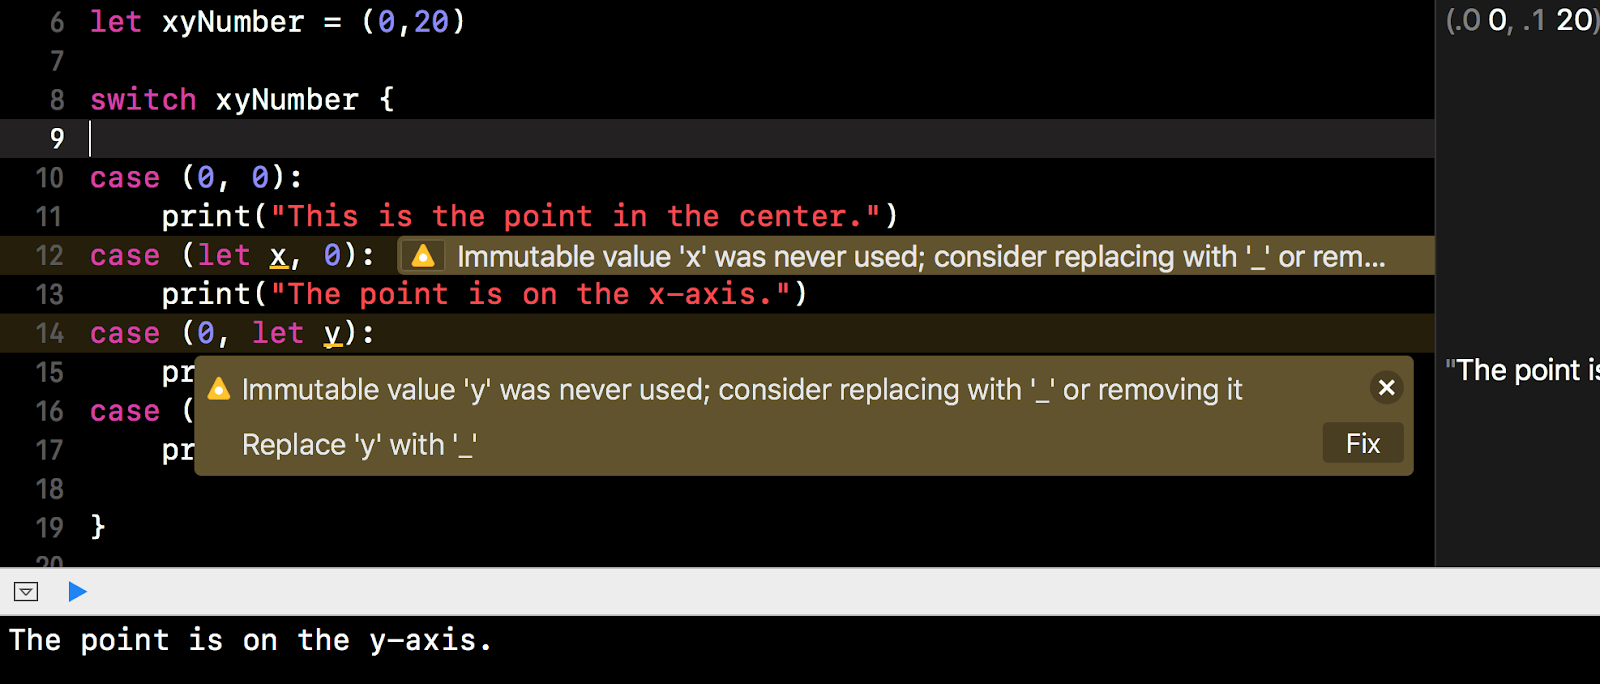
let xyNumber = (0,20)
switch xyNumber { case (0, 0): print("This is the point in the center.") case (let x, 0): print("The point is on the x-axis when x is \(x) and y is 0.") case (0, let y): print("The point is on the y-axis when y is \(y) and x is 0.") case (_, _): print("This point is any point not on the axis") } |
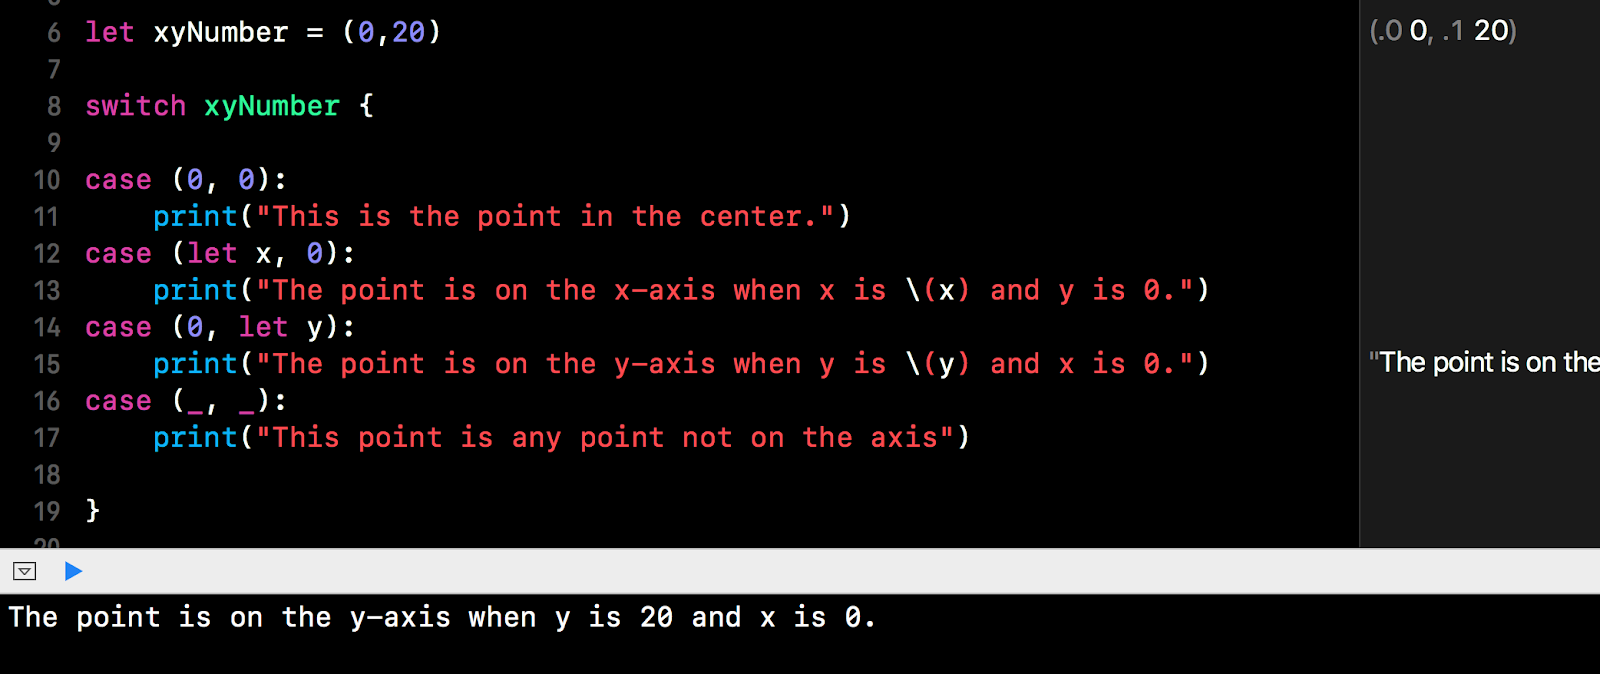
In the example above, we use let x and let y to include any condition for x or y. Then we make use of the variable in the print statement.
If we do not need to use the variable x or y, then we should use underscore _. As shown below:
Using Switch with Where
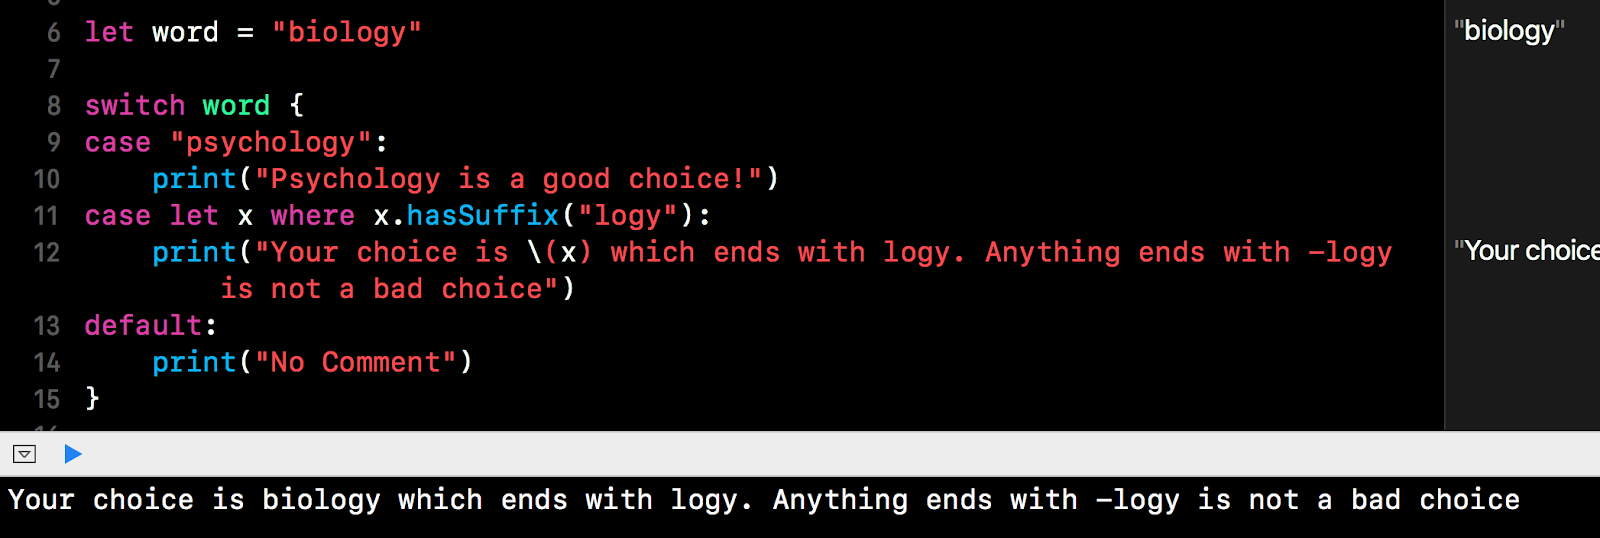
We can switch statement with where keyword. We can use where to add more complex condition in our switch statement. If we need to use where to examine the value, we also need to include value binding as shown below:
let word = "biology"
switch word { case "psychology": print("Psychology is a good choice!") case let x where x.hasSuffix("logy"): print("Your choice is \(x) which ends with logy. Anything ends with -logy is not a bad choice") default: print("No Comment") } |
Beside text, we can also use complex filter as shown in the next example.
Another example.
let studentScore:(id: Int, score: Double) = (3001,3.7)
switch studentScore { case (1001..<5000, let y) where (y <= 5.0) && (y >= 4.5) : print("Student \(studentScore.id) score an A with with GPA \(y).") case (1001..<5000, let y) where (y < 5.0) && (y >= 3.0): print("This student \(studentScore.id) is just an average student.") case (1001..<5000, 0..<3): print("This student \(studentScore.id) has below average score.") case (_, _): print("Invalid student or score number") } |

Note: The above example is not a very good example, it just illustrate how we can use where statement. To simplified it, we can use a range operator instead. However, for the purpose of showing how to use where statement; we can study the example above. Take note that for those value that we need to evaluate, we need to use value binding (using let).
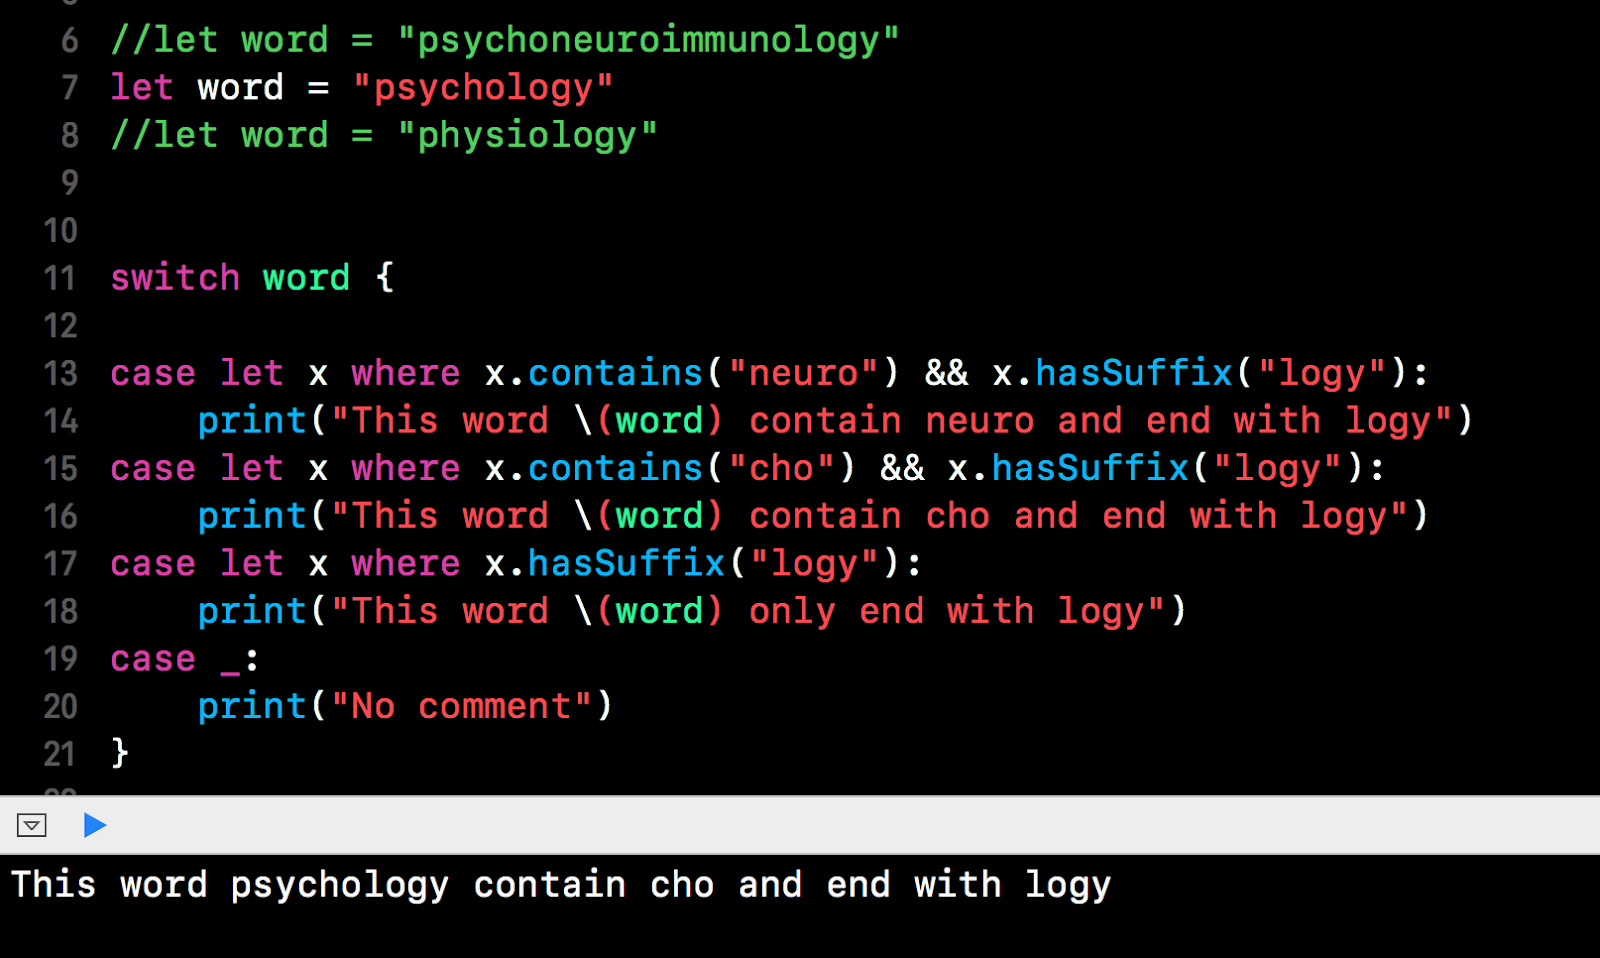
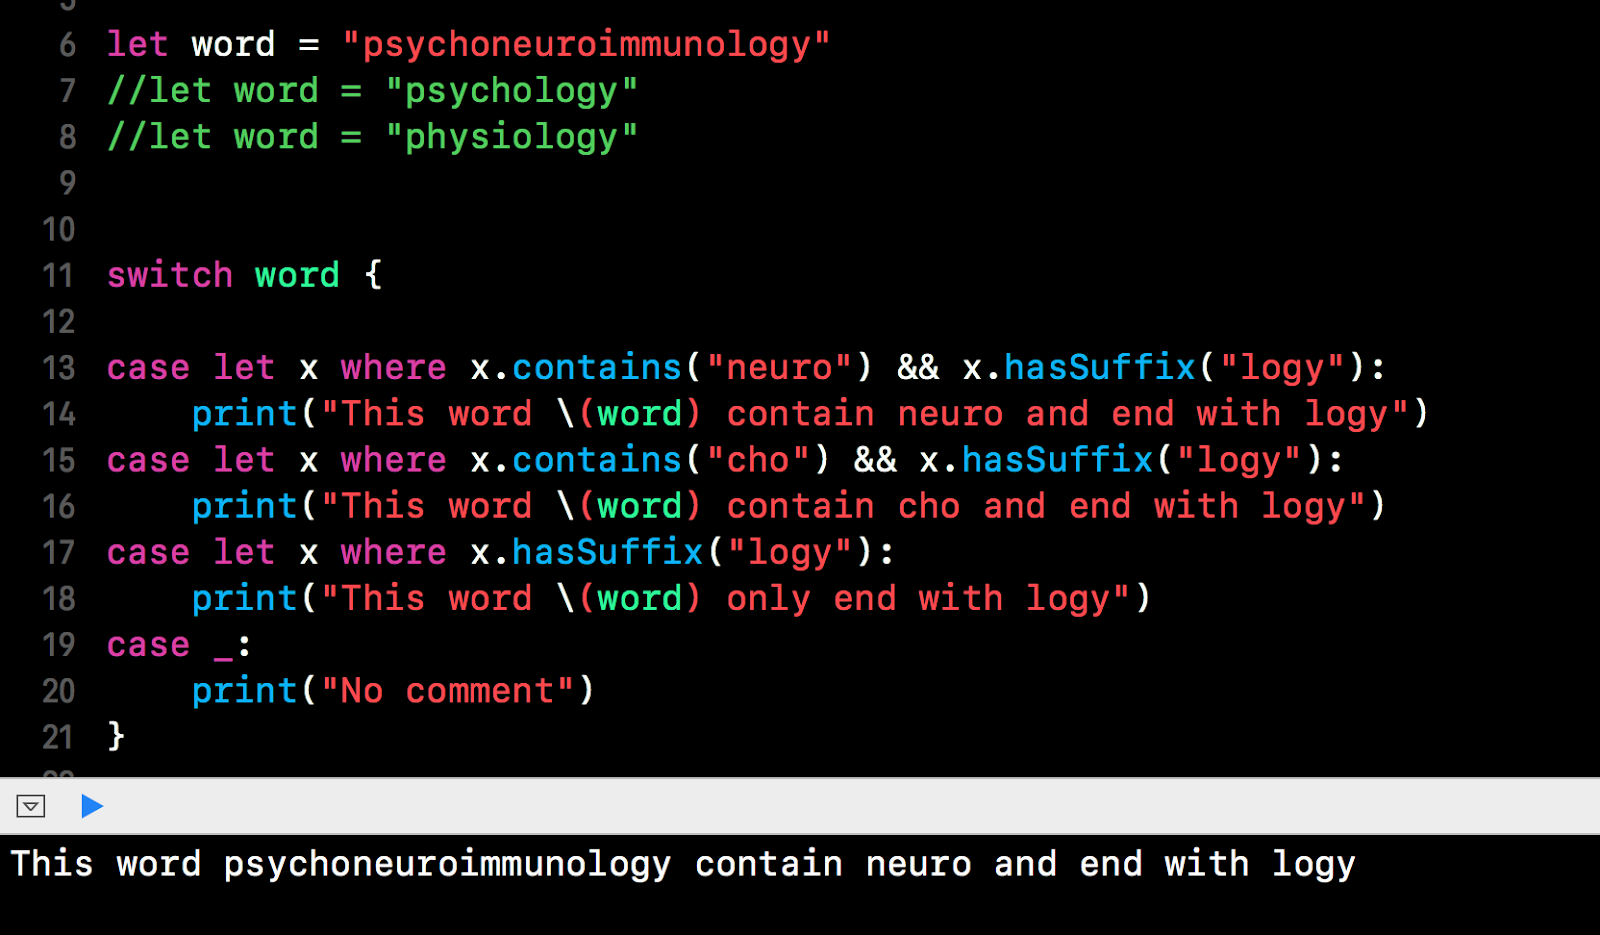
Let's try another text example:
//let word = "psychoneuroimmunology"
let word = "psychology" //let word = "physiology" switch word { case let x where x.contains("neuro") && x.hasSuffix("logy"): print("This word \(word) contain neuro and end with logy") case let x where x.contains("cho") && x.hasSuffix("logy"): print("This word \(word) contain cho and end with logy") case let x where x.hasSuffix("logy"): print("This word \(word) only end with logy") case _: print("No comment") } |
Other permutation:
Using Switch with Compound Cases
We have demonstrated earlier that we can use compound cases to accept a small letter a and a capital letter (A). Listed below are more example:
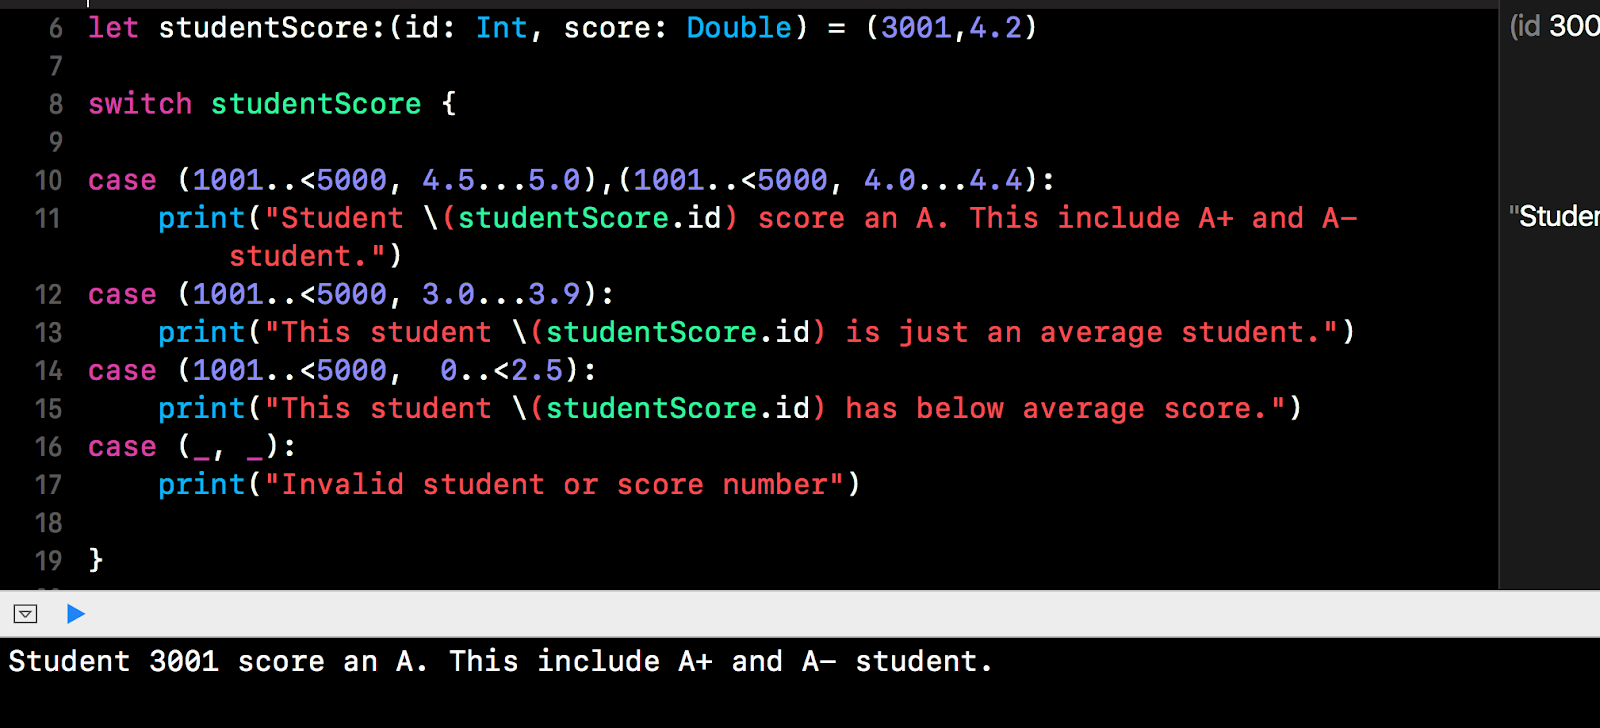
Example 1:
let studentScore:(id: Int, score: Double) = (3001,4.2)
switch studentScore { case (1001..<5000, 4.5...5.0),(1001..<5000, 4.0...4.4): print("Student \(studentScore.id) score an A. This include A+ and A- student.") case (1001..<5000, 3.0...3.9): print("This student \(studentScore.id) is just an average student.") case (1001..<5000, 0..<2.5): print("This student \(studentScore.id) has below average score.") case (_, _): print("Invalid student or score number") } |
Example 2:
let testChar:Character = "U"
switch testChar { case "a", "e", "i", "o", "u", "A", "E", "I", "O", "U": print("The character \(testChar) is a vowel.") default: print("The character belongs to other alphabet") } |

Control Transfer Statement
When we are using the control flow mentioned above, at some point we may encounter exceptional situation where we need to divert out of the control flow. On such cases we may need extra diversion command to divert from the control flow. Swift support 5 control transfer statement. They are "continue", "break", "fallthrough", "return" and "throw". We will be converging the first 3. For last 2 control transfer statement, it is related to error handling. We will be covering that in the section on error handling.
Continue Statement
Continue statement works with loop. Continue tell the loop to stop processing and start the loop with next iteration.
Example:
// Loop to print only odd number
print("Odd Number: ") for number in 1...50 { if (number % 2) == 0 { continue } else { print(number) } } |

Break Statement
Break statement stops the loop or control statement immediately and jump out of the loop or control statement immediately. For control statement, break is only allowed in switch.
Break Statement in Loop
When a break happen in a loop, it will stop the loop and break from the loop. The next statement to be execute will be after the loop.
Example:
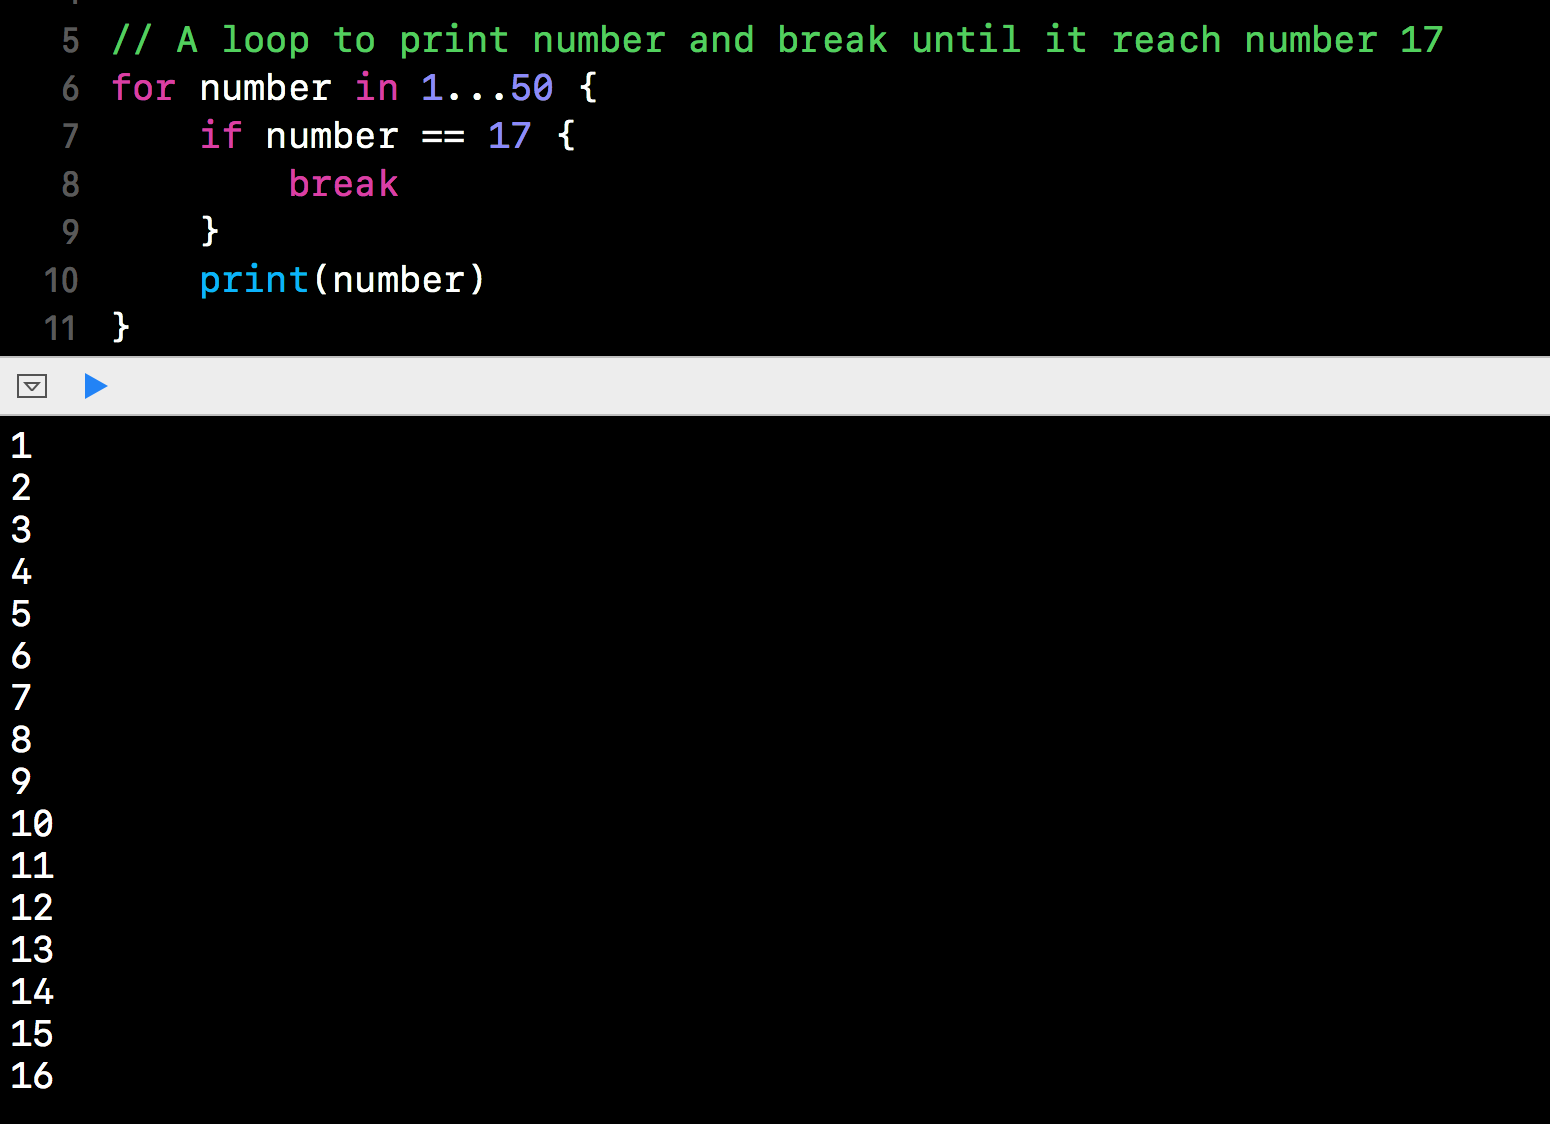
// A loop to print number and break until it reach number 17
for number in 1...50 { if number == 17 { break } print(number) } |
Example 2 using while:
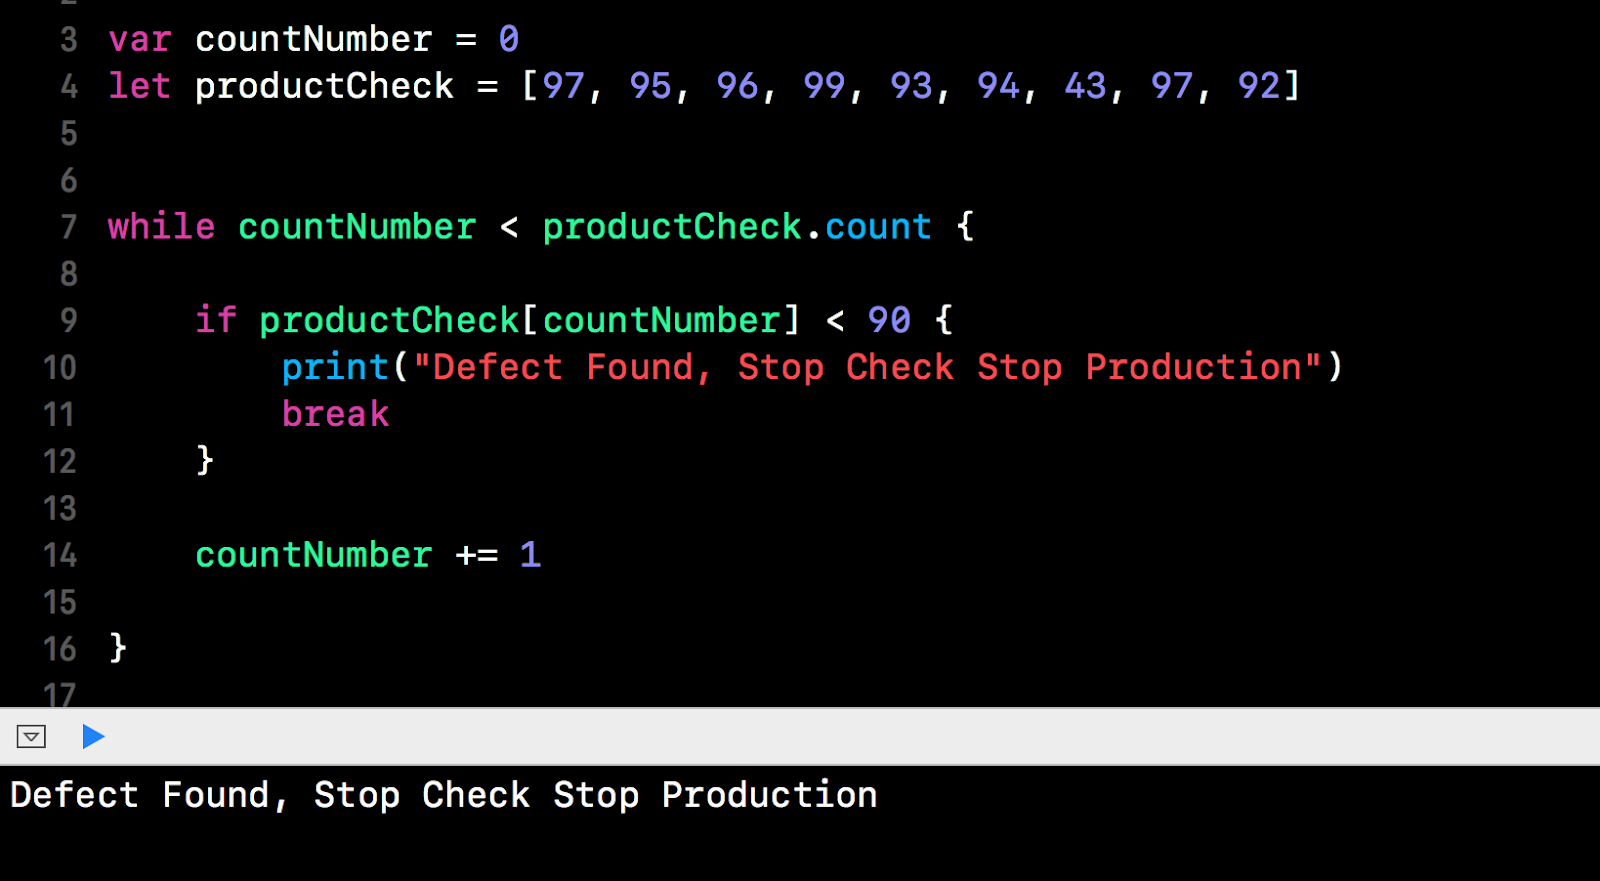
The following example will run through the array and stop if the number is less than 90.
var countNumber = 0
let productCheck = [97, 95, 96, 99, 93, 94, 43, 97, 92] while countNumber < productCheck.count { if productCheck[countNumber] < 90 { print("Defect Found, Stop Check Stop Production") break } countNumber += 1 } |
Break Statement in Switch
In order to use switch statement, we must provide exhaustive case. In many instances, we do not need to use such exhaustive case. We cannot leave such case condition with a comment or blank. We can use break as substitute.
Example:
let someChar = "e"
switch someChar { case "A", "E", "I", "O", "U", "a", "e", "i", "o", "u": print("The character is a vowel") default: //do nothing break } |

In the example above, we only interest if the character is a vowel, for all other condition, we will just end the switch.
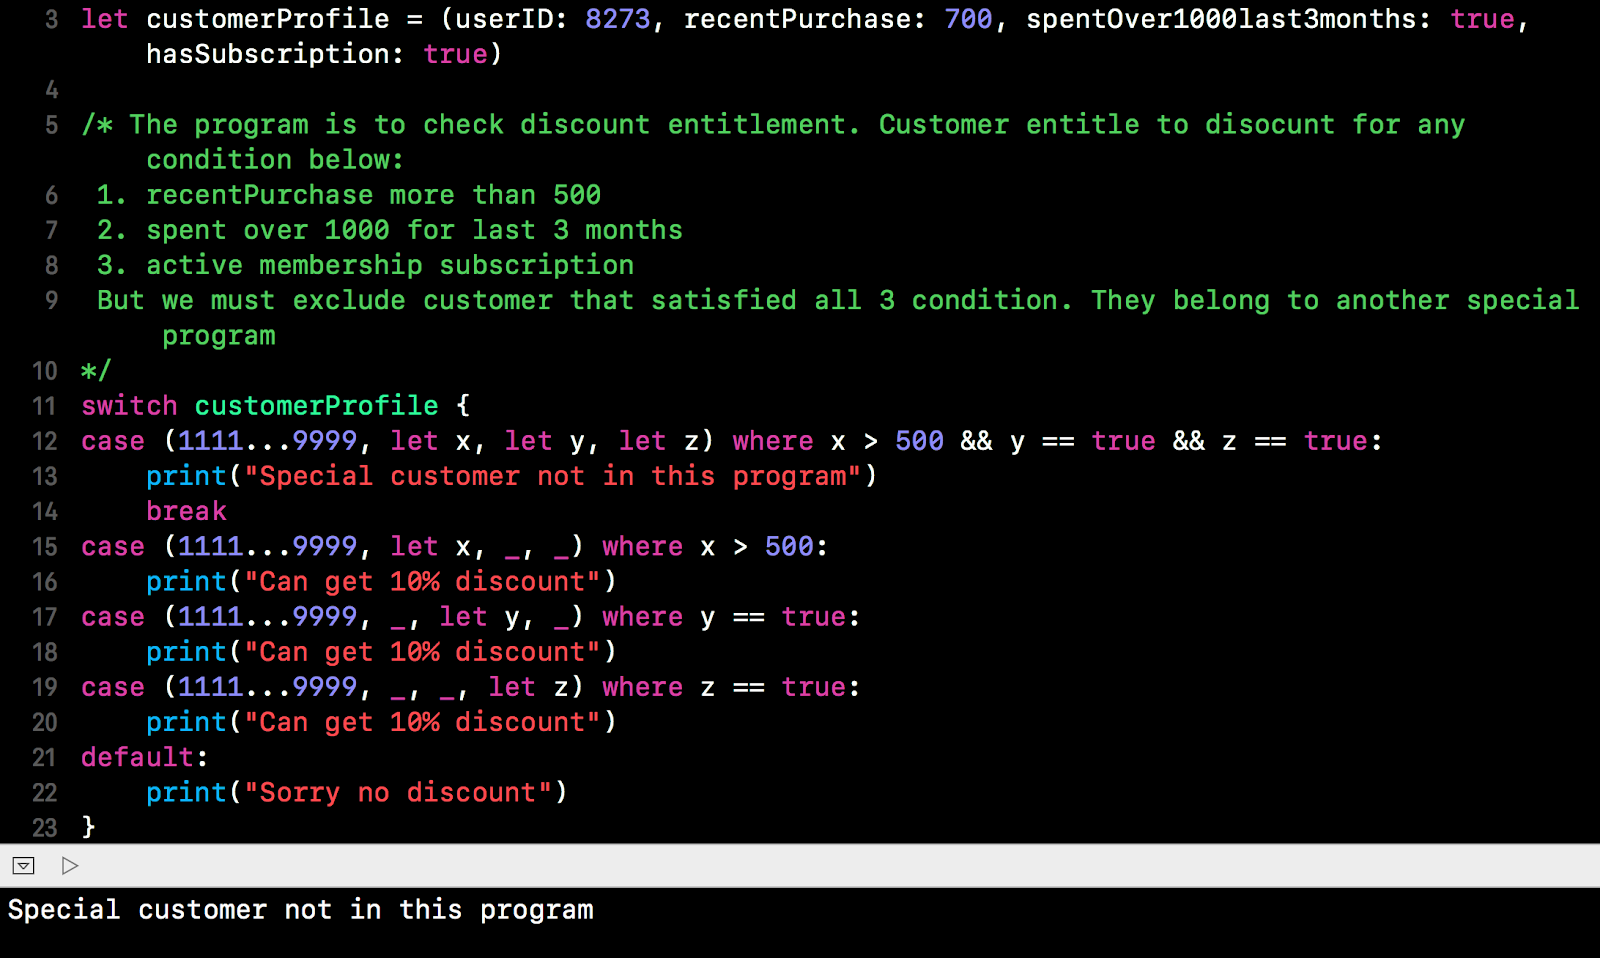
Another example of using break in switch is where we must exclude certain specific condition. Let's look at the example below, in this example customer with valid ID and satisfied any condition show be entitled to 10% discount. What happen to premium customer that satisfy all 3 condition? We must filter them out first and exclude them using break statement. Without the first case condition, we may mistakenly treat this customer as normal customer.
let customerProfile = (userID: 8273, recentPurchase: 700, spentOver1000last3months: true, hasSubscription: true)
/* The program is to check discount entitlement. Customer entitle to disocunt for any condition below: 1. recentPurchase more than 500 2. spent over 1000 for last 3 months 3. active membership subscription But we must exclude customer that satisfied all 3 condition. They belong to another special program */ switch customerProfile { case (1111...9999, let x, let y, let z) where x > 500 && y == true && z == true: print("Special customer not in this program") break case (1111...9999, let x, _, _) where x > 500: print("Can get 10% discount") case (1111...9999, _, let y, _) where y == true: print("Can get 10% discount") case (1111...9999, _, _, let z) where z == true: print("Can get 10% discount") default: print("Sorry no discount") } |
Fallthrough
The keyword fallthrough is specially cater for situation where we need switch cases to fallthrough.
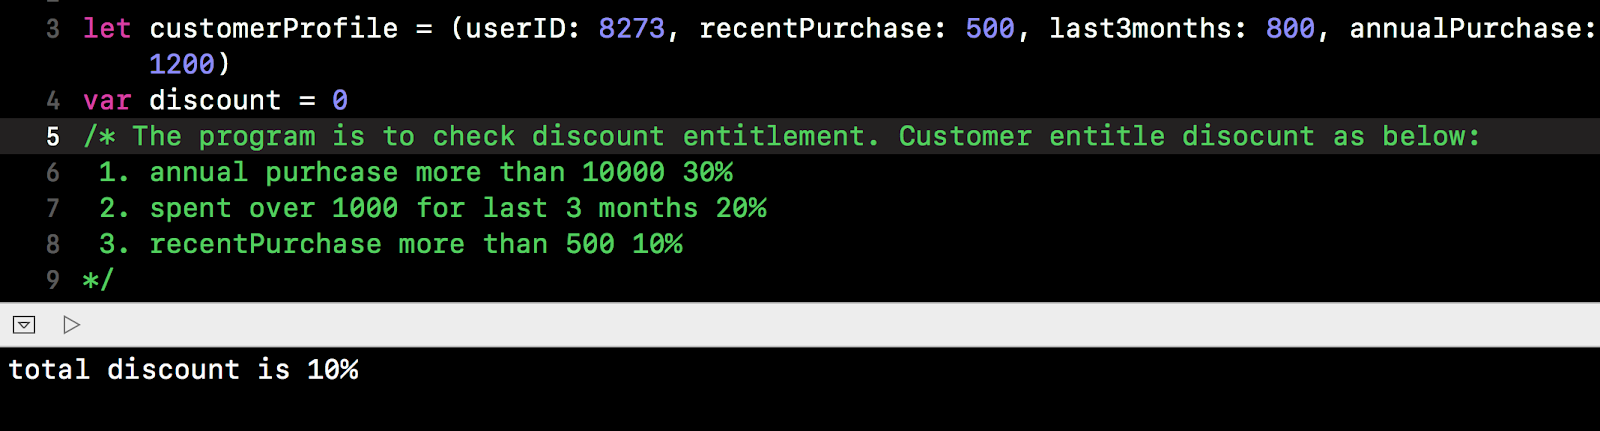
We use the similar example of giving discount. But this time the discount is cumulative. In this case we check the annual purchase first before we fall through to recent purchase.
let customerProfile = (userID: 8273, recentPurchase: 500, last3months: 1500, annualPurchase: 12000)
var discount = 0 /* The program is to check discount entitlement. Customer entitle disocunt as below: 1. annual purhcase more than 10000 30% 2. spent over 1000 for last 3 months 20% 3. recentPurchase more than 500 10% */ switch customerProfile { case (1111...9999, _, _, 10000..<1000000): discount += 10 fallthrough case (1111...9999, _, 1000..<1000000, _): discount += 10 fallthrough case (1111...9999, 500..<1000000, _, _): discount += 10 default: print("Sorry no discount") } print("total discount is \(discount)%") |

Other permutation:

Please note that we can allow fall through from the larger discount to lower discount and add them cumulatively.
Note:
- Please note that fall through case will not check the case condition that was fall through from higher level.
- Fall through will not work with value binding. If we use value binding and include a let <variable> in the case statement, we will not be able to use the keyword fallthrough.
Labeled Loops with Break or Continue
In the previous section, we have demonstrated that we can use the break statement or continue statement to control loop.
In this section, we would like to demonstrate that in a complex nested loop, we can use continue or break statement to manage control transfer by labeling the loops.
To label a loop we just add the label follow by a colon in front of the loop as shown below:
<loopName>: repeat {
…
} while <condition>
For this section, we are going to use the previous example of multiple level menu. We will label the main loop and the sub loop. In addition, we allow user to exit to the previous menu or just hit 9 to exit main menu.
// DO NOT run this program in playground
// Please create an Xcode project to run it var input: String? mainLoop: repeat { print("Enter menu number (9 to exit):") print("1. Menu - Main Course") print("2. Menu - Dessert") print("9. Exit") input = readLine() switch Int(input!) { case 1: var input1: String? mainCourse: repeat { print("Main Course") print("1. Grilled Chicken") print("2. Grilled Fish") print("99. Exit to previous") print("9. Exit Program") input1 = readLine() switch Int(input1!) { case 1: print("You have selected Grilled Chicken") case 2: print("You have selected Grilled Fish") case 9: break mainLoop default: break } } while Int(input1!) != 99 case 2: var input2: String? dessert: repeat { print("Dessert") print("1. Tiramisu") print("2. Latte") print("99. Exit to previous") print("9. Exit Program") input2 = readLine() switch Int(input2!) { case 1: print("You have selected Tiramisu") case 2: print("You have selected Latte") case 9: break mainLoop default: break } } while Int(input2!) != 99 default: break } } while Int(input!) != 9 |
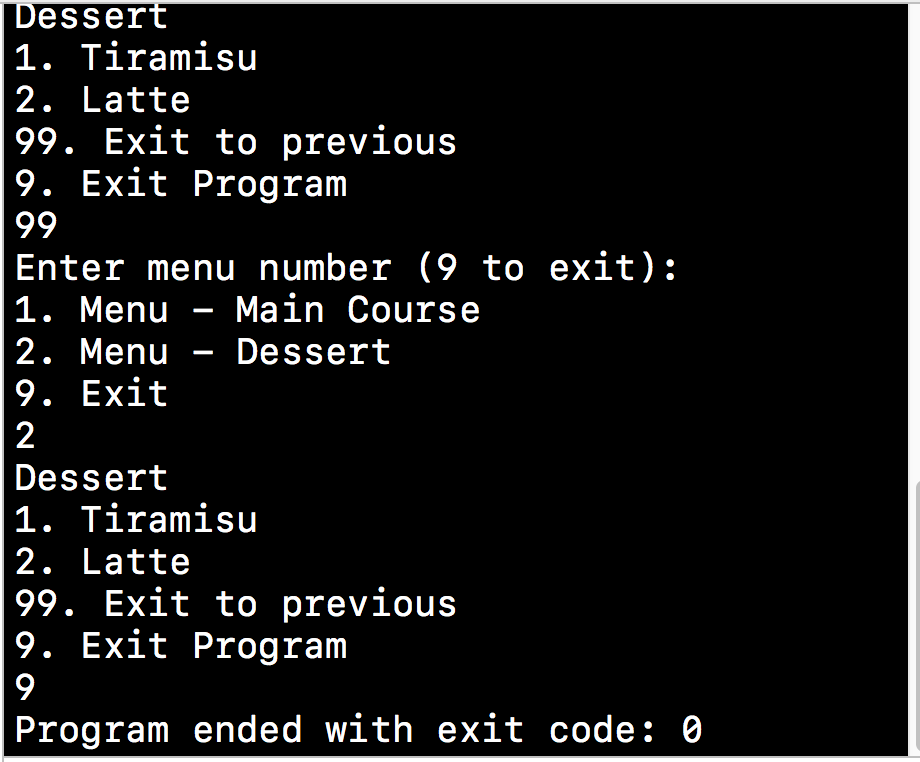
In the program above, when we are in sub menu, we can exit the program by hitting 9. Previous we need to use 99 to exit to previous menu.
Please take a look at the program, if we use break without label, we just break from the switch statement. Using labeled loop, we are able to skip 2 level up to the main loop and exit gracefully.
***
No comments:
Post a Comment