This final session will repeat what we have done on the table view controller and we would add additional features that would allow us to create new data item and remove data item. To create feature for this app to add new data item, we would add an additional view controller specifically to add new item.
But lets create an app and start the whole process from the beginning. By repeating the process, we get ourselves familiar with the practice of creating table view.
Start a new single view application project.
But lets create an app and start the whole process from the beginning. By repeating the process, we get ourselves familiar with the practice of creating table view.
Start a new single view application project.

Named the project as "Intro20"

Delete all the existing view controller and view controller Swift file. We should start the app with no view controller as shown below.

At the object library, look for table view controller and drag a copy to the storyboard.

The table view controller should be similar with the screen shot below.

Now, create the corresponding view controller file. Select Cocoa Touch Class under iOS > Source.

Select the subclass as UITableViewController and insert the name SalesRecord in front of TableViewController.

Click Next and Create. The created file should be similar to the screen shot below.

Next, select the table view controller from the document outline. This is another alternative way of selecting view controller.

At the Identity Inspector, change the class to the name of the file we have just created.

Also under Attribute Inspector make sure that "Is initial view controller" is checked.

Next, select the table view cell as shown below.

At the Attribute Inspector, change the style from Custom to Basic and enter the reuse identifier as SalesRecordCell .

Notice that a label was automatically created in the table view cell as we change the style to Basic.

Now, we will create the data file. Under iOS > Source, select Swift File.

Click Next and set the filename as SalesData. Click Create.

Once the new file in created, enter the following code for the data structures
// MARK: Data Structure
// Data structure to record sales made by each person
struct SalesRecord {

    var name: String
    var sales: Int

}

The resulting screen shot

After the data structure, we add the array that would collect all the sales record.

Next, we add the helper function that create and load sample data.
// MARK: Helper program to load sample data
func loadSampleSales() {

    let sales1 = SalesRecord(name: "Salesman 1", sales: 0)
    let sales2 = SalesRecord(name: "Salesman 2", sales: 10)
    let sales3 = SalesRecord(name: "Salesman 3", sales: 100)

    teamSalesData += [sales1, sales2, sales3]
}

The complete code for the data file should be as follow.
//
//  SalesData.swift
//  Intro20
//
//  Created by SwiftiCode on 16/8/16.
//  Copyright © 2016 SwiftiCode. All rights reserved.
//

import Foundation


// MARK: Data Structure
// Data structure to record sales made by each person
struct SalesRecord {

    var name: String
    var sales: Int

}

// MARK: Data Collection
var teamSalesData = [SalesRecord]()


// MARK: Helper program to load sample data
func loadSampleSales() {

    let sales1 = SalesRecord(name: "Salesman 1", sales: 0)
    let sales2 = SalesRecord(name: "Salesman 2", sales: 10)
    let sales3 = SalesRecord(name: "Salesman 3", sales: 100)

    teamSalesData += [sales1, sales2, sales3]
}
Screen shot shown below.

Go to the table view controller and add the load sample function.

Next we need to configure the data source for the table view controller. Template as shown below:

As usual, the number of section remains one.

The number of rows is the count of the array.

Then, we need to configure the table view cell as shown below. We just need to rename the reuseIdentifier to the name we have set in the Attribute Inspector and we need to add just two additional statement to pick out each item in the array and assign each name to the label.

Next, we will add a navigation controller to the table view controller. To do that select the table view controller as shown below.

Add a navigation controller as shown below.

Next add a title to the table by clicking on the middle of navigation bar.

Run the app to make sure that sample data populate the table correctly.

For the following section, we will be adding the editing capabilities for this app.
We will add a view controller for editing purpose. At the object library, select the view controller which is the first item in the object library.
We will add a view controller for editing purpose. At the object library, select the view controller which is the first item in the object library.

Drag the view controller to the storyboard as shown below.

Select the table view cell from the document outline as shown below.

Click the blue bar and control + drag from the blue bar to the view controller. Once we release the button, a segue dialogue box will appear as below

Select "Show" for editing purpose. An arrow will be created to form a link between the table view controller and the editing view controller. Select the little box on the arrow.

At the Attribute Inspector, set the segue identifier to "Edit". The reason we are setting the segue identifier is because in this app we will be having more than one view controller with different segue.

Next, we need to create a view controller file for the editing view controller. Select Cocoa Touch Class as shown below.

Under subclass select UIViewController and insert the name EditSales in front of ViewController.

Click Next and Create. The new file should be like the screen shot below:

To link the view controller file with the view controller UI, we need to perform the follow:
Select the view controller by selecting the yellow button on the view controller as shown below:

At the Identity Inspector, change the class to the name of the file we have just created. Now the file and UI are linked.

Drag and place 2 labels and 2 textfields to the storyboard as shown below.

Auto layout for the first label is as follows:

Auto layout for the second label is as follows:

Auto layout for the first textfield is as follows:

Auto layout for the second textfield is as follows:

We also need to change the some of the settings for each textfield. The first textfield setting should be as below

The setting for second textfield should be as below. Notice that the keyboard type is change to number pad.

Change the content of the labels to "Name" and "Sales" as shown below.
Next, look for navigation item from the object library as shown below.

Drag and drop to the navigation bar on top of the edit view controller. Next, double click the title and change the title to "Edit Sales Record" as shown below.

Next, search for bar button item from the object library.

Drag and drop to the top right corner of the edit view controller.

Drag and drop to the top right corner of the edit view controller.

Select the bar button and at the Attribute Inspector, change system item to "Save".

Next, we need to connect the textfield to the view controller file as outlet. Switch to assistant editor mode and control drag the first textfield to the edit view controller file as shown below.

The second textfield connection information is as below

We also need to connect the save button as an outlet to the editing view controller. Connection information as shown below.

The resulting code is as shown below.

We also need to add a SalesRecord optional variable as shown below. We need the variable to hold the data details for this view controller.

At the editing view controller file, go the end of the code and look for the section under navigation as shown below:

Un-comment the template code and add the following code as shown below

Then, add the rest of the code using the code below:
For the above set of code, We only process the code if user click the save button. If user click the return button on the left, we should not be processing these code. Please note that this function will run whenever it is segue to another view controller.
If user clicked save button, we will check if the textfield is empty. If it is we will add default data. Then we transfer the data from the textfield to the sales record optional variable.
Screen shot as shown below:

    // MARK: - Navigation

    // In a storyboard-based application, you will often want to do a little preparation before navigation
    override func prepareForSegue(segue: UIStoryboardSegue, sender: AnyObject?) {

        if sender === editSaveButton {

            var mySalesman: String

            let nameCheck = salesmanTextField.text ?? ""

            if nameCheck.isEmpty {
                mySalesman = "No Name"
            } else {
                mySalesman = nameCheck
            }

            var mySales: Int

            let tempSales = salesAmountTextField.text ?? ""

            if tempSales.isEmpty {
                mySales = 0
            } else {
                mySales = Int(tempSales)!
            }

            currentSalesToEdit = SalesRecord(name: mySalesman, sales: mySales)
        }
    }
For the above set of code, We only process the code if user click the save button. If user click the return button on the left, we should not be processing these code. Please note that this function will run whenever it is segue to another view controller.
If user clicked save button, we will check if the textfield is empty. If it is we will add default data. Then we transfer the data from the textfield to the sales record optional variable.
Screen shot as shown below:

Next, we need to add a block of code at the viewDidLoad template.
if let gotSalesToEdit = currentSalesToEdit {

            salesmanTextField.text = gotSalesToEdit.name
            salesAmountTextField.text = String(gotSalesToEdit.sales)
        }
The above code is to check if there is anything to edit. If there is, we will transfer the data to the textfield. The data should come from table view controller.
Screen shot shown below:

We also need to edit the navigation portion at the table view controller. Switch to table view controller. Un-comment the navigation portion and change to the code shown below.

    // MARK: - Navigation

    // In a storyboard-based application, you will often want to do a little preparation before navigation
    override func prepareForSegue(segue: UIStoryboardSegue, sender: AnyObject?) {

        if segue.identifier == "Edit" {
            // Get the new view controller using segue.destinationViewController.
            let editSalesDetailViewController = segue.destinationViewController as! EditSalesViewController

            // Pass the selected object to the new view controller.
            if let selectedCell = sender as? UITableViewCell {

                let selectedIndexPath = tableView.indexPathForCell(selectedCell)!
                let selectedSalesRecord = teamSalesData[selectedIndexPath.row]
                editSalesDetailViewController.currentSalesToEdit = selectedSalesRecord

            }

        }
    }
The above code will only be execute if the segue come from editing view controller. What we do here is to extract the data from tableview information and transfer to the destination view controller.
Screen shot below:
Screen shot below:

Below the prepareForSegue function, add the following function as shown below.
    @IBAction func editSalesViewControllerUnwindToSalesTable(segue: UIStoryboardSegue) {

        if let editSalesSourceViewController = segue.sourceViewController as? EditSalesViewController {

            let selectedIndexPath = tableView.indexPathForSelectedRow!
            teamSalesData[selectedIndexPath.row] = editSalesSourceViewController.currentSalesToEdit!
            tableView.reloadRowsAtIndexPaths([selectedIndexPath], withRowAnimation: .None)
        }

    }
The above code will only trigger when edit view controller exit and reverse back to the table view controller. At the moment of exit, this function will be trigger. What the program do is to extract the data from the source view controller, which is the edited version of the data, and make the amendment to the array. Finally, we will reload the data in the table view with the latest amendment.
Screen shot below:

The previous code will only execute when the edit view controller has unwind and reverse back to the table view controller. To connect the previous function we need to link the save button to the exit button of the edit view controller. So go to the editing view controller, control and drag the save button to the exit button. A list of possible function will show and we need to select the correct function for connection.

Once it is connected, run the app to make sure that we can edit the sample data. Select a sample record from the table.

Once selected, the app will navigate to the editing view controller and display all the data details in the textfield as shown below.

Make some changes and click save.

Once we click save, the changes will be reflected. If we change only the number then we need to go back to check the details. If we change the name, it should reflect immediately in the table.

The final part of this app is to create a view controller for user to add new data item.
Select the view controller from object library and drag it to the storyboard.

The view controller might cover other UI. So we need to drag the view controller to the empty space. See screen shot below.

Next, we select the table view controller. Then we drag a bar button item to the top right corner of the navigation bar.

Resulting screen for table view controller is shown below.

Select the bar button item, change the system item at the Attribute Inspector from custom to Add as shown below.

Resulting screen of table view controller shown below.

Next, we need to press control and drag from the Add button to the new view controller (aka add sales view controller). Select "Present Modally" from the action segue box shown below.

Once the segue is chosen, a link with an arrow will be created from the table view controller to the new view controller. Select the square on the arrow link.

On the Attribute Inspector, set the identifier as Add. As mentioned previously, we need to identified the segue when we are using more than one segue in a storyboard.

Next, select the add sales view controller as shown below.

Add a navigation controller as shown below.

Once the navigation controller is created, we can zoom out to look at the storyboard setup. It should be the same as our setup below.

Next, double click the center of the navigation bar and add a title as shown below

We also need to add bar button item to the add sales view controller.

Drag two bar button item to the top left and top right of the navigation bar as shown below.

Select the bar button item on the left.

Change the system item to cancel as shown below.

For the bar button item on the right, change the system item to save.

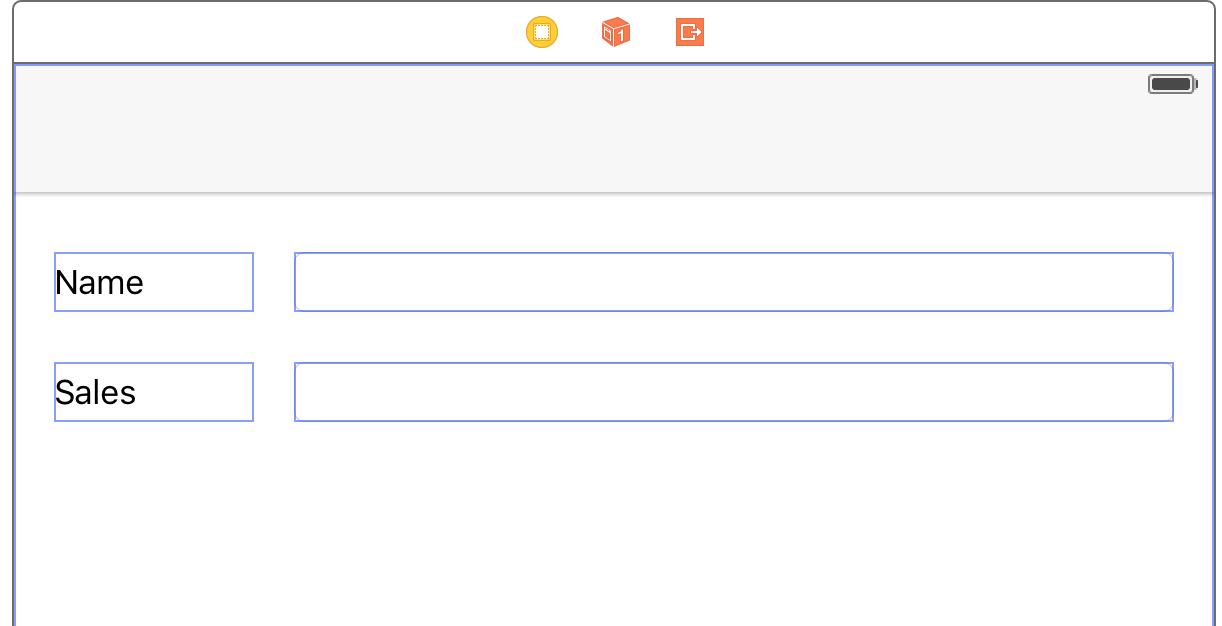
The resulting add view controller should be similar to the screen shot below.

Next we need to add 2 label and 2 textfield similar to the setup as the edit view controller.
Auto layout for the first label is as follows:

Auto layout for the first textfield.

Auto layout for the second label.

Auto layout for the second textfield

The settings of the textfield should be the same as the edit view controller. Check the settings in the edit view controller and replicate the settings. We also need to change the label text to "Name" and "Sales".
Then, we need to add a new file for this new view controller. Select Cocoa Touch as usual.

Subclass is UIViewController and insert the name AddSales. Click Next and Create.

Created view controller file shown below.

Select the add sales view controller.

At the Identity Inspector, set the class to the file we have just created. This action link the UI to the new view controller file we have just created.

Next, we also need to link the textfield to the view controller file as outlet. Switch to assistant editor mode and control drag the textfield to the add sales view controller.
The connection details for the first textfield is shown below:

Connection details for the second textfield

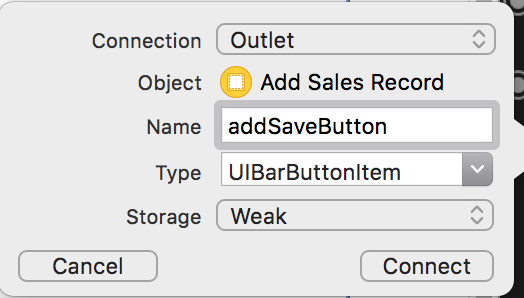
We also need to add the save button as outlet. Connection details as shown below:

We also need to create an optional variable for SalesRecord to hold the data details. Resulting code is shown below.

Next we need to drag the cancel button to the view controller as an action function. Connection details as follows:

Once the function is created. We need to add a statement to dismiss the view controller whenever user hit cancel. Resulting code is shown below

At the add sales view controller, scroll to the last section and un-comment the section under navigation.

Add the following code:
Similar to the edit function, the above code will check and process the save function only when the sender is from the save button. The rest of the code is to check the validity of the data and add default data if the textfield is left empty. Finally, we transfer the data from the textfield to sales record variable.
Screen shot shown below

We also need to create a function to add sales data when the add sales view controller is unwind to the table view controller. Go to the table view controller, just below the edit sales unwind function, add the following function:
Similar to the edit function, the previous code written in the table view controller will run when the add sales view controller exit and return to the table view controller. At the moment of exit, we run this code to transfer the data from add sales view controller to the data array by appending the new record.
Screen shot shown below:

Finally, we need to link the function. Control drag from the save button to the exit button as shown below. Select addSalesViewControllerUnwindTo SalesTable.

Once the link is created, we can test the app. Lets run the app.

Click on the add button and the following screen shows. Add some new data.

If we click cancel, nothing should happen. If we click save, new data show appear on the table.

We can also test the edit function by selecting the data item we have just created.

Try to make some changes to test if changes are reflected properly.

This final section is for us to add the functionality of delete data item from the table. This feature is already coded in the template of the table view controller. We just need to un-comment them and modify the data source.
Look for the template code in the table view controller as shown in the screen shot.

We need to un-comment them. Then, we need to add a statement to remove the data from the array. The statement should be teamSalesData.removeAtIndex (indexPath.row). This statement should be added just below the comment delete row from data source.

Finally, we need to edit the template code under viewDidLoad in the table view controller. The template code provide edit for right bar button, we need to change it to left bar button. See screen shot below.

To test the function, run the app and click the edit button on the left. A delete button should appear as shown below.

Alternatively, we can use slide gesture to delete an item. Slide the row to the left and a delete button will appear as per screen shot below.

Test and make sure the delete function work properly.
Final Note
Thank you for siting through this brief introduction. The purpose of these tutorials is to introduce various basic iOS development style and technique to other experience programmer who are not familiar with iOS development. These tutorial are not meant to be comprehensive. There are many topics such as persistent storage and core data which are not covered. Advance programming on view controller was also not covered. We hope that these brief introduction would give an idea to other developer the concept and ease of developing iOS app. If you are interested in iOS development and Swift programming please check on our blog.

Add a navigation controller as shown below.

Once the navigation controller is created, we can zoom out to look at the storyboard setup. It should be the same as our setup below.

Next, double click the center of the navigation bar and add a title as shown below

We also need to add bar button item to the add sales view controller.

Drag two bar button item to the top left and top right of the navigation bar as shown below.

Select the bar button item on the left.

Change the system item to cancel as shown below.

For the bar button item on the right, change the system item to save.

The resulting add view controller should be similar to the screen shot below.

Next we need to add 2 label and 2 textfield similar to the setup as the edit view controller.
Auto layout for the first label is as follows:

Auto layout for the first textfield.

Auto layout for the second label.

Auto layout for the second textfield

The settings of the textfield should be the same as the edit view controller. Check the settings in the edit view controller and replicate the settings. We also need to change the label text to "Name" and "Sales".
Then, we need to add a new file for this new view controller. Select Cocoa Touch as usual.

Subclass is UIViewController and insert the name AddSales. Click Next and Create.

Created view controller file shown below.

Select the add sales view controller.

At the Identity Inspector, set the class to the file we have just created. This action link the UI to the new view controller file we have just created.

Next, we also need to link the textfield to the view controller file as outlet. Switch to assistant editor mode and control drag the textfield to the add sales view controller.
The connection details for the first textfield is shown below:

Connection details for the second textfield

We also need to add the save button as outlet. Connection details as shown below:
We also need to create an optional variable for SalesRecord to hold the data details. Resulting code is shown below.

Next we need to drag the cancel button to the view controller as an action function. Connection details as follows:

Once the function is created. We need to add a statement to dismiss the view controller whenever user hit cancel. Resulting code is shown below

At the add sales view controller, scroll to the last section and un-comment the section under navigation.

Add the following code:
    // MARK: - Navigation

    // In a storyboard-based application, you will often want to do a little preparation before navigation
    override func prepareForSegue(segue: UIStoryboardSegue, sender: AnyObject?) {
        if sender === addSaveButton {

            var mySalesman: String

            let nameCheck = addSalesmanTextField.text ?? ""

            if nameCheck.isEmpty {
                mySalesman = "No Name"
            } else {
                mySalesman = nameCheck
            }

            var mySales: Int

            let tempSales = addSalesTextField.text ?? ""

            if tempSales.isEmpty {
                mySales = 0
            } else {
                mySales = Int(tempSales)!
            }

            currentAddSalesRecord = SalesRecord(name: mySalesman, sales: mySales)
        }

    }
Similar to the edit function, the above code will check and process the save function only when the sender is from the save button. The rest of the code is to check the validity of the data and add default data if the textfield is left empty. Finally, we transfer the data from the textfield to sales record variable.
Screen shot shown below

We also need to create a function to add sales data when the add sales view controller is unwind to the table view controller. Go to the table view controller, just below the edit sales unwind function, add the following function:
    @IBAction func addSalesViewControllerUnwindToSalesTable(segue: UIStoryboardSegue) {

        if let addSalesSourceViewController = segue.sourceViewController as? AddSalesViewController {

            let newIndexPath = NSIndexPath(forRow: teamSalesData.count, inSection: 0)
            teamSalesData.append(addSalesSourceViewController.currentAddSalesRecord!)
            tableView.insertRowsAtIndexPaths([newIndexPath], withRowAnimation: .Bottom)

        }

    }
Similar to the edit function, the previous code written in the table view controller will run when the add sales view controller exit and return to the table view controller. At the moment of exit, we run this code to transfer the data from add sales view controller to the data array by appending the new record.
Screen shot shown below:

Finally, we need to link the function. Control drag from the save button to the exit button as shown below. Select addSalesViewControllerUnwindTo SalesTable.

Once the link is created, we can test the app. Lets run the app.

Click on the add button and the following screen shows. Add some new data.

If we click cancel, nothing should happen. If we click save, new data show appear on the table.

We can also test the edit function by selecting the data item we have just created.

Try to make some changes to test if changes are reflected properly.

This final section is for us to add the functionality of delete data item from the table. This feature is already coded in the template of the table view controller. We just need to un-comment them and modify the data source.
Look for the template code in the table view controller as shown in the screen shot.

We need to un-comment them. Then, we need to add a statement to remove the data from the array. The statement should be teamSalesData.removeAtIndex (indexPath.row). This statement should be added just below the comment delete row from data source.

Finally, we need to edit the template code under viewDidLoad in the table view controller. The template code provide edit for right bar button, we need to change it to left bar button. See screen shot below.
To test the function, run the app and click the edit button on the left. A delete button should appear as shown below.

Alternatively, we can use slide gesture to delete an item. Slide the row to the left and a delete button will appear as per screen shot below.

Test and make sure the delete function work properly.
A copy of this project can be found at Github https://github.com/SwiftiCode/Intro20
Final Note
Thank you for siting through this brief introduction. The purpose of these tutorials is to introduce various basic iOS development style and technique to other experience programmer who are not familiar with iOS development. These tutorial are not meant to be comprehensive. There are many topics such as persistent storage and core data which are not covered. Advance programming on view controller was also not covered. We hope that these brief introduction would give an idea to other developer the concept and ease of developing iOS app. If you are interested in iOS development and Swift programming please check on our blog.
*** End ***