Chapter 6: Basics of Function
A function is a set of code that performs a specific task. We group such code into a function so that we can repeat the task again and again by calling the function.
Defining and Calling Function
To declare or define a function, we must know that there are basically 4 types of functions. They are:
- Function with no parameter and return value
- Function with parameter but no return value
- Function with parameter and return value
- Function with no parameter but have return value (Rare)
Of course we can have multiple parameter or return value but such function are more complex and it will be dealt with in a later chapter. For now, we will focus on the basics of function.
Defining and Call Function with no Parameters and Return Value
To declare a function, we must have a name. The syntax is as follows:
func <function_name>() {
<set_of_instructions>
}
Example:
func printHello() {
print("Hello!")
}

To call the function, we just type the function name with brackets. Syntax is as follows:
<function_name>()
Example:
printHello()

Defining and Call Function with Parameters and no Return Value
To declare a function, we must have a name. We also need to include the parameters. The syntax is as follows:
func <function_name>(<parameter_name>:<datatype_parameter>) {
<set_of_instructions>
}
Example:
func printHelloWithName(name: String) {
print("Hello! \(name), how are you?")
}

To call the function, we must include the input data with the correct data type in the brackets as define in the function. Syntax is as follows:
<function_name>(<input_data_mtached_datatype>)
Example:
printHelloWithName(name: "Steve")

Defining and Call Function with Parameters and Return Value
To declare a function, we must have a name, parameter and the datatype of return value. The syntax is as follows:
func <function_name>(<parameter_name>:<datatype_parameter>) -> <dataype_return_value> {
<set_of_instructions>
return <return_value>
}
Example:
func square(input: Int) -> Int {
let answer = input * input
return answer
}

We can simplified the above function to the following:
func square(input: Int) -> Int {
return input * input
}
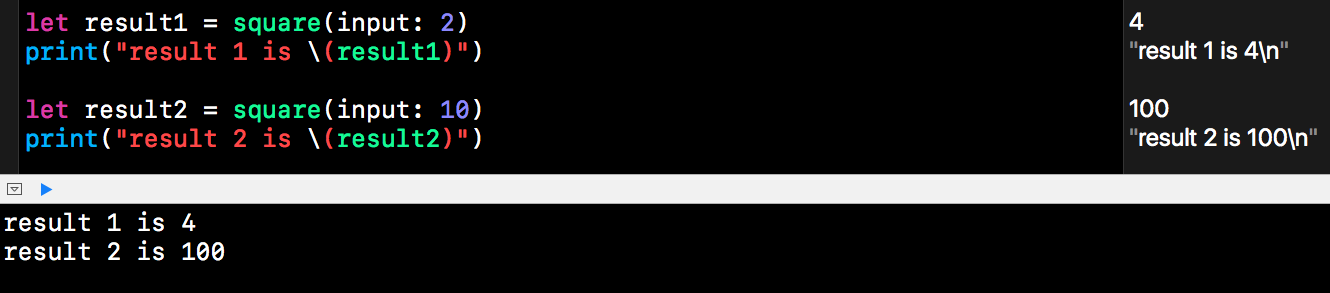
To call the function, we can call the function and at the same time assigned the return value to a constant. The syntax is as follows:
let/var <variable_name> = <function_name>(<input_data_mtached_datatype>)
Example:
let result1 = square(input: 2)
print("result 1 is \(result1)")
let result2 = square(input: 10)
print("result 2 is \(result2)")
Defining and Call Function with no Parameters but have Return Value
We can also have a function that produces a return but no input parameters. To declare such a function, we must have a name and the datatype of return value. The syntax is as follows:
func <function_name>( ) -> <dataype_return_value> {
<set_of_instructions>
return <return_value>
}
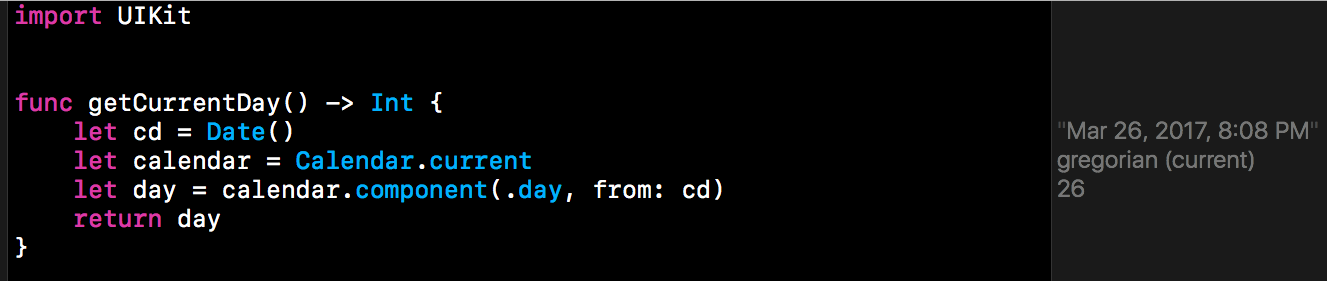
Such function is very rare. One of possible example is to extract current date. See example below.
Example:
import UIKit
func getCurrentDay() -> Int {
let cd = Date()
let calendar = Calendar.current
let day = calendar.component(.day, from: cd)
return day
}
To call the function, we can call the function and at the same time assigned the return value to a constant. The syntax is as follows:
let/var <variable_name> = <function_name>()
Example:
let today = getCurrentDay()
print(today)

Function in a Function
Calling Function in a Function
In the example above, we already call a function within our function. We can call a function within our function. In fact, that function may call another function. Let's examine the code above again:
import UIKit
func getCurrentDay() -> Int {
let cd = Date()
let calendar = Calendar.current
let day = calendar.component(.day, from: cd)
return day
}
UIKit is a library of prewritten code and function available for us to use. The function we are using is Date(). This function retrieve current date and time. We also use another function .component(.day, from: cd) to extract the day of the current date.
Nested Function
We can also create a function in a function. This is call a nested function.
Example:
import UIKit
func getDayOrMonth(choose:Int) -> Int {
switch choose {
case 1:
func getCurrentDay() -> Int {
let cd = Date()
let calendar = Calendar.current
let day = calendar.component(.day, from: cd)
return day
}
return getCurrentDay()
case 2:
func getCurrentMonth() -> Int {
let cd = Date()
let calendar = Calendar.current
let month = calendar.component(.month, from: cd)
return month
}
return getCurrentMonth()
default:
print("Please choose 1 for day and 2 for month")
return 0
}
}


Call the nested function:
let dday = getDayOrMonth(choose: 1)
let dmonth = getDayOrMonth(choose: 2)
let other = getDayOrMonth(choose: 5)

For the last call, it will also print a statement as shown below:

*** End of Chapter ***