Chapter 3: Swift Basic Operators
Swift support most of the standard operator other programming language uses. In addition, Swift improves the safety while using these operators.
All standard operators are classified into 3 types of operator. They are:
- Unary Operator: Unary operator works with a single operand. It can be placed in front of an operand (prefix) or placed behind an operand (postfix). Examples of prefix unary operator are -variable1, -10 and !variable2. Example of postfix unary operator is variable3!
- Binary Operator: Binary operator works in between 2 operand. Examples of binary operator are a + b, c / d and e * f
- Ternary Operator: Ternary operator works with 3 operand. There is only one ternary operator in Swift; it is the ternary conditional operator (a ? b : c)
In a statement 1 + 2, the plus sign is the operator and the numbers are operands.
Assignment Operator
The most common and basic operator is the assignment operator. The basic syntax is as follows:
<variable_name> = <value/expression_that_fits_to_the_datatype>
Example:
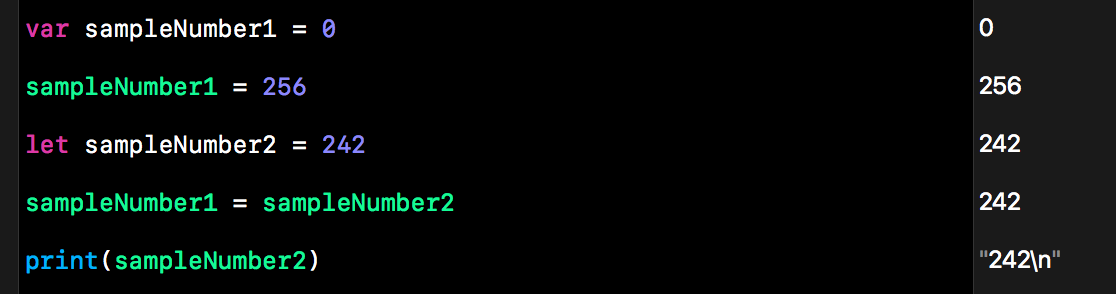
var sampleNumber1 = 0
sampleNumber1 = 256
let sampleNumber2 = 242
sampleNumber1 = sampleNumber2
print(sampleNumber2)
Assignment Operator Do Not Return Value
Unlike other programming language, Swift assignment operator does not return a number or boolean value.
In C programming, we can combine assignment statement with if such as if a = b {...}. In C programming, a = b will return true if the assignment is successful.
We cannot combine assignment and if statement in Swift because the assignment statement in Swift do not return anything. To compare an assigned value we must use comparison operator.
Arithmetic Operator
Similar to other programming language, we have the standard arithmetic operator as shown below:
- Addition (+)
- Subtraction (-)
- Multiplication (*)
- Division (/)
The abovementioned arithmetic operator are binary operator and it work between 2 operand as shown in the example below:
12+54
132 - 65
23*65
9823 / 3

// For division, please be aware of floating point data type
9823 / 3.0

Additional Note:
- Please use floating point for division to get accurate result.
- Please note that any number divide by zero will return error

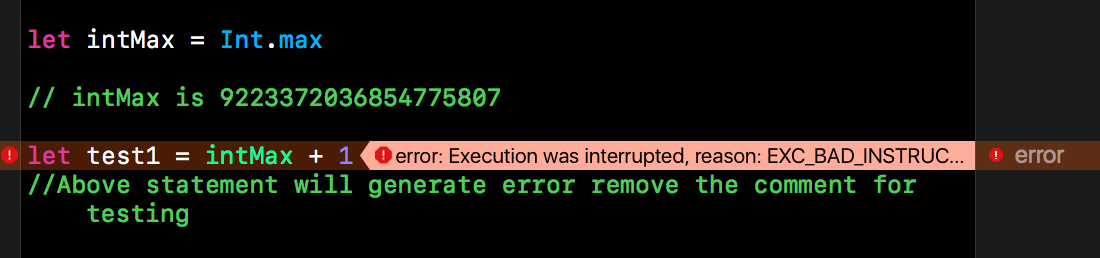
As previously mentioned in the data type section, we do not have integer overflow in Swift. Swift will return error for any attempt of integer overflow.
Example:
let intMax = Int.max

// intMax is 9223372036854775807

//let test1 = intMax + 1
//Above statement will generate error remove the comment for testing
Remainder Operator
Remainder operator is denoted as %. This operator will return the remainder after a division is performed. For example 11 % 3 will return a remainder of 2 and 11 % 2 will give a remainder of 1. See example below.
Example
11 % 3

10 % 3

11 % 2

Rules of Remainder Operator
Swift use the following formula: a = (b * some multiplier) + remainder to derived the remainder. The sign of b is always ignore. Therefore, a % b and a % -b always give same answer. -a % b will give you negative number. Please also note that Swift remainder operator only work with integer and it doesn't work on floating point number.
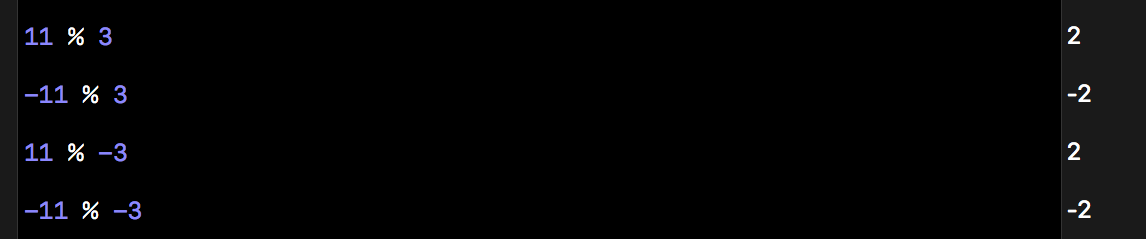
Remainder Operator with Negative Number
The remainder operator also work with negative number. However the remainder will be negative only if the first operand (dividend) is negative. If the divisor is negative, the remainder will still be positive.
Example:
11 % 3

-11 % 3

11 % -3

-11 % -3

Modulus and Remainder Operator
A lot of people confuse between modulus and remainder operator. Some programming languages uses % as modulus operator and some programing language uses % as remainder operator.
Modulus operator and remainder operator yield the same result when performing division with positive number. The difference between the two types of operator differs when dealing with negative number.
See example below:
The following is the remainder operation using Swift:
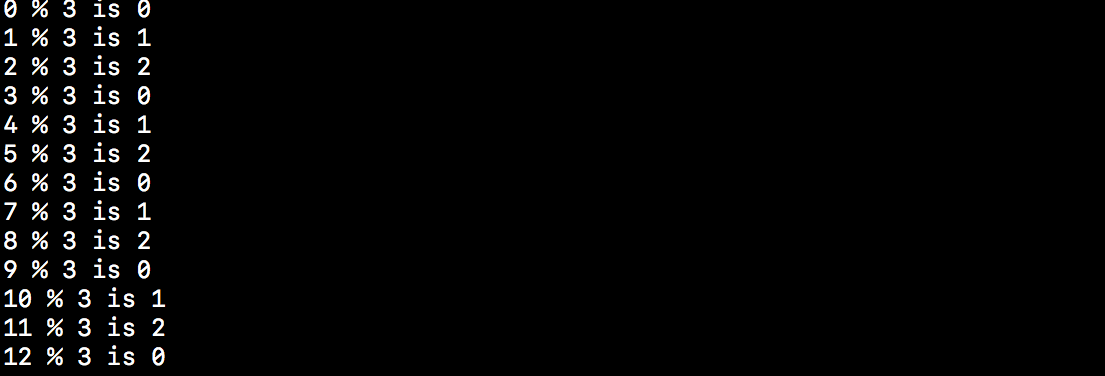
The following is the modulus operation in Python 2.7 (available in Mac OS)
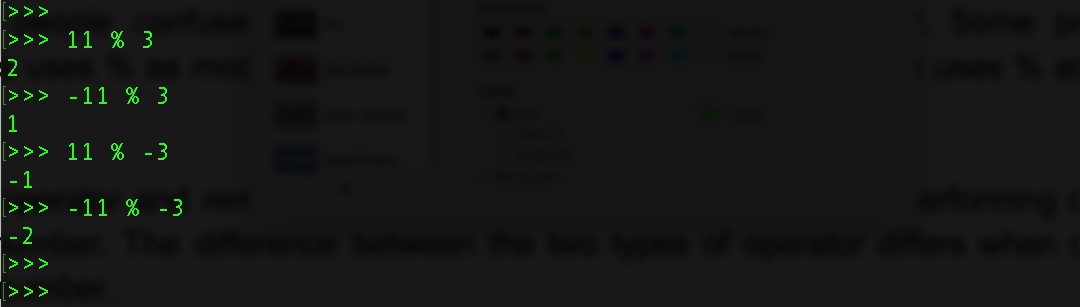
As shown above, if the both dividend and divisor is positive or negative; both operator return the same result.
However, if only dividend or divisor is negative the result is different.
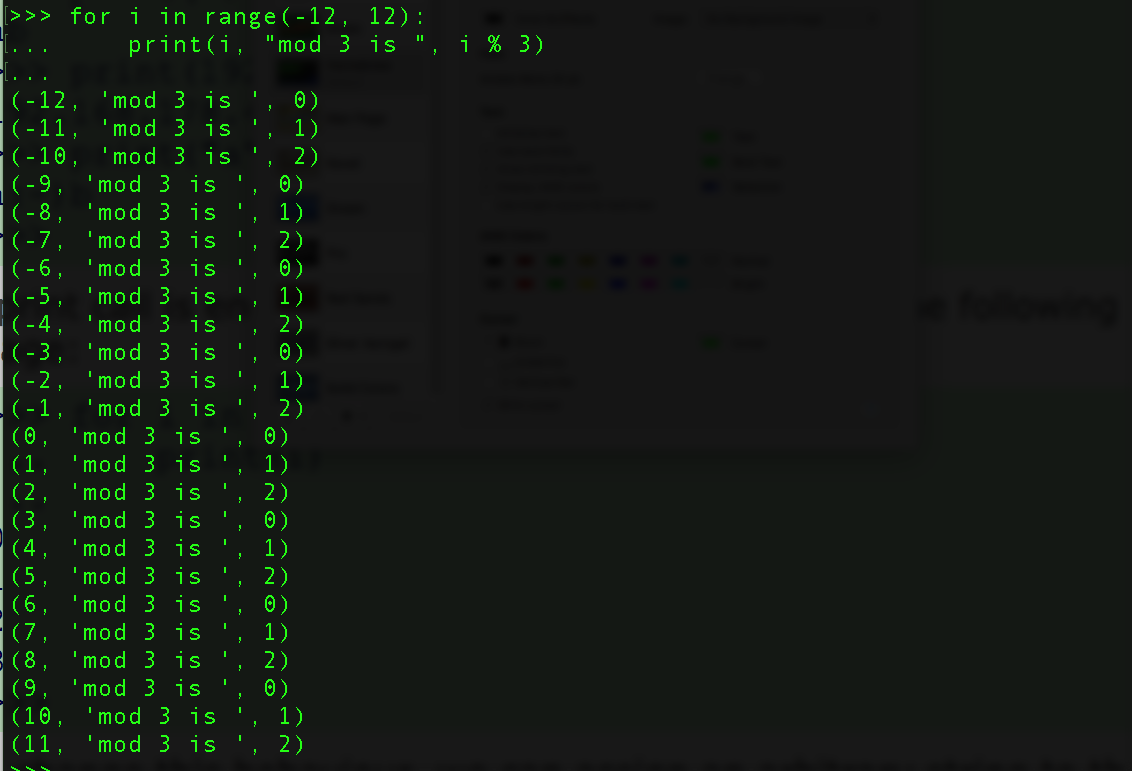
We would like to look at if divisor is always positive what happen to the remainder if we move from positive number to negative number.
Example:
for i in -12...12 {

    print("\(i) % 3 is \(i % 3)")
}
The result is as follows
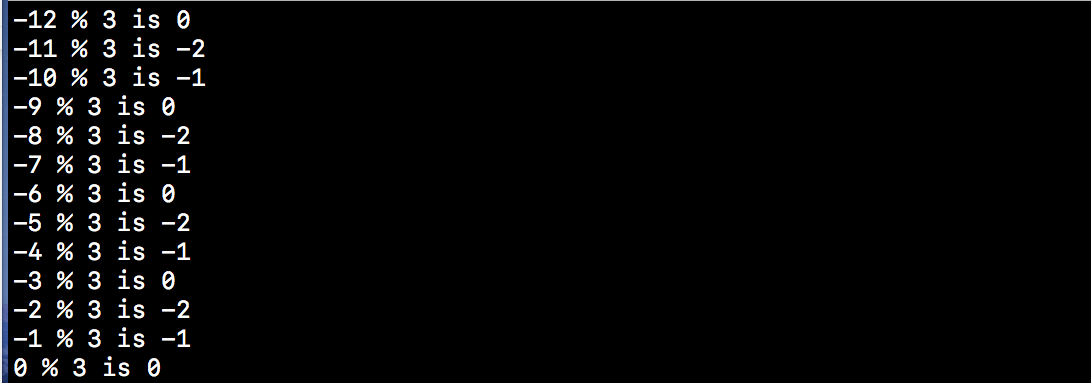
From the remainder operation, we know that once the dividend is negative, the remainder will be negative.
For modulus operation, regardless if the dividend is negative or positive, the remainder is always positive.
For certain kind of computation where the remainder must be positive, we may need modulus operator.
Remainder for Floating Point Number
To use remainder for floating point number we can use the function remainder(_,_) or truncatingRemainder(dividingBy:)
Both functions produce different result. See example below"
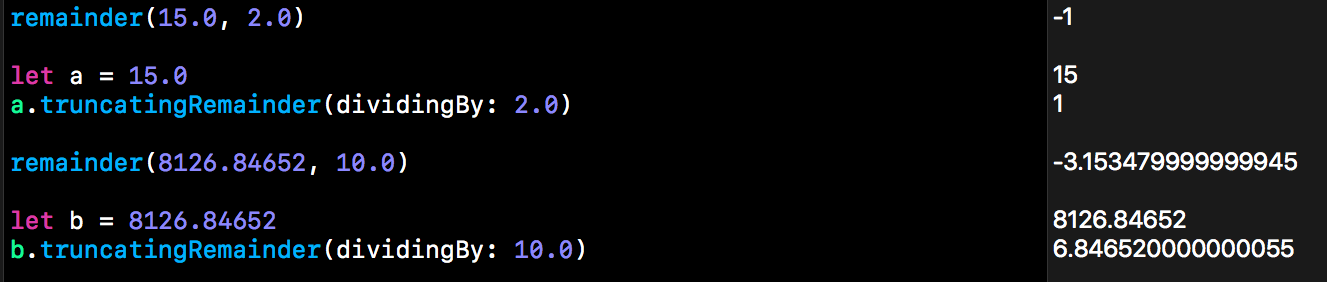
We will not examine this in detail until the later session.
Unary Minus Operator
We can convert a positive number to negative number using the unary minus operator (-). See example below:
Example:
let a = 13

let b = -a

let c = -b

Note we use the unary minus operator to convert from positive number to negative number. We can also use the same operator to convert negative number to positive number as shown above.
Unary plus operator has no effect in Swift.
Application of Arithmetic Operator
Example:
let unitPrice = 25.5
let quantity = 12546
let deposit = 10034.80

let amount = unitPrice * Double(quantity)

let discount = amount * 0.05

let discountAmount = -discount

let payableAmount = amount + discountAmount

let salesTax = payableAmount * 0.07

let totalAmount = payableAmount + salesTax

let cashPayment = totalAmount - deposit

let totalUnitCost = totalAmount / 12546

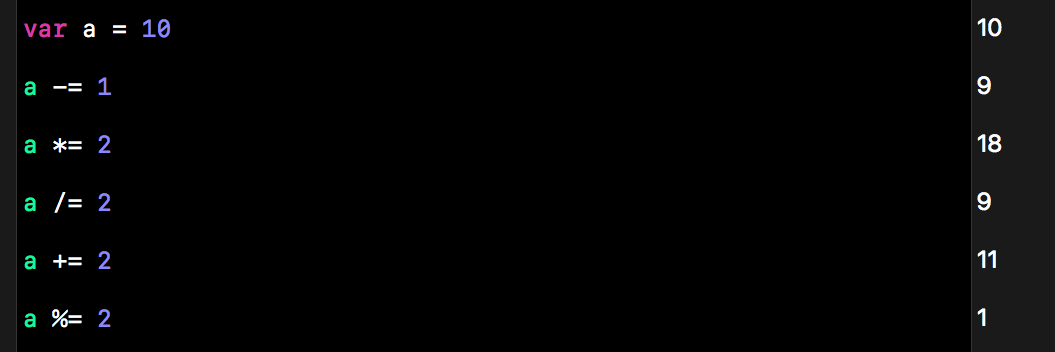
Compound Assignment Operator
Compound assignment operator such as a += x is a short form of writing a = a + x. We have the following type of compound assignment operator:
- Addition (+=) same as a = a + x
- Subtraction (-=) same as a = a - x
- Multiplication (*=) same as a = a * x
- Division (/=) same as a = a / x
- Remainder (%=) same as a = a % x
Example:
var a = 10

a -= 1

a *= 2

a /= 2

a += 2

a %= 2
Note:
Compound statement do not return value.
You cannot use the following
let var551 = var54 += 5
or
let var551 = (var54 += 5)
Example:
var 54 = 10
//let var551 = (var54 += 5) // Will generate error warning
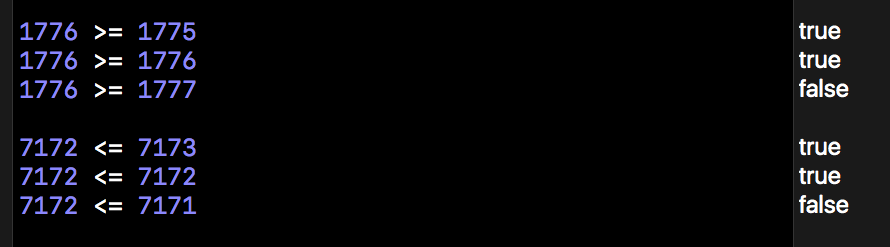
Comparison Operator
Comparison operator compare numbers and return if the test is true. The following are the comparison operators:
- Equal (==)
- Not Equal (!=)
- Greater than (>)
- Less than (<)
- Greater than OR Equal to (>=)
- Less than OR Equal to (<=)
Each comparison return a boolean value.
Example:
10 == 10
20 == 21

123 != 934
123 != 123

12476 > 887
12476 > 12476
12476 > 12477

768 < 409098
409098 < 409098
409099 < 409098

Example 2:
1776 >= 1775
1776 >= 1776
1776 >= 1777

7172 <= 7173
7172 <= 7172
7172 <= 7171
Boolean for C Programmer
The way boolean work in Swift is different from C programming. In C programming we can use 0 and non zero to represent true and false. In Swift, we cannot evaluate and interpret an integer as boolean value. The following statement will fail in Swift however it will work in C:
var x = 1
if x {...}
We need to expressly use if x == 1 to evaluate into boolean value.
let boolTest = false
// The following is the preferred method to test boolean variable
if boolTest == true
{
    print("boolTest is True")
}
else
{
    print("boolTest is False")
}

We can also use the following format without comparator since boolean is either True for False
if boolTest
{
    print("boolTest is True")
}
else
{
    print("boolTest is False")
}
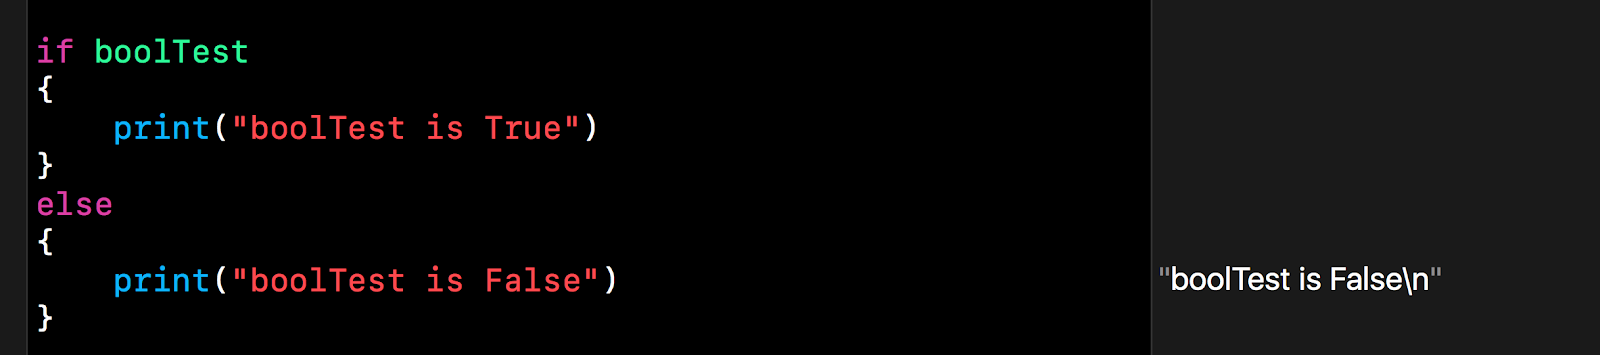
The above example worked because boolTest is a boolean variable.
We cannot use the following, remove the comment to test
/*
let wrongWay1 = 1
if wrongWay1
{
    print("wrongWay1 is True")
}
else
{
    print("wrongWay1 is False")
}
*/

The above example will produce error however we can test integer using comparator as follows
let rightWay1 = 1
if rightWay1 == 1
{
    print("rightWay1 is True")
}
else
{
    print("rightWay1 is False")
}

Ternary Conditional Operator
Ternary operator consist of 3 parts. The syntax is as follows, query?answer1:answer2. The system will evaluate the query and if the expression evaluate to true, then the system will return the evaluated value of answer1. If the query is false, the system will return the evaluated value of answer2.
Ternary operator is the condensed version of the following code:
if query {
answer1
} else {
answer2
}
Example:
var result = ""
let student1 = 65

result = student1 > 50 ? "pass" : "fail"
print("Student 1 \(result)")

The ternary operator is similar to the code below:
var result = ""
let student1 = 65

if student1 > 50 {
   result = "pass"
} else {
    result = "fail"
}

print("Student 1 \(result)")

As ternary operator is hard to understand please use it wisely and please avoid combining multiple ternary operation into one compound statement
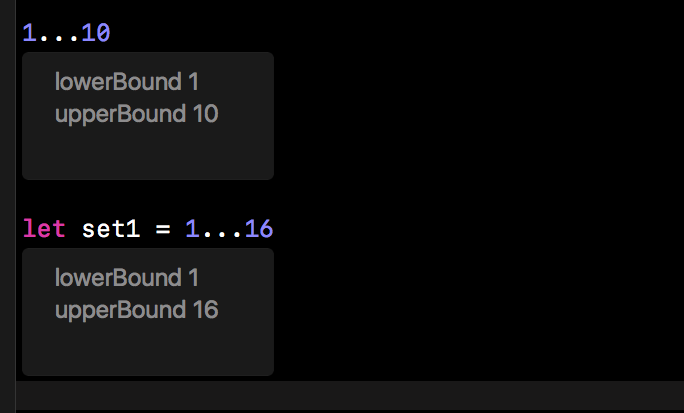
Range Operator
There are two types of range operator, the closed range operator and half-open range operator.
Closed Range Operator
Closed range operator is represented by (...). Closed range operator include the begin number and end number. To use closed range operator, please follow the syntax:
<begin_number>...<end_number>
Example:
1...10
let set1 = 1...16
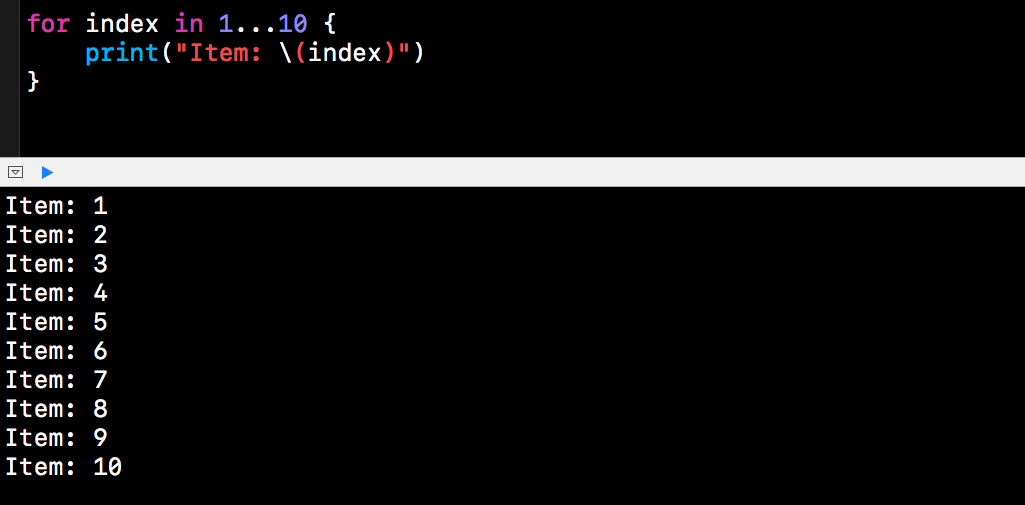
Application of Close Range Operator
Example:
for index in 1...10 {
  print("Item: \(index)")
}
Half-Open Range Operator
Half-open range operator is represented by (..<). It include the first number and the number less than the last number (last_number - 1). The syntax is as follows:
<begin_number>..<<last_number>
Example
for index in 1..<count {
    print("Item:\(index)")
}
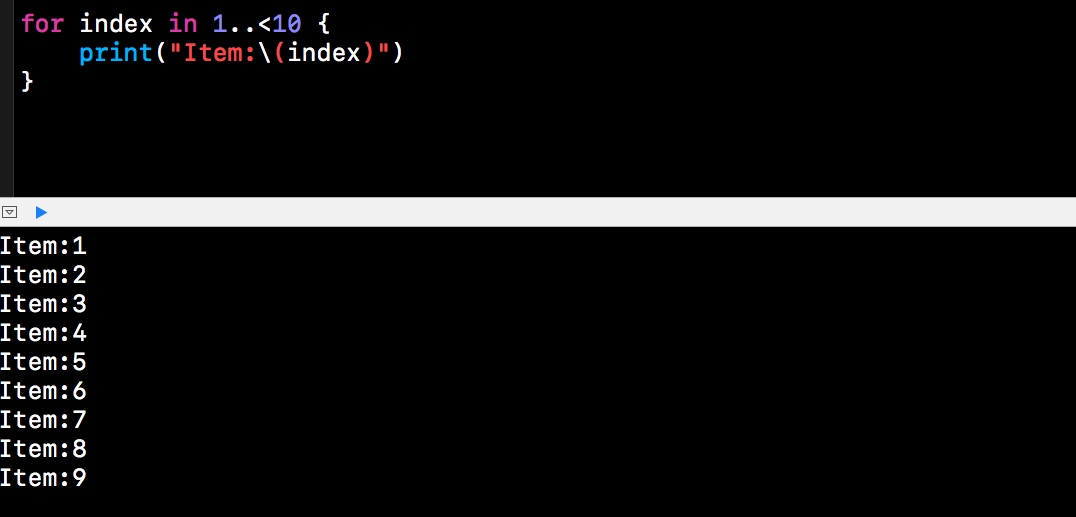
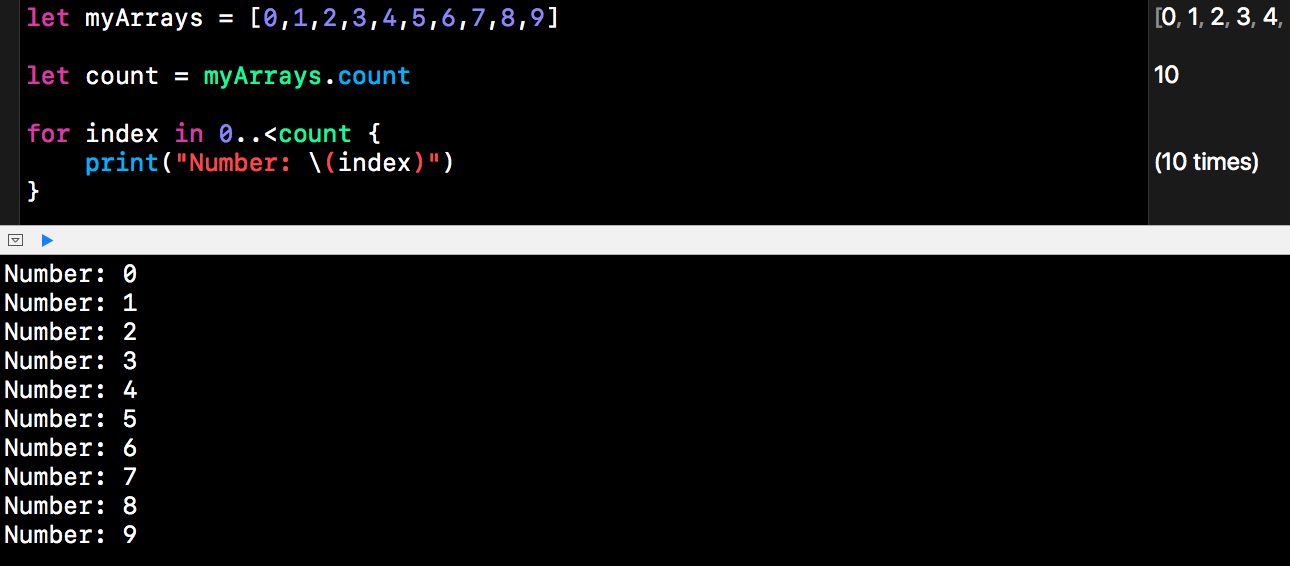
Half-range operator is useful when referencing arrays or any data index that starts from 0 and ends at total count less one.
Example:
let myArrays = [0,1,2,3,4,5,6,7,8,9]

let count = myArrays.count

for index in 0..<count
{
    print("Number: \(index)")
}
Logical Operator
In Swift, we support 3 logical operator, they are the NOT, AND and OR.
- NOT operator is denoted as !
- AND operator is denoted as &&
- OR operator is denoted as ||
Logical NOT Operator
We can use logical NOT operator as a unary prefix. A NOT in front of true will be false and vice versa. The syntax of using NOT operator is as follows:
!<variable/data>
Example
let myTruth = false

let myNewTruth = !myTruth

print("My truth is \(myTruth) and my new truth is \(myNewTruth).")

}

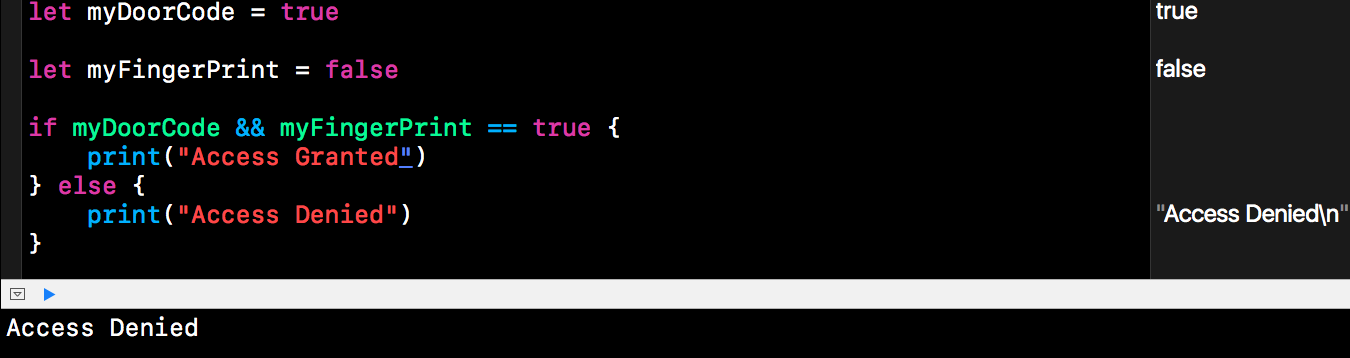
Logical AND Operator
We use logical AND operator as a binary operator in between 2 operand. The syntax of using AND operator is as follows:
<variable/data> && <variable/data>
Example
let myDoorCode = true

let myFingerPrint = false

if myDoorCode && myFingerPrint == true {
    print("Access Granted")
} else {
    print("Access Denied")
}
Logical OR Operator
We use logical OR operator as a binary operator in between 2 operand. The syntax of using OR operator is as follows:
<variable/data> || <variable/data>
Example:
let myDoorCode = true

let myFingerPrint = false

if myDoorCode || myFingerPrint == true {
    print("Access Granted")
} else {
    print("Access Denied")
}

Note:
Please note that for OR operator, the system will evaluate the leftmost operand and if it is true, the system will ignore operating the right operand. We should use the most common operand on the left to increase efficiency.
Compound Logical Operator
We use multiple logical operator to form a compound expression. The system will evaluate the leftmost expression first and to the right. Please note that however && has precedence over ||. You need to evaluate && operation from left to right and then evaluate || from left to right.
Example:
let myDoorCode = true

let myFingerPrint = false

let keyOverride = true

let overridePassCode = true

if myDoorCode && myFingerPrint || keyOverride && overridePassCode {
    print("Access Granted")
} else {
    print("Access Denied")
}
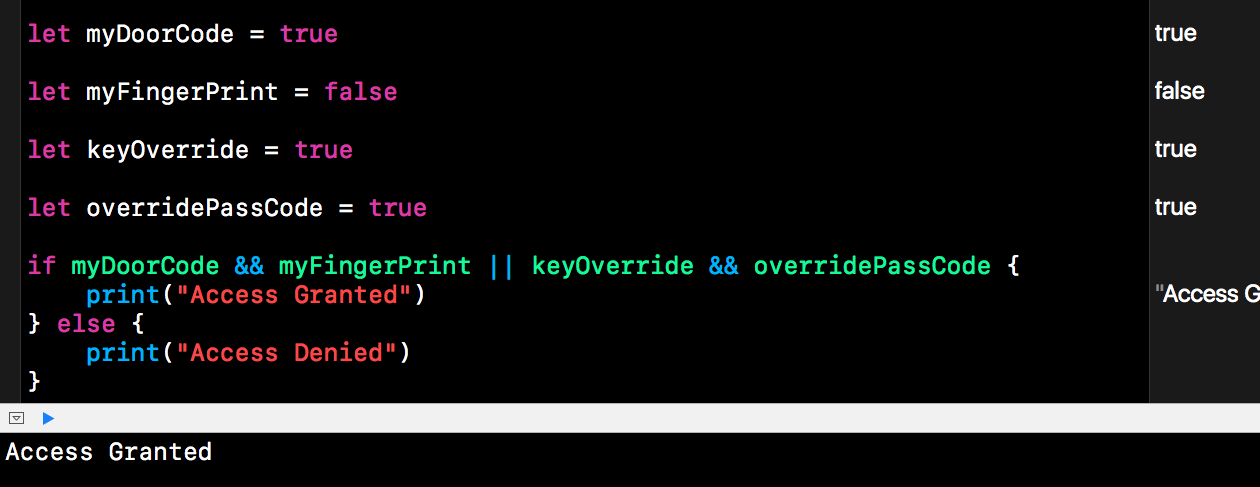
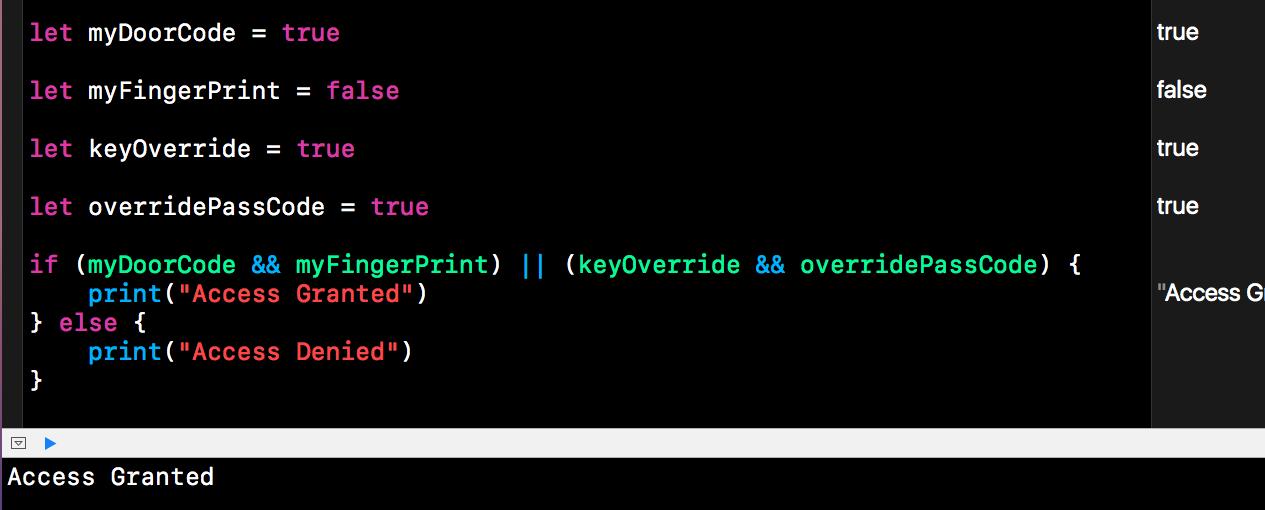
In the example above, the system allowed 2 combination for user to enter the gate. Either the user enter the door code correct together with a correct fingerprint scan or; the user can use manual override key together with a correct override passcode.
To improve readability, the above example should be written as follows:
More example:
let condition1 = true
let condition2 = false
let condition3 = true
let condition4 = false
condition1 || condition2 && condition3 && condition4
// Please note that && has precedence over || You need to evaluate && operation from left to right and then evaluate || from left to right

Example:
true || false && true && false
true && false || false || true
true && true || false && false
false || true && true || false

Operator Precedence
Operator precedence is the order of computing the operator. Consider the example below:
Example:
42 - 20 * 12 / 3 + 5 * 6 + 54
// The result is 46
For some programming language all the arithmetic got the same precedence, that means the system will evaluate the computation in the order from left to right. The result will be 612 if we evaluate from left to right.
Most programming language however, adopt the common precedence where multiplication and division have the same precedence but they are placed in a higher order than addition and subtraction.
In the example above, we should evaluate the multiplication and division first from left to right. After multiplication and division are evaluated, then we start evaluation addition and subtraction from left to right.
To change the order of precedence, such as we want to perform a subtraction first, we can add parenthesis to affect the order. Parenthesis has a higher precedence than the other arithmetic operator.
Example:
(42 - 20) * 12 / 3 + 5 * (6 + 54)

In the example above, the system will perform computation in the parenthesis first before resuming normal arithmetic operation. The result is different.
Similarly, we can also use parenthesis to affect the order of evaluation when we use logical operator as shown in the previous section.
Listed below is a simplified table of the operator precedence. All operators under the same group have the same precedence. Left associative means the system will evaluate the expression from left to right. Right associative means that the system will evaluate the expression from right to left.
Precedence group
|
Operator
|
Description
|
Associativity
|
Primary Expression
|
( )
|
Parenthesis
|
Left associative
|
Prefix Operator
|
!
-
|
Logical NOT
Unary Minus
|
None
None
|
Multiplication
|
*
|
Multiply
|
Left associative
|
/
|
Divide
|
Left associative
| |
%
|
Remainder
|
Left associative
| |
Addition
|
+
|
Add
|
Left associative
|
-
|
Subtract
|
Left associative
| |
Range formation
|
..<
|
Half-open range
|
None
|
...
|
Closed range
|
None
| |
Comparison
|
<
|
Less than
|
None
|
<=
|
Less than or equal
|
None
| |
>
|
Greater than
|
None
| |
>=
|
Greater than or equal
|
None
| |
==
|
Equal
|
None
| |
!=
|
Not equal
|
None
| |
Logical conjunction
|
&&
|
Logical AND
|
Left associative
|
Logical disjunction
|
||
|
Logical OR
|
Left associative
|
Ternary
|
?:
|
Ternary conditional
|
Right associative
|
Assignment
|
=
|
Assign
|
Right associative
|
*=
|
Multiply and assign
|
Right associative
| |
/=
|
Divide and assign
|
Right associative
| |
%=
|
Remainder and assign
|
Right associative
| |
+=
|
Add and assign
|
Right associative
| |
-=
|
Subtract and assign
|
Right associative
| |
Function Arrow
|
->
|
Function Arrow
|
Right associative
|
Explicit Parentheses
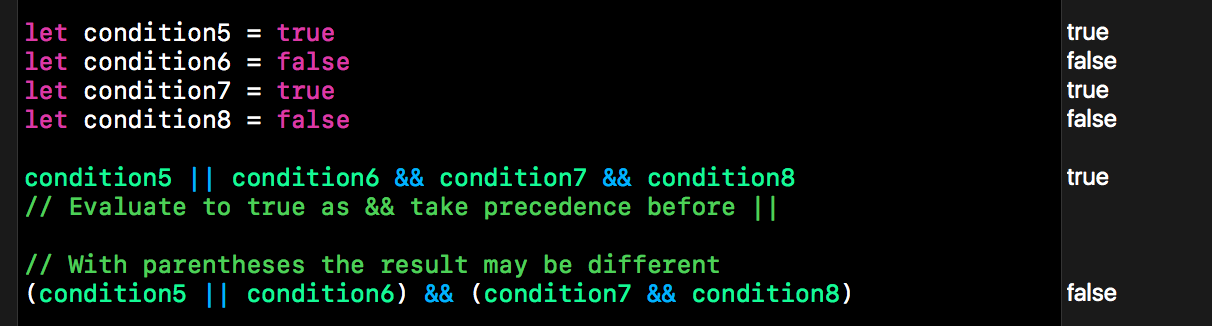
For complex expression it is better to use bracket or parentheses to organize the expression. It also improve code readability.
Example:
let condition5 = true
let condition6 = false
let condition7 = true
let condition8 = false

condition5 || condition6 && condition7 && condition8
// Evaluate to true as && take precedence before ||

// With parentheses the result may be different
(condition5 || condition6) && (condition7 && condition8)
*** End Of Chapter ***